Affiliate disclosure: This post may contain affiliate links. If you buy through a link on this page, MOTOZMO may earn a small commission at no extra cost to you. It helps keep our guides free. How we test and choose products.
You cannot make a plain leather motorcycle boot fully waterproof, but a treated smooth-leather boot can get you through hours of steady rain with dry socks, as long as you seal the seams and the welt and not just the flat leather.
I learned the gap between those two claims the wet way, riding home through an afternoon storm in boots I had sprayed once and called done. The leather beaded water fine. The stitching drank it.
The routine below is the one I use now: clean, condition, wax, seam work, cure, test. If you are still shopping for the boots themselves, start with our guide to the best leather motorcycle boots, then treat the pair before its first wet ride.
Can Treated Leather Ever Be Truly Waterproof?
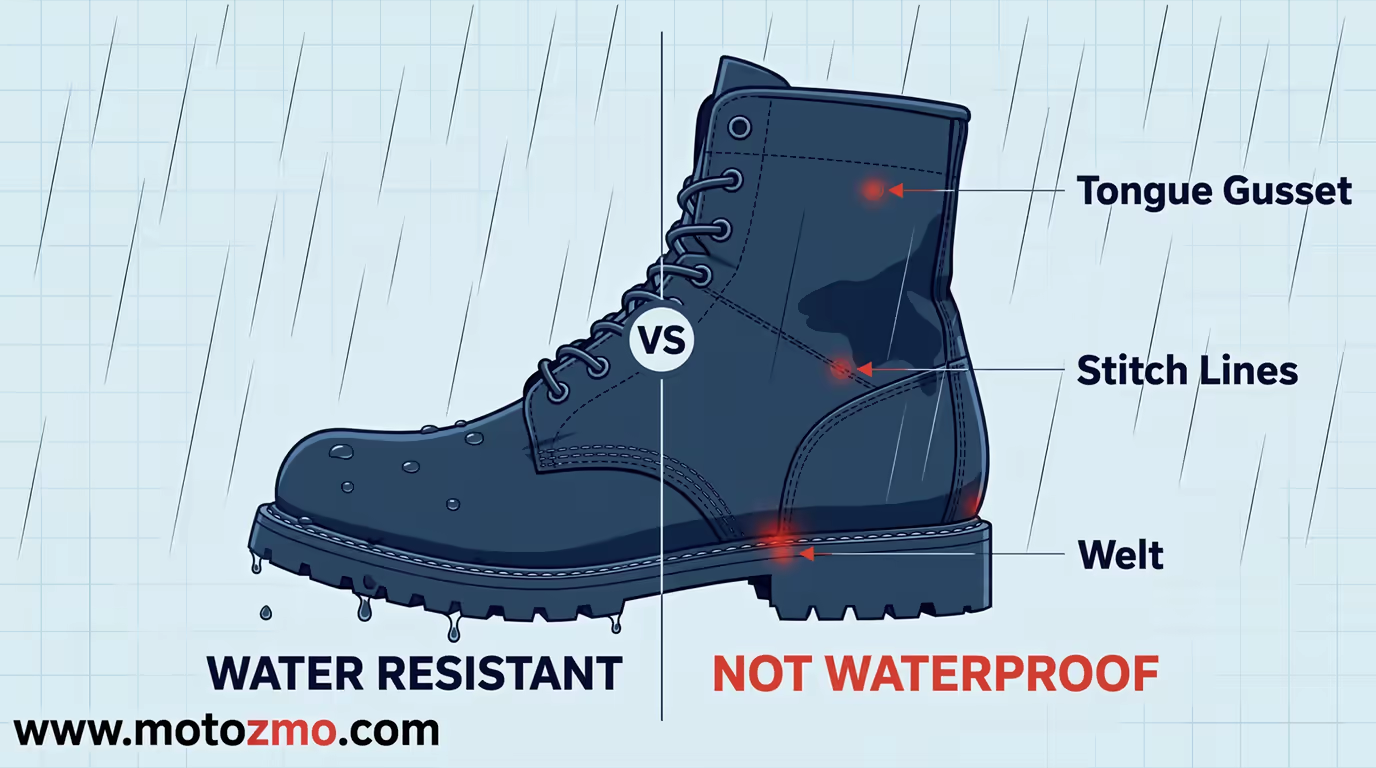
No. Leather is skin, and skin has pores. Wax and dubbin fill those pores and coat the fibers, so water beads on the surface and runs off instead of soaking in. That is water resistance. It is not a sealed barrier, and no jar or spray turns it into one.
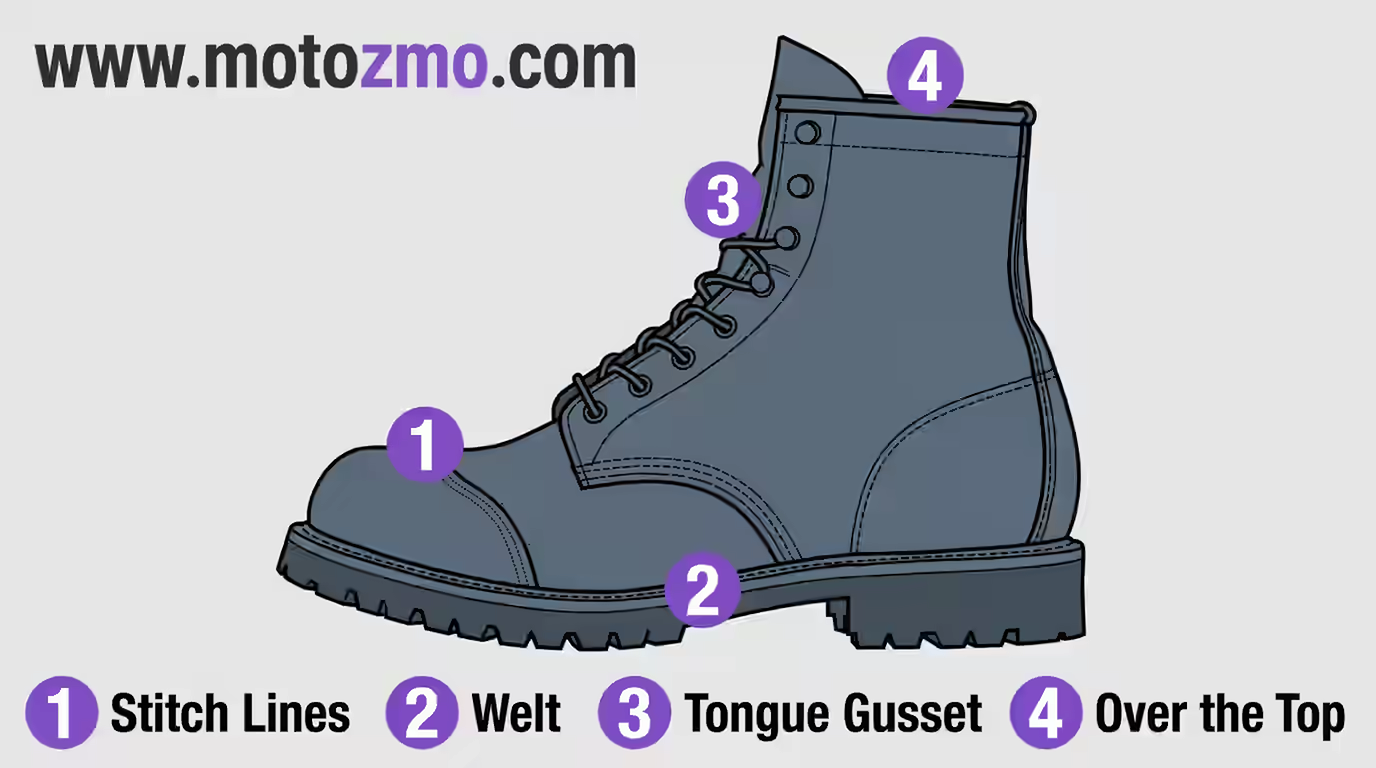
The flat leather is rarely where a boot fails first. Water gets in through three other paths. It wicks along the stitch lines, where every needle hole is a tiny open door.
It creeps through the welt, the joint where the upper meets the sole. And it runs down your shin, past the top of the boot, and into the tongue area, because most riding boots have a gusseted tongue that stops partway up.
Wax the toe box all weekend and a boot can still wet your socks through the seams in twenty minutes of highway rain.
The only boots sold as waterproof have a membrane liner inside. If yours has one, your job changes: the liner does the waterproofing, and you keep the outer leather beading so it does not soak up water and hold cold water against the liner. A light spray is enough. Save the heavy wax work for plain leather.
So set the goal right. Treated plain leather should handle a wet commute and hours of touring rain. It will not handle standing in a flooded underpass, and a boot that soaks through in a ten-minute drizzle is telling you the treatment is gone, not that the method failed.
Which Leather Do Your Boots Use?
Full-Grain and Smooth Leather
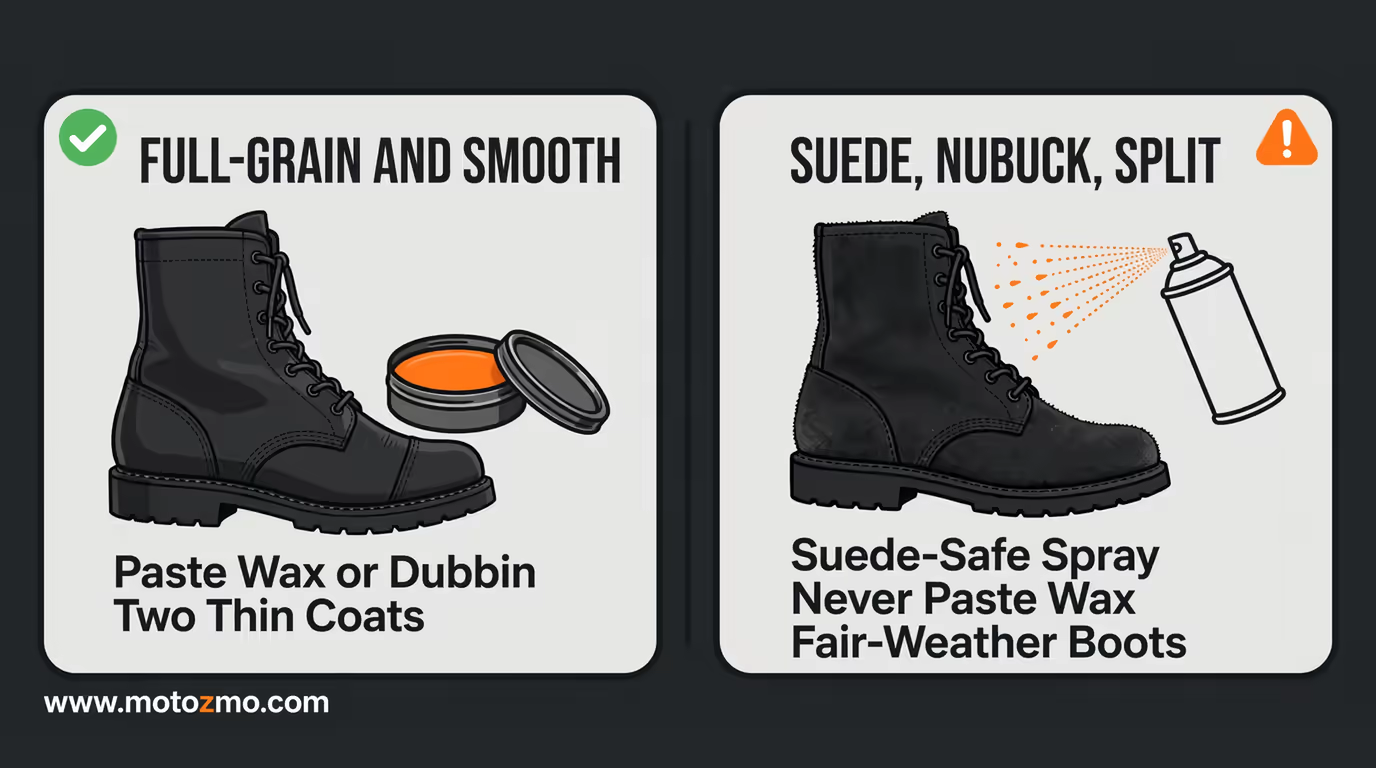
This is the easy case, and it covers most leather riding boots. Smooth full-grain leather takes paste wax and dubbin well and holds the treatment for weeks.
Two things to know before you start:
- Wax darkens leather, often a full shade, and the change is close to permanent. Test on a hidden spot first, inside the heel or under a strap, and look at it dry before you commit to the whole boot.
- Oil-tanned leather needs less conditioner than dry smooth leather but takes wax the same way.
Split Leather, Suede, and Nubuck
Split leather is the lower layer of the hide, and suede and nubuck are buffed surfaces with a nap. All three drink water faster than smooth leather, and paste wax is the wrong tool for them.
Wax mats the nap flat and stains it, and brushing will not fix the look. Use a waterproofing spray made for suede and nubuck instead, in two light coats, and brush the nap back up after it dries.
The result is weaker than wax on smooth leather. Suede riding boots are fair-weather boots, and no spray changes that.
What Do You Need Before You Start?
- A horsehair brush or a stiff nylon brush
- Saddle soap or a leather cleaner, and a bowl of warm water
- Beeswax-based paste wax or dubbin, for smooth leather
- A water-based waterproofing wax, if you want less darkening on light leather
- A suede-safe waterproofing spray, if your boots are suede, nubuck, or split leather
- Seam sealer for the stitch lines (optional, worth it on boots that leak at the seams)
- Two soft cloths and an old toothbrush
- Newspaper or boot trees
- A hair dryer with a warm setting, for beeswax pastes
The whole job takes about half an hour of work plus an overnight cure. Do not rush the cure.
How Do You Waterproof Leather Boots Step by Step?
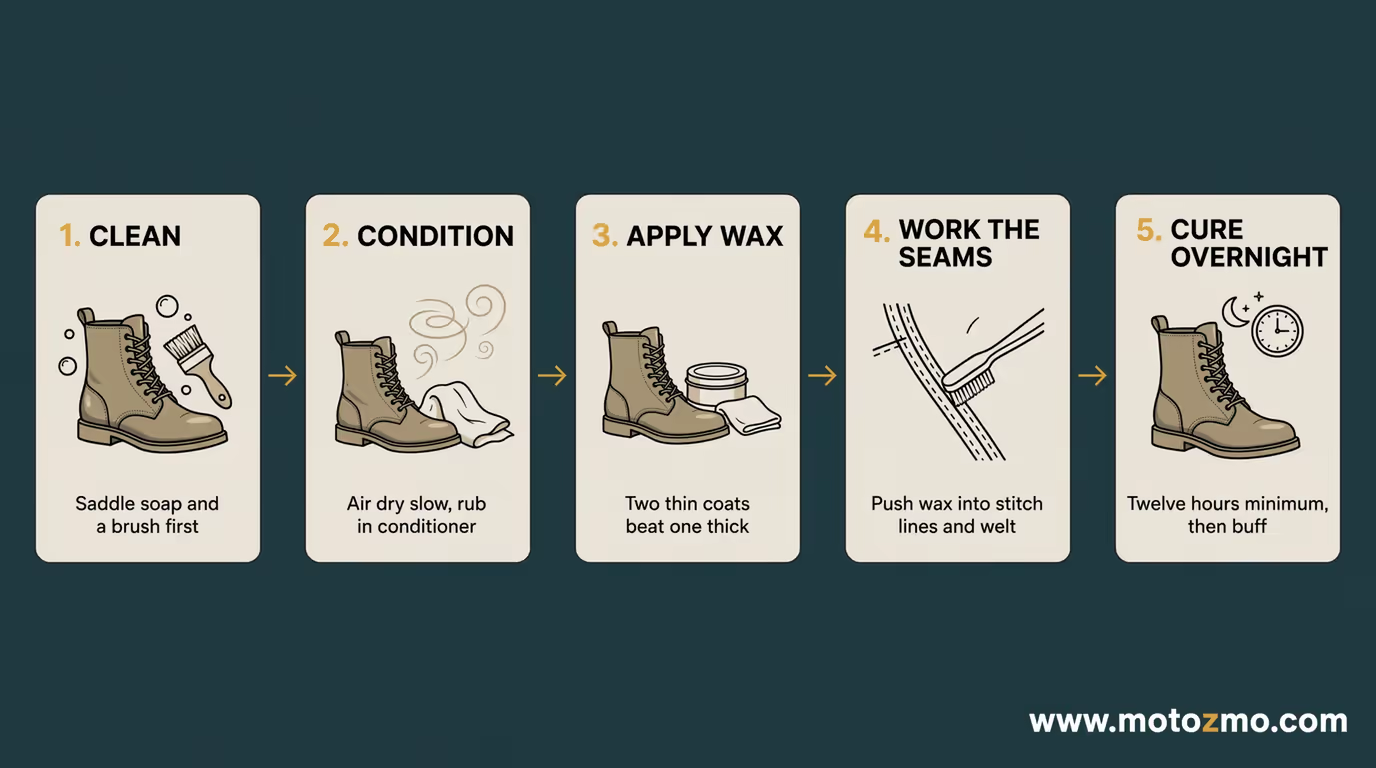
Step One: Clean the Boots First
Pull the laces out. Brush off the dry dirt, then wash the boots with saddle soap and warm water, working the toothbrush along the welt and the stitch lines.
Wax over dirty leather seals the dirt in instead of soaking into the fibers, so this step decides how long the treatment lasts. Wipe the soap off with a damp cloth.
Step Two: Dry Them Slow, Then Condition
Stuff the boots with newspaper and let them air dry at room temperature. Heat is the enemy here. Red Wing’s care guide tells owners to air dry at room temperature and keep boots away from radiators and other direct heat, because heat dries leather out and cracks it.
The same rule applies after every wet ride. Once the boots are dry, rub in a thin coat of conditioner if the leather feels stiff or looks pale. Go lighter on oil-tanned leather that still feels supple.
Conditioning before waxing matters: wax locks in the state the leather is in, and you do not want to lock in dry.
Step Three: Apply the Wax in Thin Coats
Work the paste in with a cloth or your fingers, in small circles, one panel at a time. For beeswax pastes, warm the leather first with the hair dryer on its warm setting, a few inches away. Warm leather drinks wax down into the fibers; cold leather wears it as a smear on the surface.
Two thin coats beat one thick coat. Let the first coat soak in for fifteen minutes, wipe off what did not absorb, then lay the second. Water-based waxes go on differently: most makers have you apply them to clean, still-damp leather, and Nikwax’s re-waterproofing guide walks through that clean-then-proof order. Follow the tin or bottle you bought, not a generic version.
Step Four: Work the Seams, the Welt, and the Tongue
This is the step most guides rush, and it is the step that keeps socks dry. Push wax into every stitch line with the toothbrush: the welt seam at the sole, the toe box seams, the heel counter, the stitching around the ankle and the shifter pad.
Pull the tongue forward and wax into the fold where it meets the boot, as far up the gusset as you can reach. If one seam is a known leak, run a thin bead of seam sealer along that stitch line after the wax. Five patient minutes here beat a third coat on the toe.
Step Five: Cure Overnight and Buff
Leave the boots in a ventilated room for at least twelve hours, a full day if you can. Wipe off any wax still sitting on the surface, buff, and put the laces back in. The leather will look darker and feel a bit waxy for the first ride or two. That feel fades; the water resistance stays.
What Should You Never Put on Riding Boots?
Heavy oils, used with a heavy hand. Neatsfoot oil and mink oil are fine conditioners in small amounts, but soaking a boot in oil softens the leather past the point a riding boot wants. The ankle loses support and the boot stretches. Condition to fix dry leather, not as a waterproofing plan.
Garage folk recipes. Petroleum jelly, motor oil, and cooking fats show up in old advice because they do shed water for a day. They also stain, hold grit against the leather, and soften stitching.
Skip them. Silicone spray as your only treatment on smooth leather is a lesser trap: it beads water for a week or two, soaks nothing into the fibers, and washes off fast. It has a real job on suede and mixed-material boots. On smooth leather, wax is the treatment.
And keep every treatment off the sole. Wipe the outsole and heel edges clean when you finish. A waxed sole on a wet peg is a bad trade: you gave up grip, the one thing a riding boot must never give up, to waterproof a part that was never going to leak.
How Do You Test Whether It Worked?
Run the boot under a faucet or a shower head for a minute or two, aiming at the toe and along the seams. Treated leather beads the water and sheets it off. A patch that darkens as you watch is a thin spot: the water is soaking in there, and that panel needs another coat.
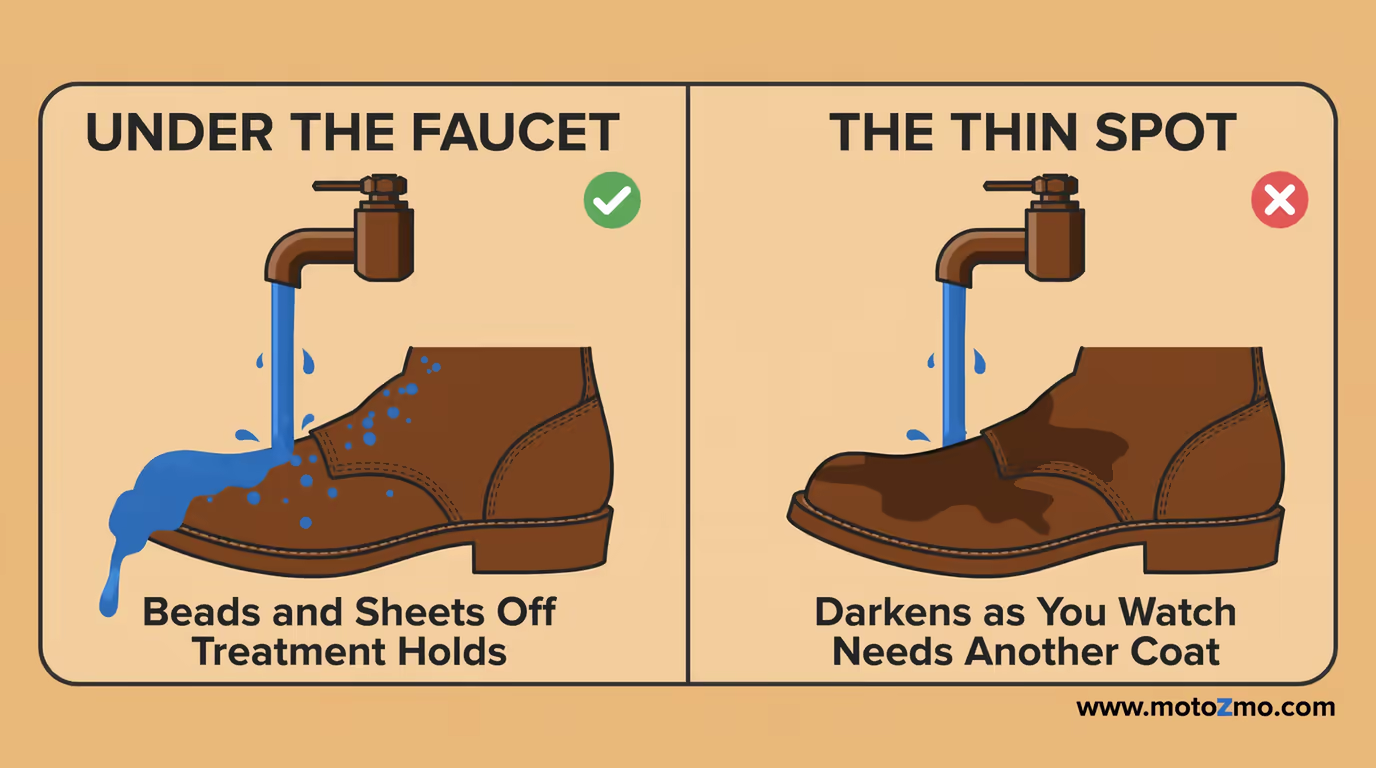
For a harder test, stuff the boot with a dry paper towel, then hold the seams and the tongue area under the shower for a few minutes. Pull the towel out and feel it. Damp at the toe points to the surface and along one side points to a seam.
Damp up high points to the tongue and the boot top, which no treatment fixes; that water came in over the top, and rain pants that overlap the boot are the answer.
How Often Do You Need to Treat Them Again?
Let the bead test set the schedule. Sprinkle water on the toe before a ride. If it beads and runs off, ride. If it soaks in and darkens the leather, the treatment is spent and the boots go back on the bench.
In practice, a commuter in a wet season lands on a treatment every month or two; a fair-weather rider can go a season on one. After a real drenching, dry the boots slow, then run the bead test before you assume the wax survived.
Store treated boots dry, with trees or newspaper in them, out of a hot garage corner.
When Is It Time to Replace the Boots Instead?
Treatment cannot fix leather that has cracked through the surface, a welt seam that has split open, or a sole worn smooth. A cobbler can restitch a seam and resole a welted boot, and for a good pair that money is well spent. For a cheap pair with cracked leather, it is money toward boots that were failing anyway.
Fit belongs in the same talk. A boot that pinches strains its seams at every step, and strained seams gap and leak sooner than relaxed ones.
If your boots hurt across the ball of the foot, no wax fixes that; start from a pair built for your feet, like the ones in our roundup of the best motorcycle boots for wide feet, and treat the new pair before the first storm instead of after it.
Do the routine once, test it at the sink, and the next forecast with rain in it gets a lot less interesting.