Affiliate disclosure: This post may contain affiliate links. If you buy through a link on this page, MOTOZMO may earn a small commission at no extra cost to you. It helps keep our guides free. How we test and choose products.
Yes, you can install heated motorcycle grips yourself in about an hour with basic hand tools, and the job is mostly wire routing, not surgery.
I have done this job on my bikes, and the part riders get wrong is almost never the grips. It is the wiring. Most kits from the best heated motorcycle grips ship with a fused harness, and the real decision is where that harness gets its power: straight from the battery, from a switched fuse tap, or through a relay. Pick wrong and you either wake up to a dead battery or starve a weak charging system.
In this guide I walk through every step: removing the old grips, the glue question, the wiring options, controller placement, and the lock-to-lock test that catches the mistakes most install videos skip.
Should You Install Heated Grips Yourself or Pay a Shop?
Most riders can do this job. If you can change a battery and strip a wire, you can install heated grips. A shop charges $50 to $150 in labor on top of the kit, and the whole job takes 60 to 120 minutes in a garage.
Pay a shop instead if your bike has a maze of fairings you do not want to remove, a CAN-bus electrical system where tapping the wrong wire causes faults, or a charging system you already suspect is weak. There is no shame in that. A botched wiring job costs more than the labor quote.
| Factor | DIY | Shop |
|---|---|---|
| Cost | Kit only | $50 to $150 labor on top of the kit |
| Time | 60 to 120 minutes | Drop off and wait |
| Best for | Riders fine with basic wiring | Complex fairings, CAN-bus bikes, weak charging systems |
What Tools Do You Need for the Job?
Keep it simple. You need less than you think, and buying specialty tools for a one-hour job is a waste of money.
- Isopropyl alcohol and rags (for cleaning bars and dissolving old glue)
- A razor blade or grip-removal tool
- A T-handle or channel locks plus a rag (for bar-end weights)
- 120-grit sandpaper or a file (for ridges on the throttle tube)
- Zip ties, a dozen or more
- Wire cutters and strippers
- A multimeter, optional but useful for testing
How Do You Remove the Old Grips without Damage?
Start with the battery. Disconnect the negative terminal first. You will be working around the bars and routing wire near metal, and one accidental short against the frame is all it takes to ruin your day.
Bar-end weights come off next, and they fight back. Factory bar ends are often installed with thread locker or tight interference threads. Wrap the weight in a rag, hold it with channel locks so it cannot spin, and use a T-handle on the bolt for extra turning force.
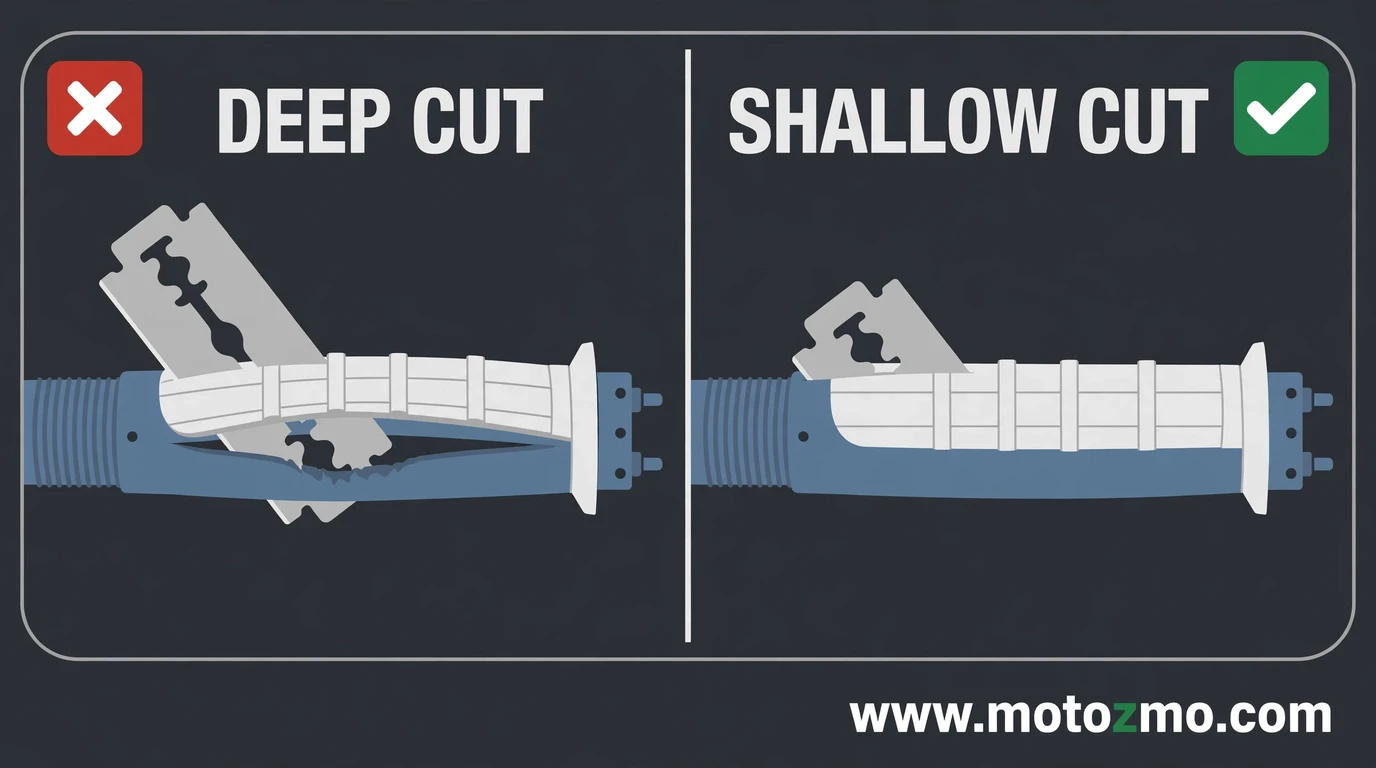
For the grips themselves you have two options. If you want to keep them, slide a thin screwdriver or a nozzle of compressed air under the grip and break the glue bond, then twist them off. If the grips are trash, slice them lengthwise with a razor blade and peel them away. This is where the first classic mistake happens.
Mistake: cutting into the plastic throttle tube on the right side. The tube sits under the right grip, and a deep razor cut scores it, which makes the throttle gritty or sticky forever.
Keep the blade shallow and angle it away from the tube. When the grips are off, wipe both bars and the throttle tube clean with isopropyl alcohol until no glue residue remains.
Should You Glue the New Grips on?
This is the question that splits the heated-grip world, and the answer depends on whose grips you bought.
Oxford ships superglue with their kits and their instructions are blunt: the grips must be glued, and the company accepts no liability for unglued grips. Their glue sets in seconds, which means you get exactly one attempt at positioning.
Dry-fit everything first, mark the final position with tape, and only then apply the glue. The wire exit on the grip must face down and clear of the clutch lever and brake lever, and on the throttle side the grip must rotate freely without stretching the wire.
Koso takes the opposite line. Their Apollo instructions say adhesive is optional, warn you not to hammer or force a tight grip onto the bar, and forbid pulling on the wires to seat the grip. A grip that rotates on the bar gets a dab of adhesive; a grip that fits snug does not need it.
Mistake: gluing before the dry fit. Superglue bonds skin in seconds too, so keep a rag handy and work fast. If a heated grip seizes halfway onto the bar, you cannot twist it home without tearing the heating element wires inside. Oxford’s installation instructions say to test the fit dry before any adhesive touches the bar.
One more prep step for the throttle side. Some factory throttle tubes have ridges or a flange molded in. If the heated grip will not slide on with gentle pressure, knock those ridges down with a file or 120-grit sandpaper. Never force it. A cracked inner shell kills the grip.
Where Should the Grips Get Their Power?
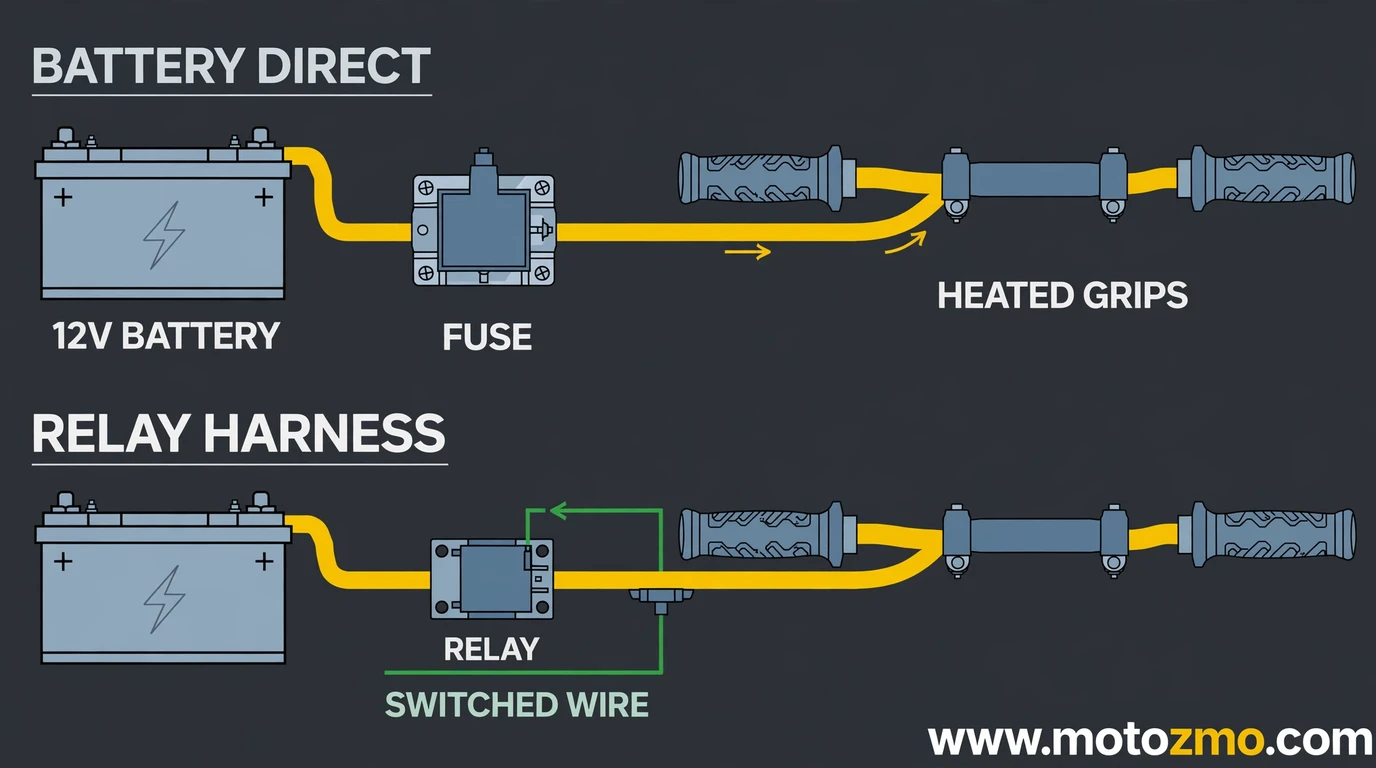
This is the decision that matters most, and almost no install guide explains it as a choice. You have three ways to power heated grips, and each one trades simplicity for safety in a different way.
| Option | How it works | Watch out for |
|---|---|---|
| Battery direct with a smart controller | Fused ring terminals go under the battery bolts; the controller cuts power at low voltage | Safe only if the kit has auto shutoff. Oxford cuts at 10.5V, Koso at 11.5V. No shutoff means a dead battery by morning. |
| Ignition-switched fuse tap | Grips draw from a circuit that dies with the key | Needs a spare switched circuit with spare capacity. Never just fit a bigger fuse; the factory fuse size is the ceiling. |
| Relay harness | The battery feeds the grips through a relay; a thin wire from a switched circuit flips the relay | More parts and more wiring, but zero chance of draining the battery |
If your kit is a basic one with no voltage sensing, the relay is not optional. As one veteran wrench put it, the relay is mandatory for a direct battery wire, not to protect the wire but to stop you leaving the grips on. The first dead battery teaches the lesson.
A few wiring rules that are not negotiable. Always fuse the positive leg as close to the battery as practical. Typical kits run a 4 to 7.5 amp fuse; Koso ships a 4 amp fuse in the harness. Do not tap the headlight circuit. Headlight wiring is often marginal already, and it cannot take another 3 to 5 amps.
And if you plan to add more heated gear later, this is the moment to wire in a switched power-distribution setup once instead of stacking ring terminals on the battery bolts until you need a longer bolt.
Koso’s wiring instructions show the standard layout: red positive to a DC 12V ignition-switched feed with the 4A fuse in line, black ground to the frame or engine on a solid ground point. Follow the sheet that came with your kit before any forum advice, including mine.
How Do You Route the Wires So Nothing Binds?
Route the harness along a frame rail, away from pinch points, sharp edges, and heat sources. This usually means lifting the tank or removing a side panel. Use plenty of zip ties. If your bodywork is a nightmare to remove, a fish tape pushed from the headstock back to the battery saves a lot of swearing.
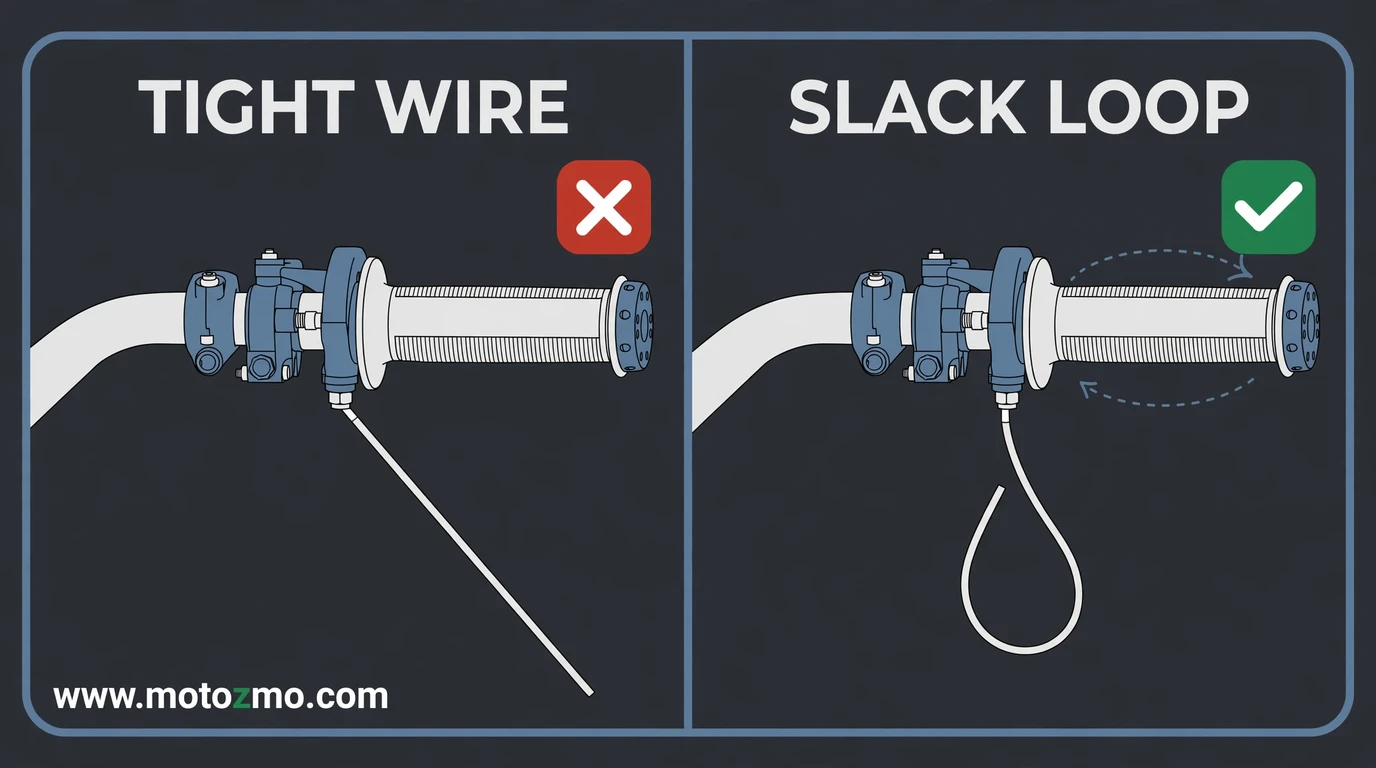
The throttle side is where installs go wrong. The wires on the right grip must have enough slack for full throttle rotation and full steering lock in both directions.
Mistake: routing the throttle-side wires tight. A wire that goes taut at full throttle can hold the throttle open. You test for this in the next section, but the fix is routing, not hoping.
Keep the harness away from brake lines and throttle cables. A wire snagged on a cable changes how that control feels, and you will not notice it until you need the control in a hurry.
Where Should the Controller Go?
Mount the heat controller on the left side, within thumb reach of the left grip, so you can change settings without taking your hand off the bars.
Never mount it on the right. Your right hand runs the throttle and front brake; it has no business hunting for a heat button.
Oxford kits include a handlebar bracket for this. Koso Apollo grips skip the question entirely with the controller built into the grip flange, which is the cleanest setup of all.
How Do You Test the Install Before You Button It up?
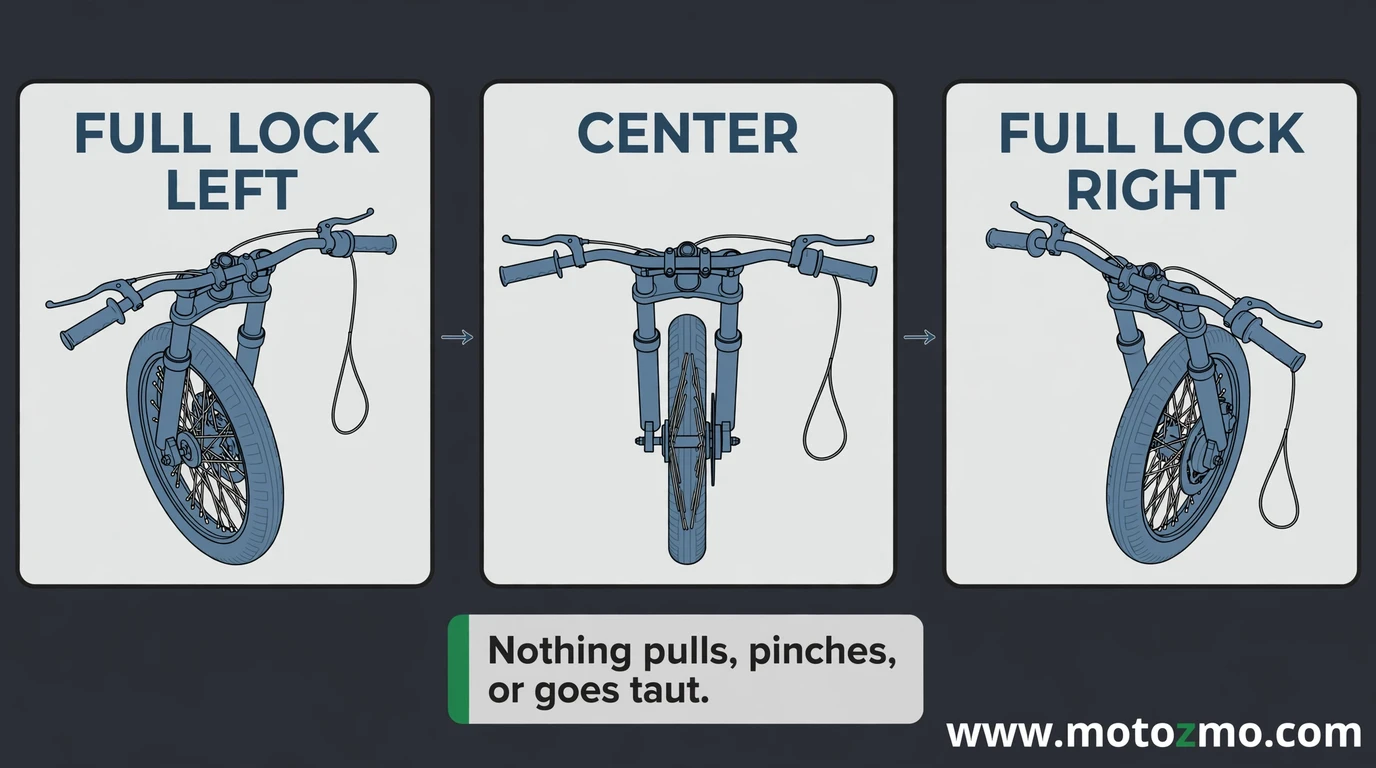
Do not secure everything and reassemble the bike before testing. Test first, tidy second. Run this checklist:
- Reconnect the battery, negative terminal last.
- Turn the ignition on and cycle through every heat level. Each level should change the grip temperature.
- Roll the throttle from closed to fully open and back. It must snap shut on its own with no drag.
- Turn the handlebars to full lock left and full lock right. Nothing should pull, pinch, or go taut.
- Refit the bar-end weights. Many heated grips have open or trimmable ends so the weights go back on.
- Check the controller LED or display, then secure the harness with zip ties and reassemble the bodywork.
Mistake: skipping the lock-to-lock test. Steering that feels fine centered can bind at full lock, and full lock is exactly where you are when a U-turn goes wrong.
Will Your Charging System Handle the Extra Load?
A pair of heated grips draws 3 to 5 amps at full heat. Oxford rates their kits under 4 amps; Koso measured 2.9 amps on the highest setting. That is a meager draw for a big touring bike and a real load for a small single at idle, where the charging system barely keeps up with the lights.
Test it before winter. Start the bike, switch the grips to max, and watch a voltmeter at idle. If voltage sags and stays down, your charging system has no headroom. On bikes under 500cc, run the grips on a lower setting in town and save full heat for cruising RPM, where the stator earns its keep.
One more habit worth building: do not run the grips on max all the time. Heating elements last longer when they cycle, and you will be more comfortable letting the controller hold a temperature than blasting full heat and switching off.
What Breaks When the Install Is Sloppy?
Every shortcut in this job has a matching failure. Knowing the pair keeps you honest while you work.
| Mistake | Consequence |
|---|---|
| Throttle-side wires routed tight | Throttle can stick open. That is a crash risk, not an annoyance. |
| No fuse on the positive leg | A chafed wire melts the loom or starts a fire. |
| Grip glued before the dry fit | You get one shot. Superglue sets in seconds. |
| Wired hot with no auto shutoff | Dead battery by morning. |
| Skipped the lock-to-lock test | Binding shows up at full steering lock, on the road. |
Heated grips only warm your palms, so if your fingers still go numb on cold mornings, read the heated gloves versus heated grips breakdown before you spend money. The right answer for deep winter is often grips plus warm gloves, not grips alone.
FAQ
Can I install heated grips over my existing grips instead of replacing them?
Yes. Oxford sells heated overgrips that wrap around your current grips and fasten with velcro. They install in minutes with no glue and no wiring into the bars, but they are bulkier than replacement grips and the heat has to travel through your old grip rubber.
Will installing heated grips void my dealer warranty?
Usually not if you keep the factory wiring intact. A fused harness on the battery terminals or a proper fuse tap rarely causes trouble. Splicing into factory circuits or overloading one can give a dealer grounds to deny an electrical claim.