Affiliate disclosure: This post may contain affiliate links. If you buy through a link on this page, MOTOZMO may earn a small commission at no extra cost to you. It helps keep our guides free. How we test and choose products.
Yes: wiring heated gloves to your motorcycle takes about 30 minutes and one fused battery harness.
You bolt ring terminals straight to the battery, route the lead out from under the seat, plug in your gloves or a controller, and fit a fuse sized to your gear’s amp draw.
No cutting or splicing, and nothing about the bike changes for good. I have run gloves plus a jacket liner through the same setup on my commuter for three winters, and it has never let me down.
This guide covers each step in order, the fuse math, and the charging-system check most guides skip. If you have not picked your gear yet, our heated motorcycle gear guide walks through the options first.
What Do You Need Before You Start?
Most 12V heated gloves and gear ship with a fused battery harness in the box. Check yours before you buy anything extra. Here is the full kit:
- Fused battery harness (comes with most 12V gear; buy one if yours did not)
- Temperature controller: single-zone for one heat setting, dual-zone if you want gloves on their own setting (more on this below)
- Y-harness for gloves: included with most gloves, needed only if you are not plugging the gloves into a heated jacket liner
- Zip ties, a screwdriver or small wrench for the battery terminals, and your bike’s owner’s manual
Plan on 30 minutes. Difficulty: easy. The only skill involved is getting to your battery, which on some bikes means removing a side cover or the seat.
How Do You Install the Battery Harness?
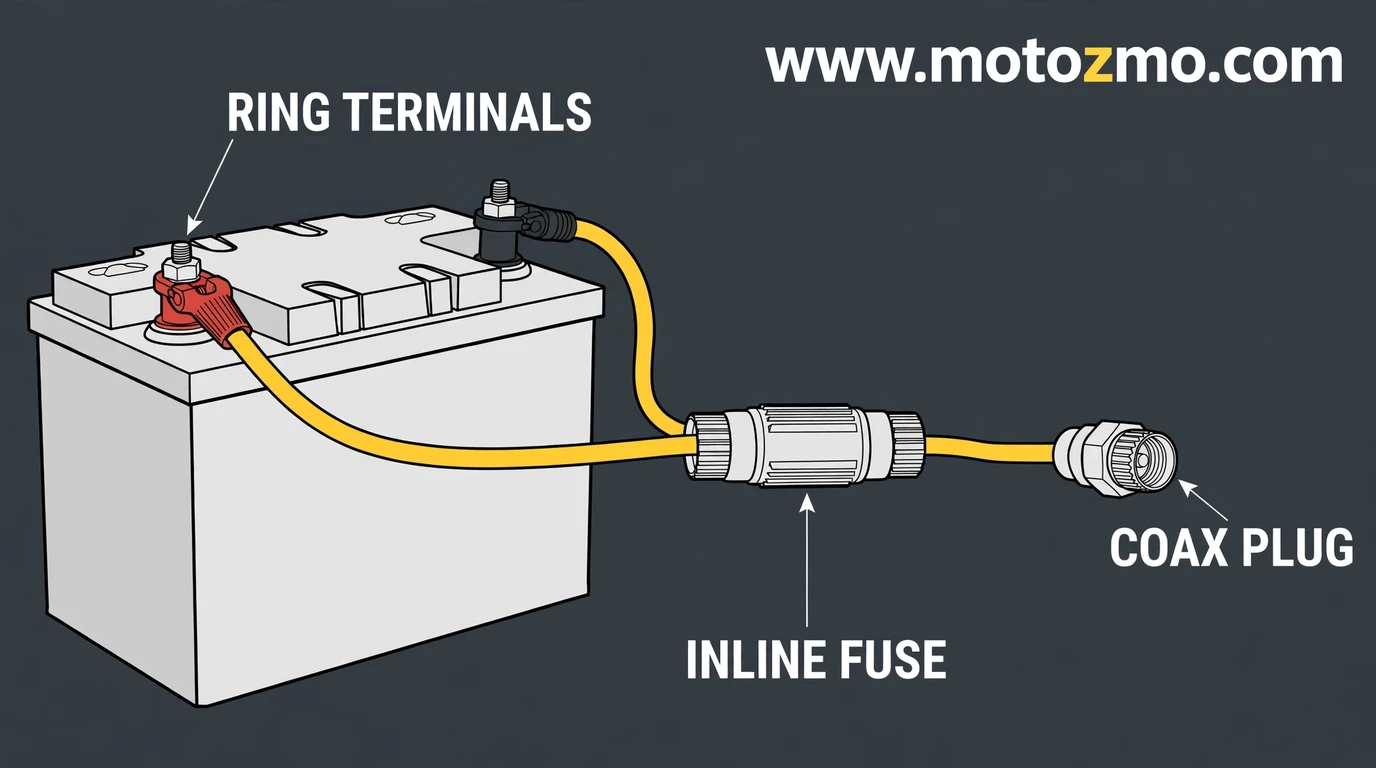
Every major heated-gear maker uses the same basic harness: ring terminals on one end, an inline fuse holder in the middle, and a coax plug on the other end. Follow these steps in order.
- Kill the bike completely. Turn the ignition off and pull the key. This matters twice: once now, and once later when you first plug the gear in.
- Get to the battery. Remove the seat or side cover per your owner’s manual. Note which terminal is positive (+) and which is negative (-).
- Disconnect the positive cable. Loosen the screw, lift the cable off the terminal. (Your gear maker’s manual says positive first, so follow it.)
- Attach the harness ring terminals. Red ring to the positive terminal, black ring to the negative terminal.
- Route the lead out. Snake the coax plug end through the frame toward the side of the bike where your gear plugs in. Gerbing puts jacket connections on the left, so the lead should come out on the left. Let at least 2 inches stick out from under the seat edge so you can reach it with gloves on.
- Secure it. Zip-tie the wire to the frame or another rigid part. Keep it away from the exhaust and from anything that moves: suspension linkages, steering stops, the chain.
- Reconnect the battery. Put the bike’s own cables back on their terminals and tighten the screws. Replace the seat or covers.
Common mistake: plugging a garment into the lead while the bike is running or the key is on. Makers warn this can cause a power surge that damages the garment’s heating elements. Connect your gear with the key out, then start the bike.
What Size Fuse Does Your Gear Need?
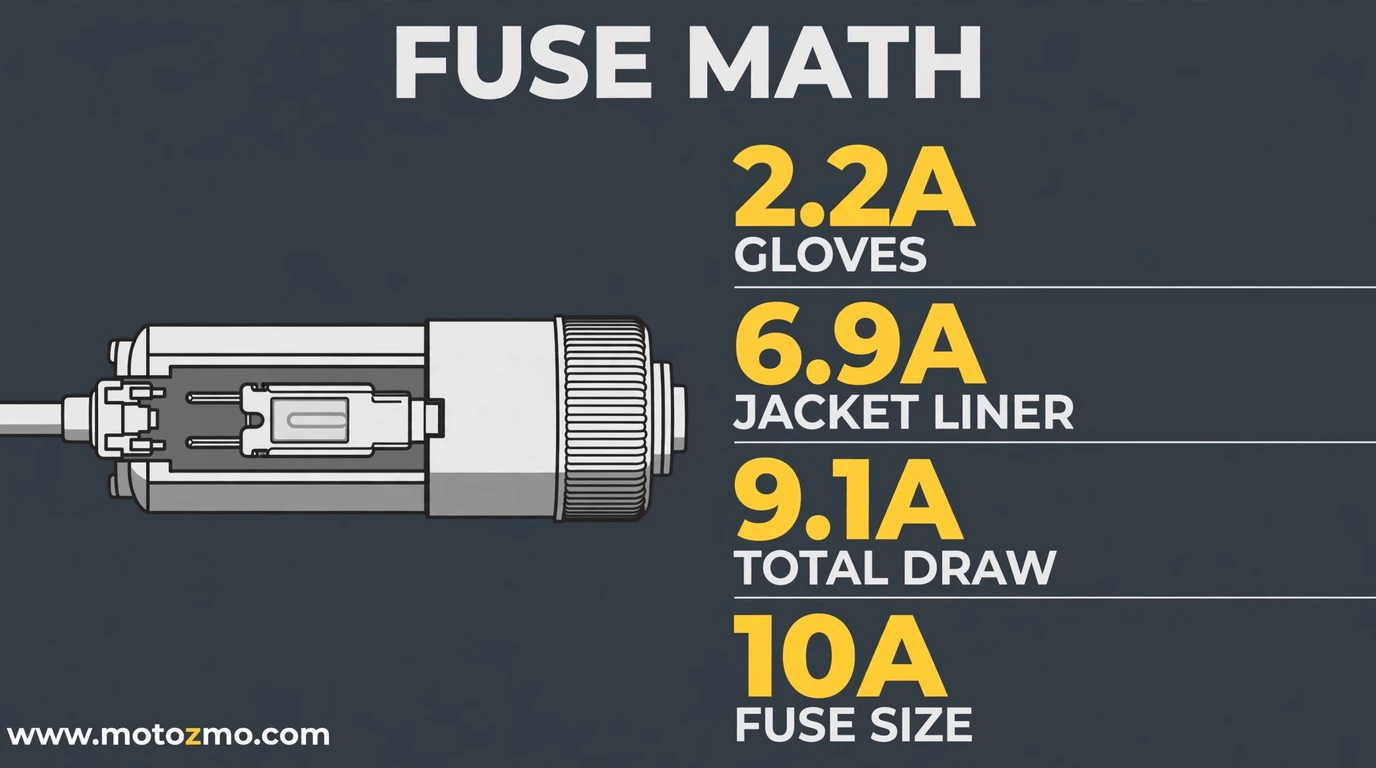
The harness comes with a fuse, but the right size depends on how much gear you run. Add up the amp draw of everything you will plug in at once:
| Garment | Typical draw (Gerbing 12V) |
|---|---|
| Gloves | 2.2 amps |
| Socks or insoles | 2.2 amps |
| Pants | 4.0 amps |
| Vest | 4.2 amps |
| Jacket liner | 6.9 amps |
Your brand’s numbers will differ a little, so check its manual, but the math is the same. Add the draws, then pick the next fuse size above your total.
Gerbing’s connection guide works it like this: gloves (2.2A) plus jacket liner (6.9A) = 9.1A, so a 10A fuse covers it. Gerbing also suggests going one step higher (15A in that example) to ride through the brief surge when the gear first powers up.
Two traps here. First, a Battery Tender lead looks like it fits, but its fuse is usually 5 amps: fine for a trickle charger, not for heated gear. Riders on forums report blown fuses the first cold morning they try it. Use a dedicated harness built for heated gear.
Second, when you add a garment later (gloves in November, pants in January), redo the math and swap the fuse. The fuse protects the wire, not the gear, so an undersized fuse blows and an oversized one lets the wire cook.
How Do You Hook up Gloves and Other Gear?
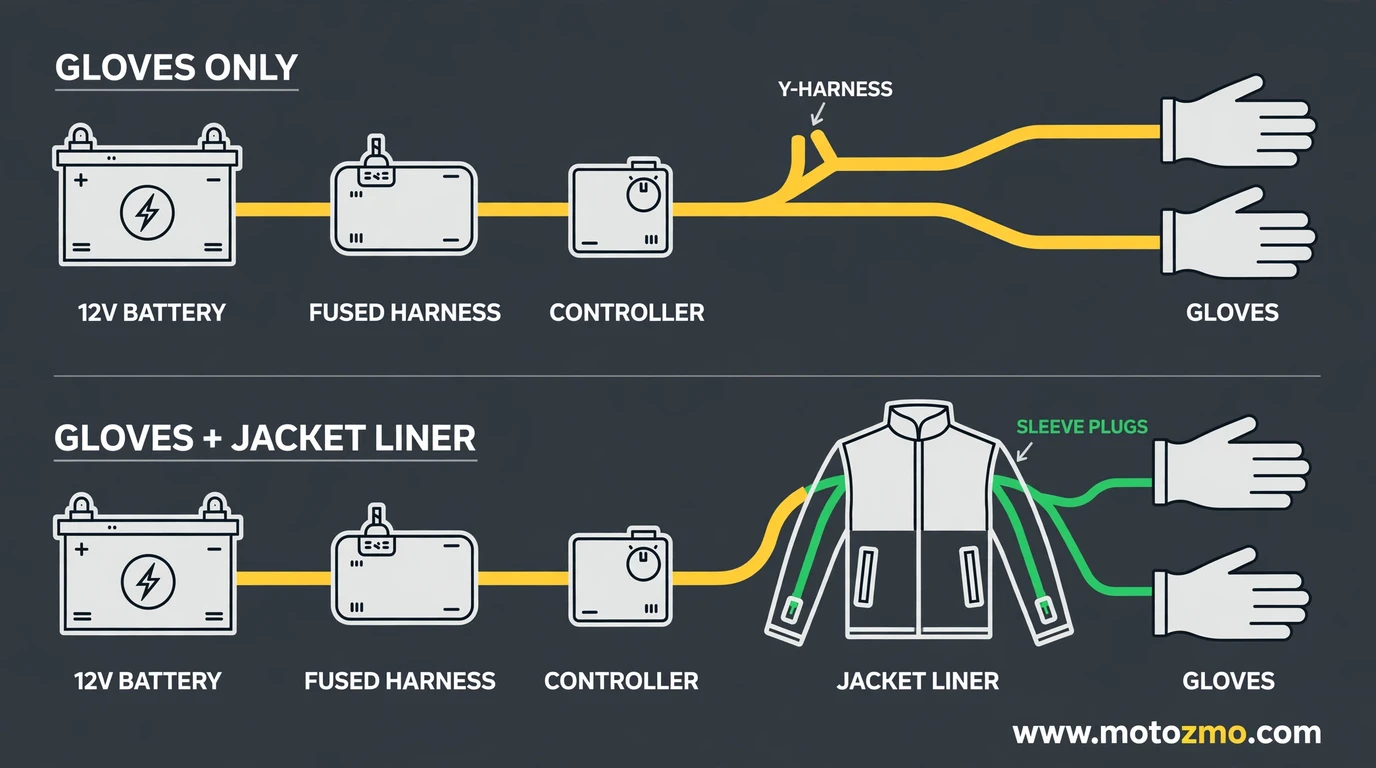
With the harness installed, everything plugs together with coax connectors, no tools needed. There are two common layouts.
Gloves only. Run the Y-harness’s two long cords up through your jacket sleeves and plug each glove into its cord. Plug the Y-harness’s short end into the battery harness (or into a controller, then into the harness). That is the whole job.
Gloves plus a jacket liner. Skip the Y-harness. The jacket liner has plug leads built into the sleeves for the gloves. Plug the liner into the battery harness, plug the gloves into the liner, done. Socks and insoles work the same way off a pant liner.
Controllers. You can plug gear straight into the harness and it will run at full heat, but most riders want a controller. A single-zone controller sets one temperature for everything. A dual-zone controller splits your gear into two zones (jacket on one, gloves on the other) because hands usually want more heat than your core. Gerbing’s heated glove FAQ confirms gloves can share a controller or run on their own zone. If you ride with more than one garment, get the dual.
Still deciding between glove types? Our roundup of the best heated gloves for motorcycle riders covers wired and battery options. And if all this wiring sounds like more project than you want, heated grips vs heated gloves lays out the lower-effort alternative honestly.
Can Your Bike’s Charging System Keep up?
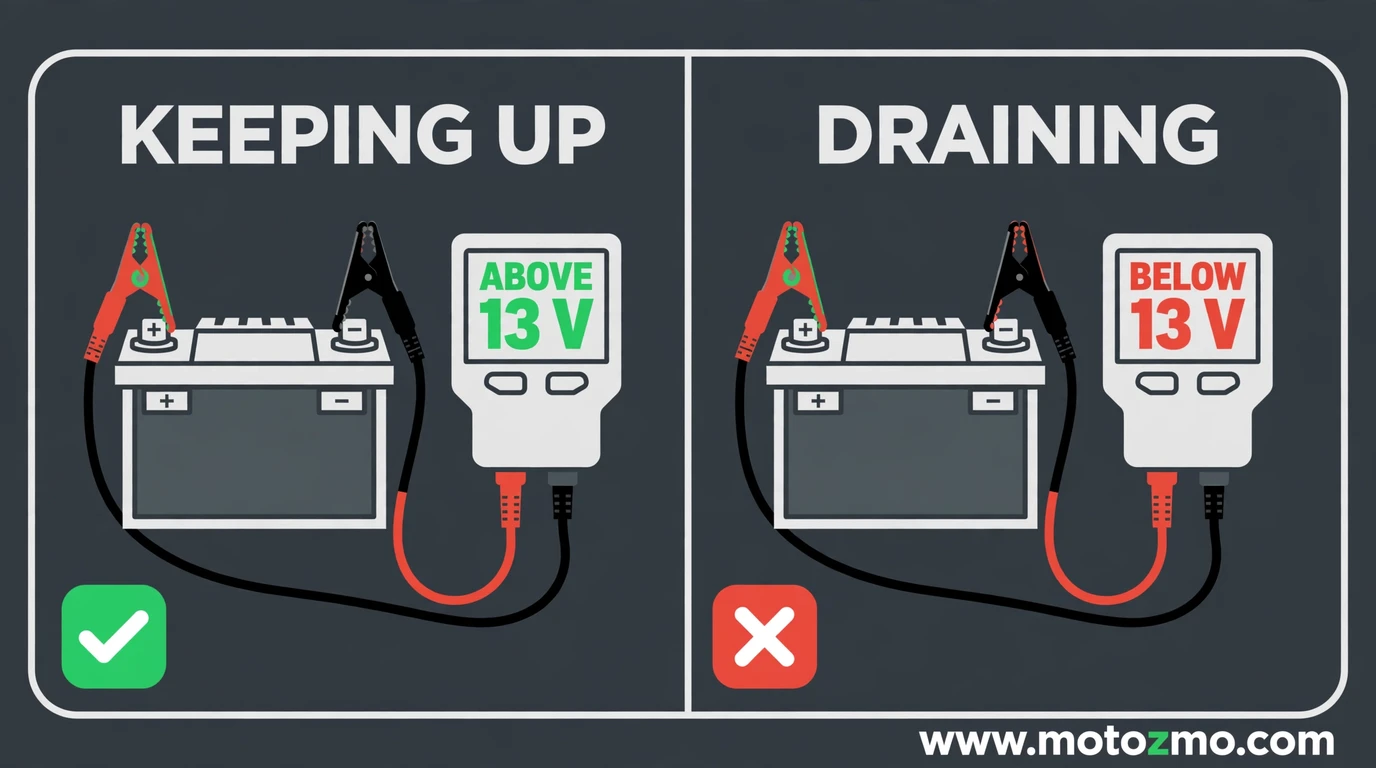
Heated gear pulls real current, and small bikes do not always make enough to spare. Add your gear’s total draw to what the bike itself needs: lights, ignition, fuel pump, roughly 10 to 15 amps on most bikes, and compare that to your alternator’s rated output in the owner’s manual.
| Gear combo | Total draw | Verdict |
|---|---|---|
| Gloves only | ~2.2A | Fine on almost any bike |
| Gloves + jacket liner | ~9A | Fine on most mid-size and larger bikes |
| Full suit (jacket, pants, gloves, socks) | ~17A | Check your alternator output first |
When in doubt, do the voltmeter check. With the bike idling and the gear on high, touch a voltmeter to the battery terminals. If it holds above 13 volts, the charging system is keeping up. If it sinks below that, you are draining the battery. It will be dead by the time you reach work.
The fix is simple: run the gear on medium instead of high, or unplug one garment. Commuters on small-displacement bikes hit this wall most often; it is the one spec worth checking before you buy a full suit.
What Mistakes Do Riders Make Wiring Heated Gear?
| Mistake | Why it happens | How to avoid it |
|---|---|---|
| Using the Battery Tender lead | The plug fits, so it looks fine | Its 5A fuse is too small, so install the gear maker’s harness |
| Undersized fuse | Sized to steady draw, not startup surge | Go one fuse rating above your calculated total |
| Wire routed near the exhaust | Shortest path looks tempting | Route along the frame, zip-tie, keep clear of heat and moving parts |
| Plugging in with the key on | Rushing to get moving | Connect gear with the key out, then start the bike |
| Tapping a factory switched circuit | Wants gear to switch with ignition | Go straight to the battery: factory wires are too thin for 9+ amps |
| Leaving gear plugged in after shutoff | Forgetfulness at the parking spot | Unplug when you park; the harness has no ignition cutoff |
That is everything. One harness, one fuse sized to your gear, one charging-system check, and your winter riding changes completely.