
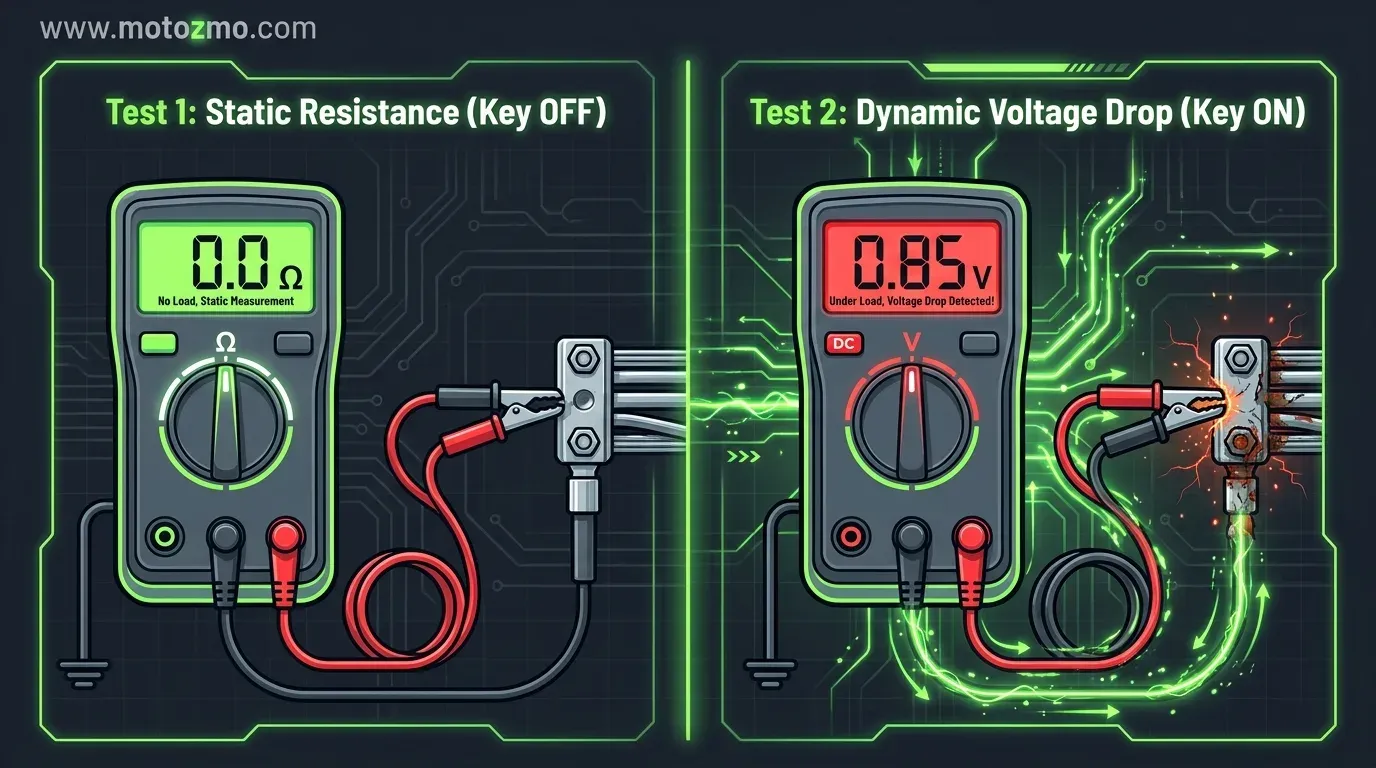
Most guides only teach one ground test, and it’s the one that misses the most common kind of failure. Checking resistance with everything switched off tells you whether a ground is completely broken. It won’t tell you whether a ground is just barely hanging on, which is the more common problem and the harder one to catch.
This page walks through both tests: the quick one you probably already know, and the one that catches a marginal ground before it strands you. For everything else in this cluster, our full guide to wiring, grounds, and connectors is the place to start.
What You Need Before You Start
A basic digital multimeter is the only tool this job requires, along with a small wire brush or a bit of sandpaper to clean a test spot down to bare metal.
If you’re building out a toolbox and want to know what else is worth carrying, our list of tools worth carrying covers that separately.
Test 1: Check Resistance with Everything Switched off
This is the fast test, and it’s a fine first step. It takes about two minutes.
- Turn the key off and, if you can, disconnect the battery
- Set your multimeter to resistance (ohms) or continuity mode
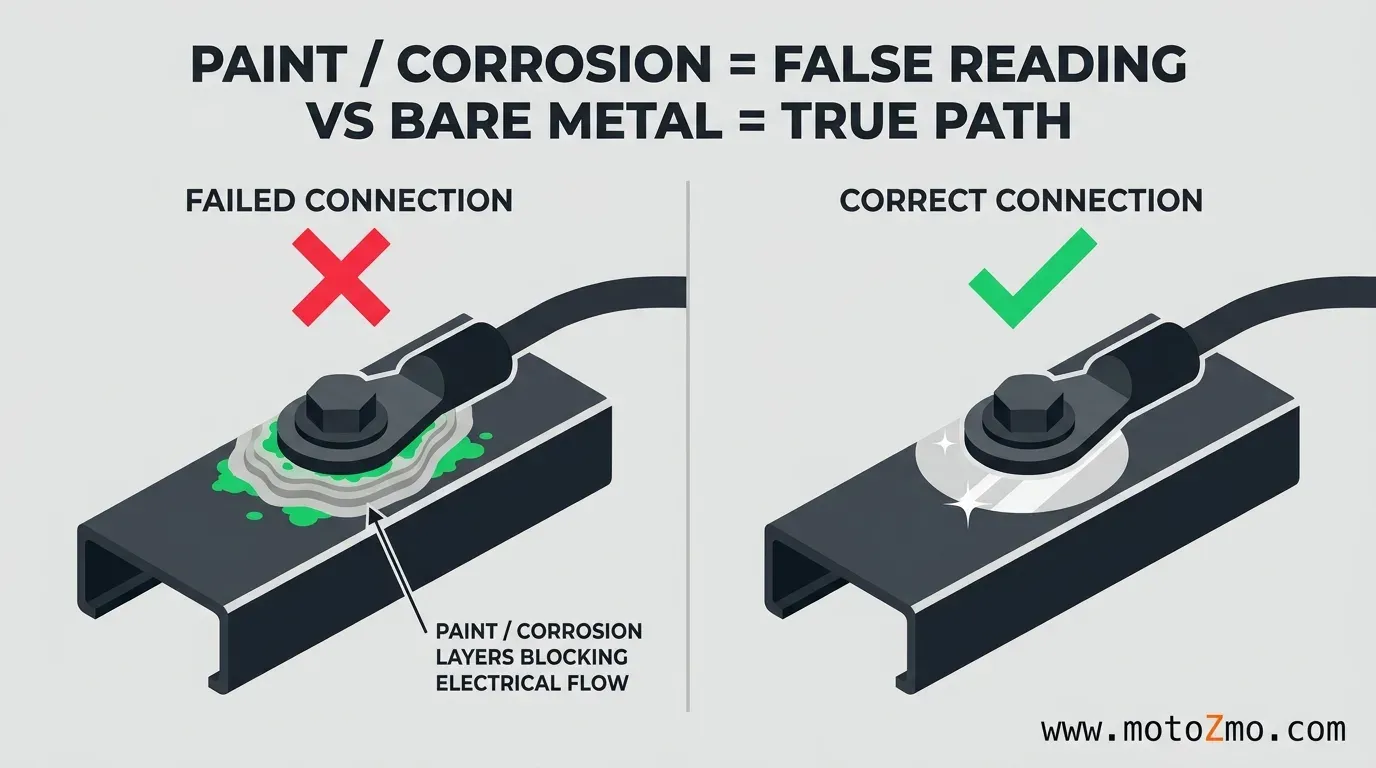
- Clean a small spot on the ground point down to bare metal, since paint and corrosion both block a reading
- Touch one probe to that ground point and the other probe to the battery’s negative terminal
- A good ground should read close to 0 ohms, or make the meter beep if you’re in continuity mode
If you get a high reading or no reading at all, you’ve found a broken ground. That part is simple. The harder part is that a ground can pass this test and still be the source of your problem, which is exactly why there’s a second test.
Test 2: Check Voltage Drop While the Circuit Is Working
Think of voltage like water pressure moving through a pipe. A little bit of debris in the pipe won’t stop the flow completely, but it does cause a pressure drop across that section.
A voltage drop test measures the same kind of loss, across a section of wire or a ground joint, while current is flowing through it. Resistance testing only asks whether the pipe is connected at all. Voltage drop testing asks how much pressure that section is costing you, and it can catch a problem that Test 1 walks right past, since a joint with a little corrosion can still show close to 0 ohms with no current flowing, and only reveal the resistance once real current is pushing through it.
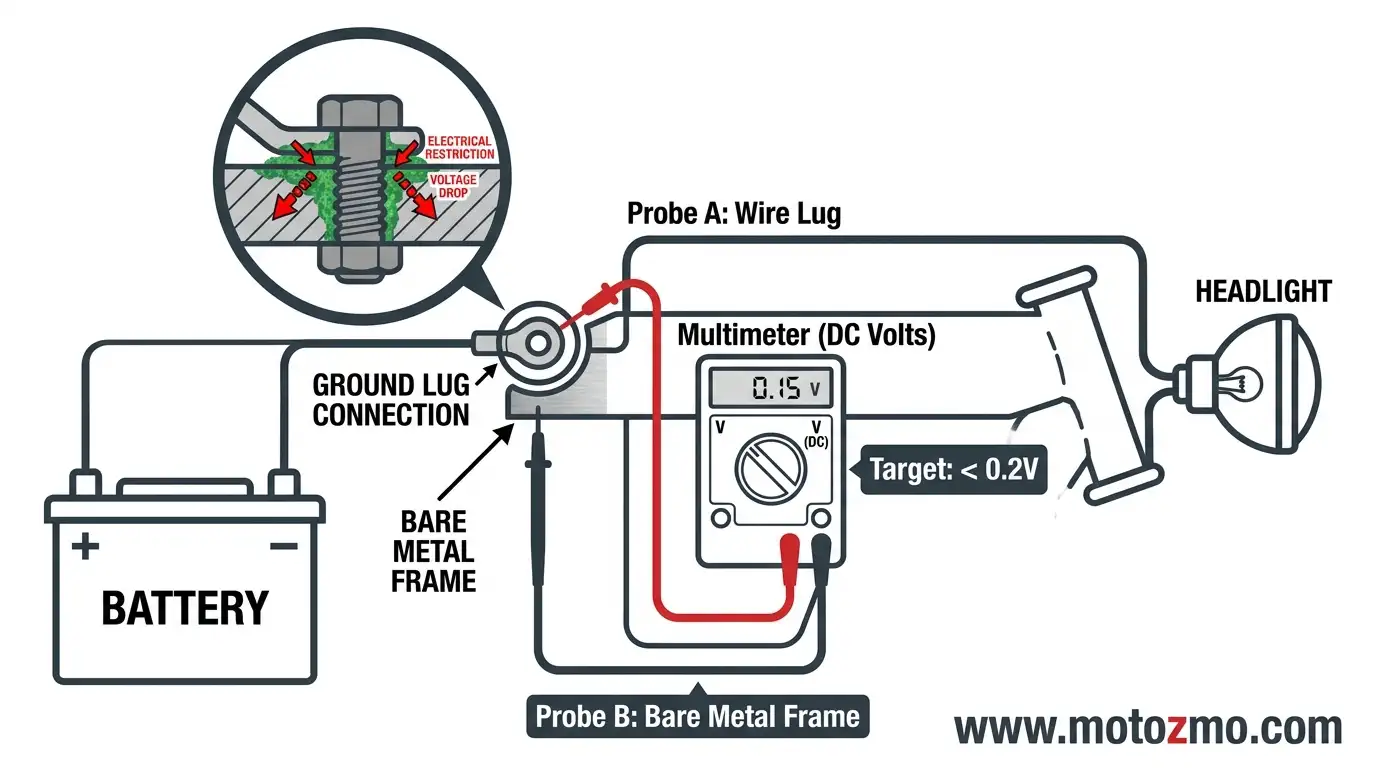
This test takes a bit longer, closer to five minutes, and it needs the circuit switched on while you measure.
- Set your multimeter to DC volts, on the lowest range that covers a small reading
- Turn on whatever uses that ground: headlight, horn, or for the main engine-to-frame strap, crank the starter for a few seconds
- Place one probe on one side of the ground joint and the other probe on the other side of the same joint, so you’re measuring across the connection itself, not from the connection to somewhere else
- Read the voltage while current is flowing
A reading close to zero, under about 0.2 volts, means the connection is handling current the way it should. A reading noticeably higher than that means real resistance is hiding in that joint, even though it might have passed Test 1 with no complaints.
Fluke’s guide to automotive voltage drop testing explains why ground-side connections in particular deserve this closer look, since a bad ground can throw off other readings on the same circuit without ever showing up as a dead component.
For the bike’s main ground strap, which carries the heaviest load on the whole system during starting, Fluke’s starter-circuit test procedure uses the same crank-and-measure approach described above.
| Test | What it checks | Good reading | Bad reading |
|---|---|---|---|
| Resistance (key off) | Whether the ground is physically connected at all | Close to 0 ohms, or a continuity beep | High resistance or no reading |
| Voltage drop (circuit on) | How much the connection is costing you while current flows | Under about 0.2 volts | Noticeably higher, even if Test 1 looked fine |
This is also why a ground can test perfectly clean on a workbench and still cause the kind of on-and-off fault covered in why a connection can test fine and still cause problems: the corrosion inside that joint may only show itself once real current, vibration, or heat is involved, none of which are present during a simple key-off check.
Why You Should Test Against the Battery Negative Terminal, Not Just Any Piece of Metal
It’s tempting to touch your black probe to whatever frame rail is closest and call that “ground.” The problem is that the frame is only a good reference if every ground strap and bolt between that spot and the battery is itself in good shape, and you’re testing because you’re not sure that’s true.
The battery’s negative terminal is the one point on the bike you can trust as an reference, since it’s the true return path everything else is supposed to connect back to. Reference your test to that terminal instead of the nearest bolt, and a bad ground strap somewhere in between will show up in your reading instead of hiding from it.
What a Failed Ground Test Means
A ground that fails Test 1 just needs the bolt removed, both surfaces cleaned back to bare metal, and reassembled with a proper torque. A ground that fails Test 2 while passing Test 1 needs the same cleaning, since it’s corrosion building up inside the joint rather than the bolt being loose.
Either way, once it’s clean, protecting the connection is what keeps the same spot from creeping back to a bad reading a few months later. If you’re not sure where your bike’s main grounds are, our page on where these grounds sit on a bike covers the common locations.
Common Mistakes That Give a False “Good” Reading
- Testing over paint, powder coat, or a film of corrosion instead of bare metal, which adds resistance that has nothing to do with the ground bolt itself
- Only running Test 1 and stopping there, since a marginal ground will often pass a no-load resistance check
- Referencing the test to a random piece of frame instead of the battery negative terminal
- Testing a ground, light, or horn connection with a test light instead of a multimeter, which only tells you power is present, not how much of it is being lost. Why a test light can’t do this specific job covers the difference in more detail
Is This a Ground Problem, or Something Else?
If the whole bike seems weak on power, slow to crank, or the battery itself won’t hold a charge, that points toward the battery before it points toward a ground. Our battery guide is the better starting point for that pattern.
Can I Test a Ground with a Test Light Instead of a Multimeter?
Not for this job. A test light can confirm a circuit has power, but it can’t tell you how much voltage is being lost across a specific connection, which is the whole point of Test 2. You need a multimeter for the voltage drop test, though a test light is still handy for other quick checks around the bike.
How Often Should I Check My Main Grounds?
Checking the main engine-to-frame strap and the grounds near the headlight and tail light once a season, or any time you’re already doing other maintenance, is enough for most riders. If you’ve already had one intermittent electrical problem, it’s worth checking sooner, since a ground that failed once is more likely to be building up corrosion again in the same spot.
A ground connection either passes both of these tests or it doesn’t, and now you have a way to know which one it is instead of guessing from the symptoms alone.