
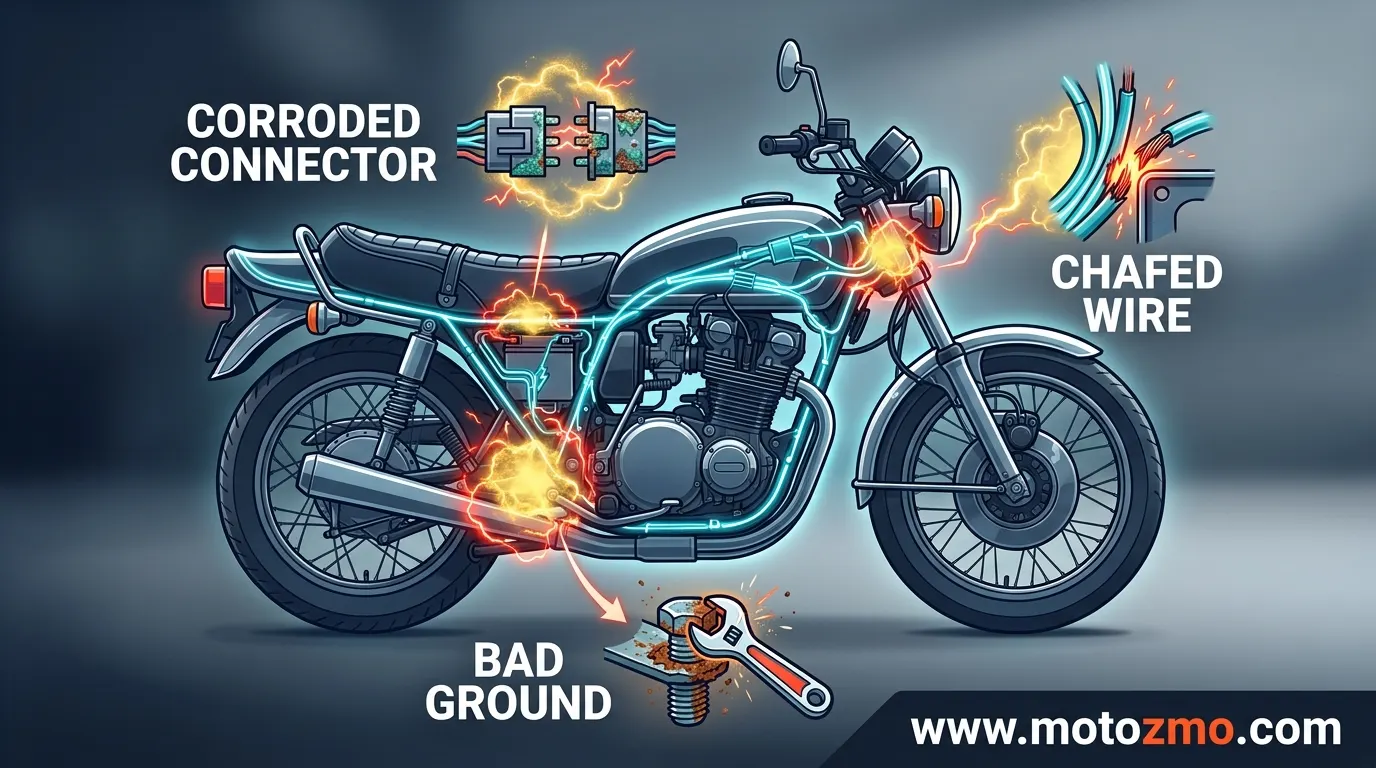
Most random motorcycle electrical problems come down to four weak points: a loose or corroded connector, a bad ground, a wire rubbed through where it touches the frame, or a fuse that’s about to fail. None of these show up on a quick glance under the seat, which is exactly why the fault seems to come and go for no reason. Riders suspect the battery or a big-ticket part like the stator first, when the real fix is often a two-minute job: cleaning a plug or tightening a ground bolt.
This guide walks through where these weak points hide, what order to check them in, and how to tell whether your bike’s problem belongs on this page or points somewhere else, like a dying battery or a bad starter circuit. If you’re not sure yet, our full motorcycle problems guide is a good place to start.
Why Do Motorcycle Electrical Problems Feel So Random?
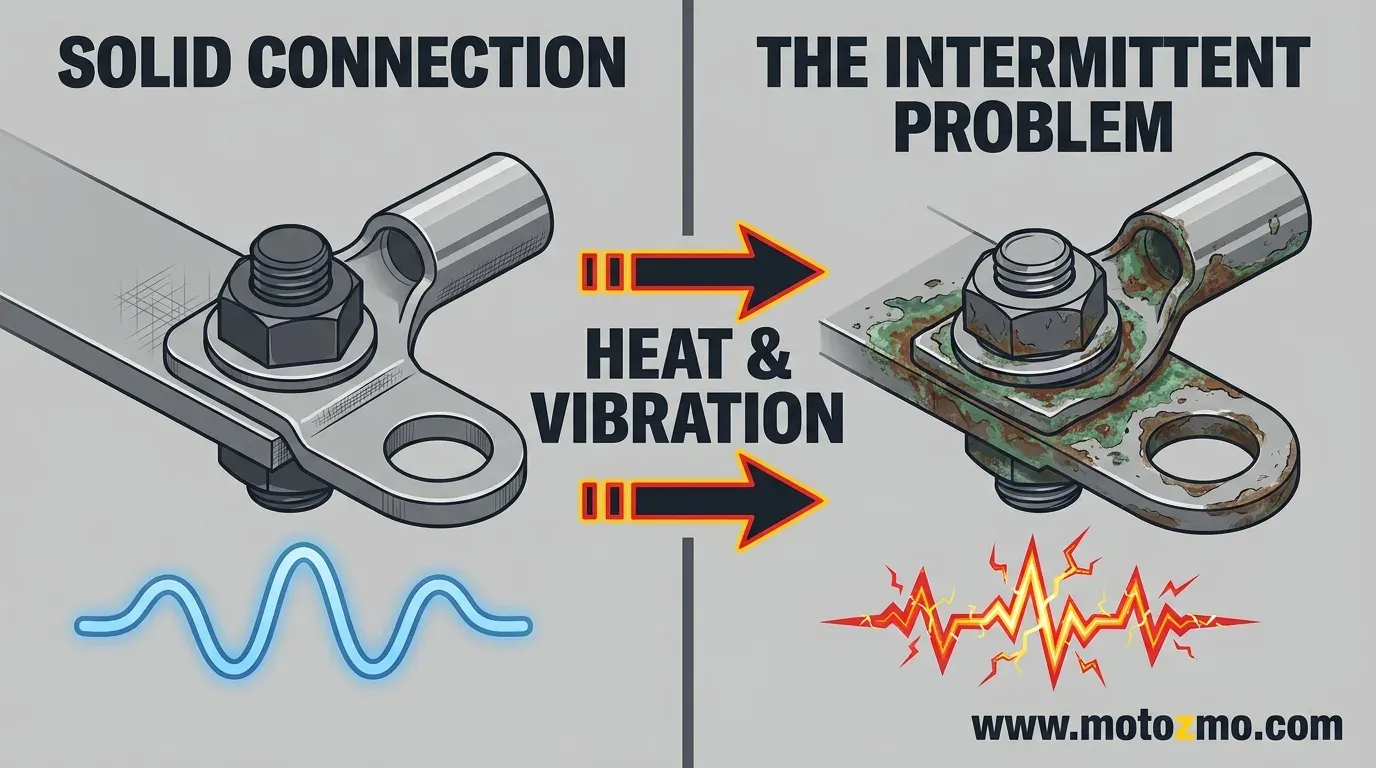
A wire that’s completely dead is easy to find. A wire that’s almost good is what makes people crazy. A connector with a thin layer of corrosion, or a ground bolt that’s a quarter-turn loose, still passes current most of the time. It only drops out when heat expands the metal, when vibration shakes a plug apart for a second, or when rain reaches a spot that’s dry. That’s why the dash flickers on a rough road, or the bike dies on a hot day and starts fine an hour later once things cool down and settle back into place.
This is a different problem from a part that’s failed, which is why it gets its own page here. For the deeper walkthrough of why these faults come and go, we cover it in detail here.
Where Do These Weak Points Hide on Your Bike?
| Weak point | What goes wrong | What it looks like |
|---|---|---|
| Connectors | Corrosion or a loose pin lets current through only part of the time | Flickering lights, a gauge that jumps, a bike that dies and restarts |
| Grounds | A loose or corroded ground strap adds resistance to the whole circuit | Dim lights, a weak horn, several unrelated things acting up at once |
| Wiring insulation | The harness rubs against the frame, tank, or a bracket until it wears through | A fuse that keeps blowing, a short that only shows up when you turn the bars |
| Fuses and relays | Vibration and heat wear out the fuse holder or a cheap relay | Everything electrical dies at once, then comes back after a restart |
Check these roughly in that order. Connectors and grounds are the cheapest and fastest to rule out, so start there before you reach for a multimeter.
What Order Should You Check Things in?
Work from cheap and fast to slow and technical. Don’t jump straight to the multimeter on your first pass.
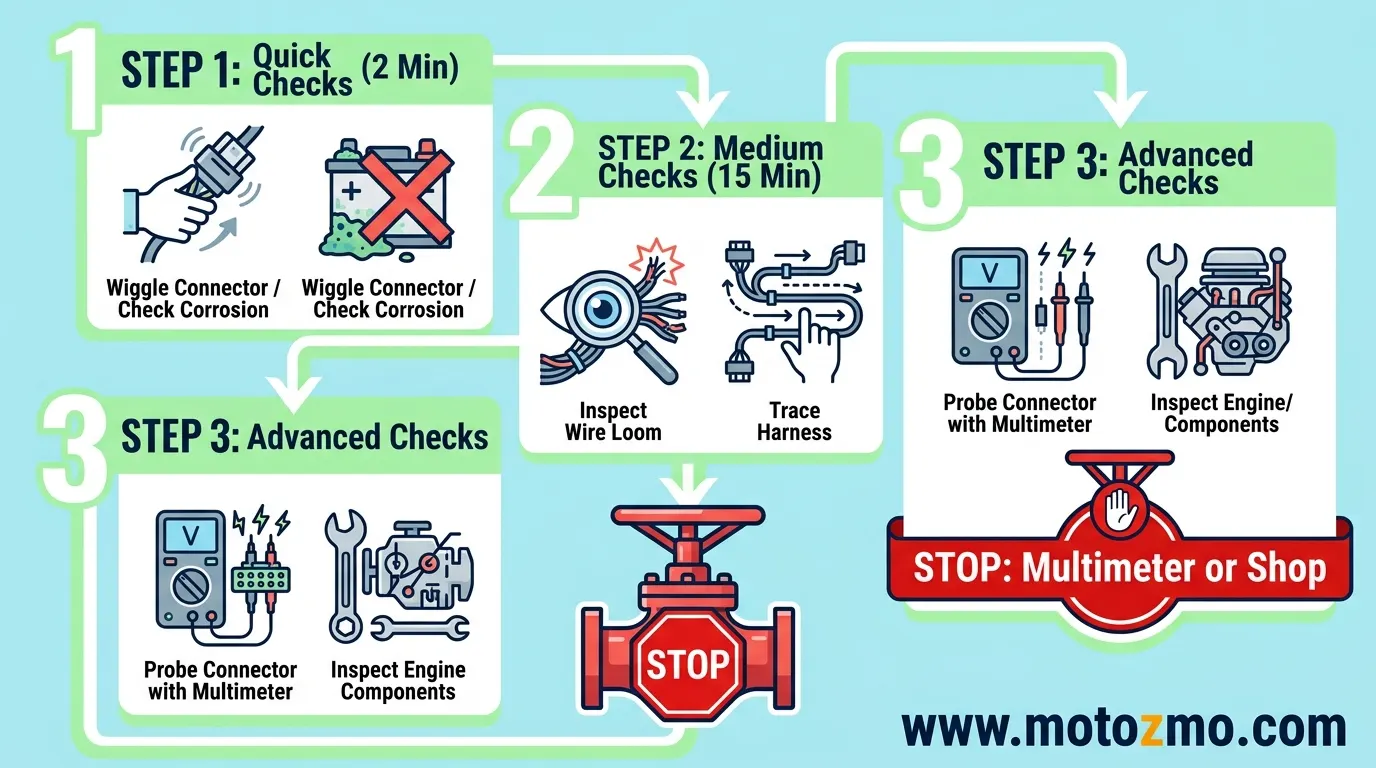
Quick checks, about two minutes:
- Wiggle the main connectors under the seat and at the battery while a helper watches the dash
- Check the main fuse and any relays for a loose fit in the holder
- Look at the battery terminals for a chalky white or green film
Medium checks, about fifteen minutes:
- Trace the harness by hand, feeling for a stiff or brittle patch that means chafed insulation underneath
- Check the ground strap between the engine and frame, plus the smaller ground bolts near the headlight and tail light
- Pull the seat and tank and look for a wire pinned against a bracket or the frame rail
Advanced checks:
- Test for continuity and voltage drop across suspect connectors and grounds with a multimeter
- Run a parasitic draw test if the battery keeps dying overnight with no obvious cause
If none of this turns up anything after the medium stage, that’s the point to hand the bike to a shop with a wiring diagram for your exact model. Guessing past this point risks damaging a connector or spending money on parts you don’t need.
Which Symptom Points to Which Cause?
| Symptom | Most likely cause | Check first |
|---|---|---|
| Dash or lights flicker over bumps | Loose connector or ground | Wiggle test at the headlight bucket and under the seat |
| Everything dies, then works again after a restart | Blown or loose main fuse | Fuse holder fit and amperage rating |
| Problem only shows up once the engine is warm | A marginal connection that opens up as it heats | Connectors near the engine and headlight bucket |
| One switch (horn, signal, high beam) is dead or weak | Corroded or worn switch contact | The handlebar switch housing on that side |
| Battery is fine but dies overnight | Parasitic draw from a wire touching a live circuit | A load test with everything switched off |
Where Does the Wiring Itself Give out?
Three spots do most of the damage on a typical bike: the headlight bucket, where handlebar and front wiring bunch together behind the bulb; the taillight and rear fender area, where road spray and vibration both hit at once; and the handlebar switch housings, where the wires flex every time you turn the bars. We go through each of these spots in detail here, including what a chafed wire looks like before it fails completely.
This isn’t just a nuisance issue. The National Highway Traffic Safety Administration has recalled motorcycles over a wire harness damaged during assembly, a flaw serious enough to knock out the turn signal, headlight, taillight, horn, or instrument panel on the affected bikes. A wiring fault that takes out your lights or horn is a safety problem, not just an inconvenience.
How Do You Test a Ground Connection?
A ground wire looks fine from the outside even when it’s the problem, since the failure happens where the metal meets the bolt or the frame, not along the wire itself.
The short version: disconnect the ground, clean both metal surfaces back to bare metal, and check resistance between the ground point and the battery’s negative terminal with the engine off. We walk through the full test, step by step, here.
Do You Need a Multimeter or a Test Light?
Both have a place in a toolbox, and neither replaces the other. A test light is fast for confirming a circuit has power at all. A multimeter tells you how much resistance is sitting in a connection that looks fine but isn’t, which matters most for exactly the kind of marginal, corroded connector this whole page is about. We break down which one to reach for and when, here.
Where Should You, and Shouldn’t You, Use Dielectric Grease?
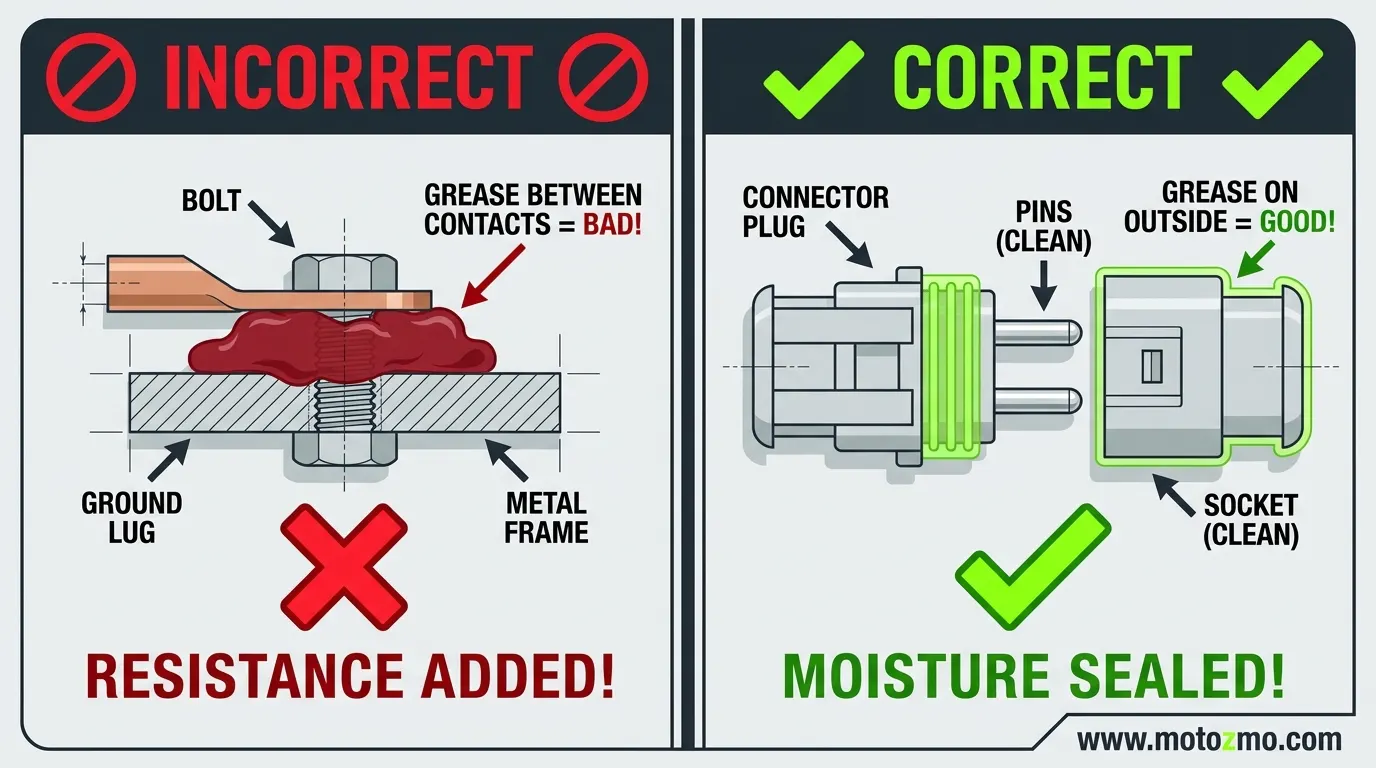
Dielectric grease doesn’t conduct electricity, and that trips people up. It works on a plug-and-socket connector because the pins push the grease aside as they mate, leaving bare metal touching bare metal while the grease seals the rest of the connector from moisture.
It doesn’t work the same way on a flat joint that never gets wiped clean by insertion, like a ring terminal sitting under a bolt or a battery cable lug. Smear grease there and you can add resistance instead of removing it. We cover a grease and a contact cleaner that work for this, here.
Should You Repair the Wire or Replace the Whole Run?
A single chafed spot near the headstock or under the tank is a fair repair with a strip of heat-shrink tubing and a proper crimped connector, not electrical tape.
If you’re finding a second or third bad spot on the same harness, or the insulation feels brittle everywhere you touch it, that’s telling you the whole run is close to the end of its life, and patching it again just delays the same repair. A wire repair kit that covers most of these jobs is here.
Is This a Wiring Problem, or Something Else?
Not every electrical-feeling problem belongs on this page. A few common mix-ups:
If the bike cranks slowly or won’t crank at all, and it gets worse over a few days, that points to a battery on its way out more than a wiring fault. Our battery guide covers that path.
If the bike cranks but you hear a single click and it doesn’t fire, that’s a starter or solenoid issue rather than wiring.
If the engine dies while you’re riding, rather than the lights or gauges acting up, check our page on an engine that cuts out first, since that can point to a fuel or ignition cause as easily as a wiring one.
When Should You Stop and See a Mechanic?
See a mechanic once you’ve found a melted wire, smell burning plastic, or a fuse that blows again right after you replace it. Any of those means a short somewhere is actively drawing more current than the circuit is rated for, and continuing to ride, or continuing to swap fuses, risks a fire rather than just another flicker.
The Motorcycle Safety Foundation’s own pre-ride checklist calls for checking the wiring harness for fraying, chafing, and worn insulation before every ride, right alongside the lights and switches, for exactly this reason.
How Much Does It Cost to Fix a Motorcycle Wiring Problem?
A cleaned connector or a re-seated ground costs nothing but your time. A single repaired chafe point runs the price of a repair kit, under thirty dollars in parts.
A full harness replacement on an older or less common model can run several hundred dollars in parts alone, which is why catching a chafe point early, before it turns into a short, is worth the fifteen minutes it takes.
Is It Safe to Keep Riding with an Intermittent Electrical Problem?
It depends on what’s affected. A flickering dash light is annoying but not urgent. A horn, brake light, or headlight that cuts out is a safety problem you should fix before your next ride, since other drivers rely on those signals to know what you’re doing.
Your bike’s electrical system is only as strong as its weakest connection, and on most bikes that weak point is a five-dollar part, not the wiring harness itself. Work through the checks in order, match what you’re seeing against the tables above, and you’ll find the fault before you’ve spent a dollar on parts you didn’t need.