Affiliate disclosure: This post may contain affiliate links. If you buy through a link on this page, MOTOZMO may earn a small commission at no extra cost to you. It helps keep our guides free. How we test and choose products.
Top Picks For You
Ancor Marine Grade Heat Shrink Butt Connectors
Stop repeating electrical fixes. These adhesive-lined connectors lock out moisture completely, creating a heavy-duty, waterproof splice that prevents future wiring corrosion from harsh weather exposure.
Check Price
Wirefy Ratcheting Crimping Tool
Eliminate weak, slipping splices. This ratcheting tool guarantees full compression force on every single terminal, ensuring your motorcycle’s electrical repairs never vibrate loose on the road.
Check Price
Sopoby Solder Seal Wire Connectors
Repair damaged wires in cramped motorcycle housings where heavy tools cannot fit. Simply heat to solder and seal simultaneously, delivering quick fixes without swinging a crimper.
Check Price
Wagner HT400 Heat Gun
Prevent burnt wiring and melted fairings. This targeted heat source provides precise, controlled temperature settings to shrink sleeves evenly without the soot or scorch damage of open flames.
Check Price
A proper wire repair setup is three separate things, not one bundled kit: a good connector, a tool or method to seal it, and a controlled heat source. Most bundled “wire repair kits” skimp on at least one of these, usually the crimper, which is often the flimsy stamped tool tucked in for free rather than something that makes a solid crimp.
Below are four picks that each cover one piece of the job properly, with real pros and cons from riders and other users who’ve used them. For the bigger picture on wiring and connectors, our full guide to wiring, grounds, and connectors covers the rest of this cluster, and if you’re repairing a wire because it chafed through, our page on where motorcycle wiring fails covers the spots this happens.
Which Piece Do You Need?
| Your situation | What you need | Pick |
|---|---|---|
| A wire chafed through and you need a reliable splice | A proper connector | Ancor Marine Grade Heat Shrink Butt Connectors |
| Your current crimps keep pulling apart | A real crimping tool | Wirefy Ratcheting Crimping Tool |
| The break is inside a tight spot, like a switch housing, where a crimper won’t fit | A no-crimp connector | Sopoby Solder Seal Wire Connectors |
| You’ve been using a lighter to shrink connectors | A controlled heat source | Wagner HT400 Heat Gun |
Ancor Marine Grade Heat Shrink Butt Connectors
- Best for: The everyday splice most riders should reach for first
- Format: 25-pack, 16-14 AWG
Key Features
- Adhesive-lined heat shrink jacket
- Exceeds standard automotive testing thresholds
- Thermal-cycling moisture barrier design
These are adhesive-lined heat shrink connectors built to marine standards, which is a higher bar than most automotive-labeled connectors ever get tested against, and they’re a common recommendation among boat and powersport owners doing their wiring. The adhesive lining seals the joint against water rather than insulating it, which matters given how much of this cluster comes down to moisture getting where it shouldn’t.
The tradeoff, and it’s a real one from an owner who put these through years of use: in a saltwater bilge environment, a tiny pocket of air trapped inside the crimp can draw in moisture as the connector heats and cools repeatedly, eventually corroding the joint from the inside.
A motorcycle’s wiring doesn’t sit in standing saltwater, so this is a smaller risk for most riders than it is for a boat owner, but it’s the same thermal-cycling mechanism that shows up throughout this cluster, and it’s a good reason not to treat any sealed connector as maintenance-free forever.
Wirefy Ratcheting Crimping Tool
- Best for: Making the connector above work the way it’s supposed to
- Format: Single tool
Key Features
- Mandatory complete-cycle ratcheting system
- Specifically engineered terminal die jaws
- High-leverage ergonomic handle design
- Built-in pull-test verification functionality
A good connector crimped with a bad tool is still a bad connection, and this is where most cheap wire repair kits fall apart. This tool’s ratcheting mechanism won’t release until you’ve applied full, even pressure, which stops the half-finished crimps that a basic pliers-style crimper allows.
One long-time user rebuilding a boat’s entire wiring during a restoration project reported using it across every connector size in a large variety pack without a single failure once they got their technique right.
The tradeoff: technique still matters, and one detailed review pointed out that skipping the pull test after crimping is how a bad crimp goes unnoticed, since the connector can look fine while the wire slides right back out under any tension.
A separate batch of these tools has also drawn complaints that the crimping die doesn’t fully compress before the handle bottoms out, so it’s worth doing a pull test on your very first crimp before you commit to using it on your whole harness.
Sopoby Solder Seal Wire Connectors
- Best for: A repair inside a tight spot where a crimping tool physically won’t fit
- Format: 200-piece kit
Key Features
- Integrated low-temperature solder ring
- Dual-walled heat shrink tubed casing
- No-crimper-required tight-space application
These combine solder and heat shrink into one sleeve: slide the stripped wires in, apply heat, and the solder melts to join the wires while the sleeve shrinks and seals around them, no crimper needed at all. That makes them genuinely useful for a repair tucked inside a handlebar switch housing or headlight bucket, where there’s no room to swing a crimping tool. Riders on multiple motorcycle and boating forums report using this exact style of connector for years without issue.
The tradeoff is a real disagreement among people who do this for a living. Some professional mechanics avoid solder-seal connectors because the solder used is formulated to melt at a low temperature, and that same low-melting alloy can crack under vibration over time rather than flexing with it.
This isn’t a fringe opinion: the American Boat and Yacht Council’s (ABYC) wiring standard states that solder should never be the sole mechanical connection in a circuit, precisely because a soldered joint alone doesn’t handle vibration and flexing as well as a proper crimp does. On a bike, where everything vibrates constantly, that’s worth knowing before you commit to these for a connection that would be hard to redo later.
Wagner HT400 Heat Gun
- Best for: Even, controlled heat instead of a lighter or a torch
- Format: Single tool
Key Features
- Focused pencil-point nozzle tip
- Dual fixed-temperature heat settings
- Compact, lightweight frame maneuverability
- Hands-free built-in support stand
Both the connectors above need heat to seal properly, and a lighter gives you an open flame with no temperature control, which can scorch the tubing, melt nearby plastic on a headlight bucket or switch housing, or leave one side of the connector unsealed while the other overheats.
This heat gun runs at two fixed temperatures and its narrow, pencil-like shape is built to get into the same tight spots the connectors above need to reach, which is exactly the situation most motorcycle wiring repairs happen in.
The tradeoff: it’s a small, light-duty tool, and a handful of buyers have reported units failing after light use, which is a fair risk at this price point compared to a full-size heat gun built for daily trade use.
Given how rarely most riders reach for one of these, that’s a tradeoff worth accepting for most people, but it’s not the tool to buy if you’re doing wiring work often enough to want something that will outlast years of shop use.
Solder-Seal vs Crimp and Heat Shrink: The Real Debate
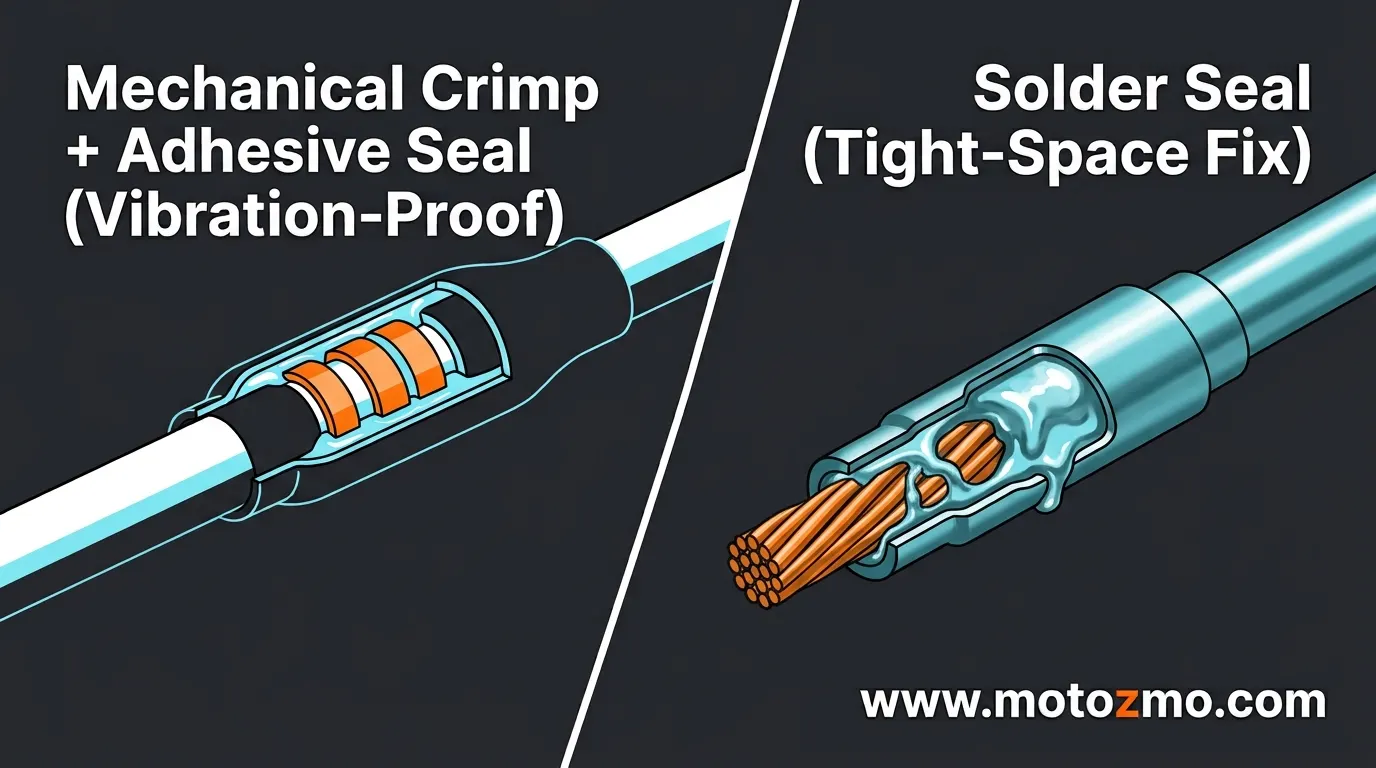
If you only take one thing from this page, it’s that these two approaches aren’t interchangeable, and picking one shouldn’t come down to whichever kit had more pieces for the price. Crimp and heat shrink, the Ancor and Wirefy combination above, gives you a mechanical connection that holds under vibration on its own, with the heat shrink there purely to seal and insulate it.
Solder seal connectors are faster and need no tool, but they lean on a low-temperature solder joint as the only thing holding the wires together, which is exactly what standards bodies like ABYC warn against for a connection that has to survive years of vibration. Keep solder-seal connectors for tight spots you genuinely can’t reach with a crimper, and default to a proper crimp everywhere else.
Before you repair anything, make sure you’ve found the real problem rather than the first bad-looking wire you see. If you haven’t already, confirm the fault with the right tool, and once the repair is done, protecting the new connection helps keep it from becoming next year’s chafe point.
Do I Need a Heat Gun, or Will a Lighter Work?
A lighter can work in a pinch, but it’s harder to control, and an open flame right next to a plastic switch housing or fairing panel is a real risk. A cheap heat gun costs less than most people expect and gives you even heat without the soot or scorch marks a lighter can leave behind.
Can I Mix Crimp Connectors from One Brand with a Crimper from Another?
You can, but the fit won’t always be as precise, since barrel thickness and shape vary slightly between manufacturers. A crimper and connector from the same brand, sized for the same wire gauge, gives the most consistent result, which is worth it for a repair you don’t want to revisit.
Whichever combination you pick, the repair is only as good as the weakest part of it. A great connector crimped badly fails the same way a bad connector does, so spend the extra few minutes on a pull test before you button everything back up.