
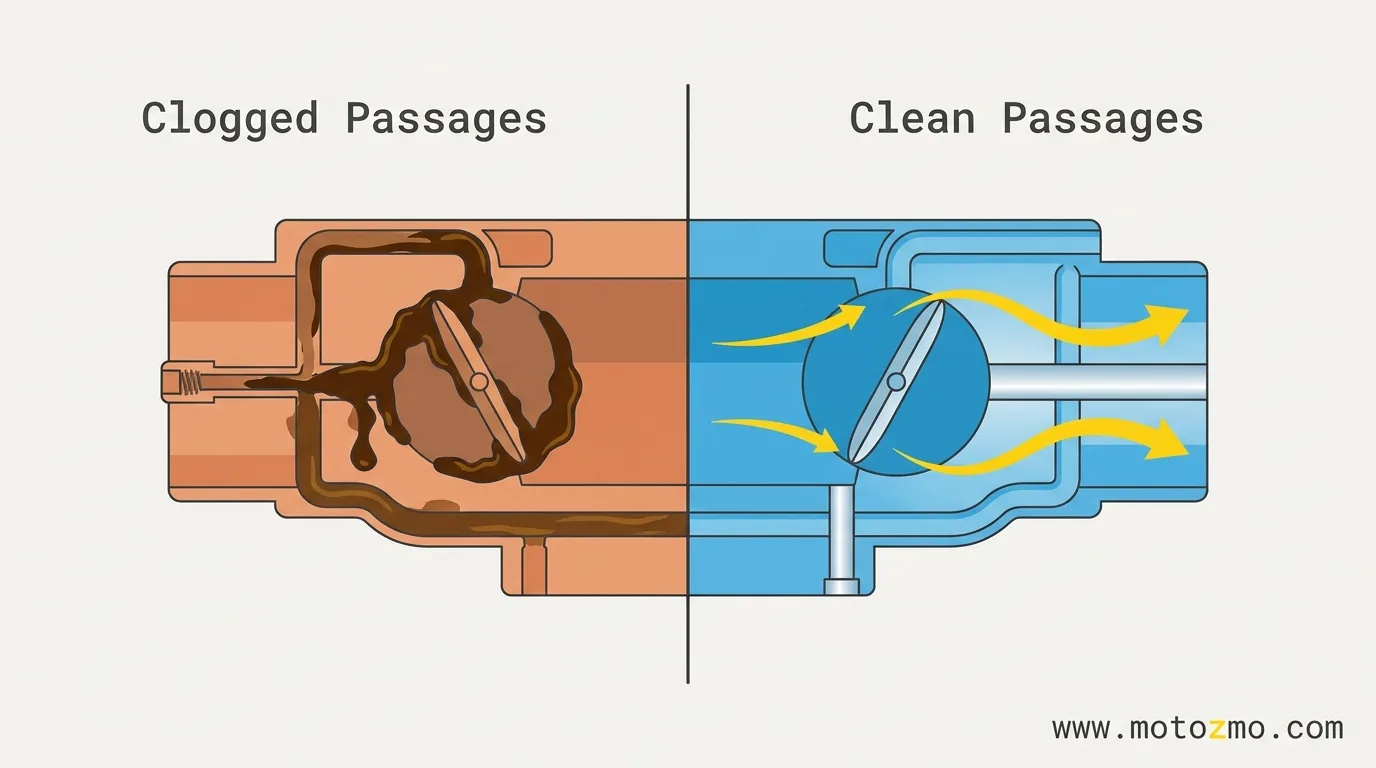
Yes, you can clean a motorcycle carburetor without pulling it off the bike, using either a carburetor cleaner sprayed through the air intake or a fuel additive run through the tank, both of which dissolve the varnish and gum deposits clogging the jets.
This works well for the light-to-moderate buildup that comes from ethanol fuel sitting too long or a bike that doesn’t get ridden often, and it saves the 2 to 3 hours a full teardown takes along with the risk of losing a tiny spring or misaligning a linkage during reassembly.
It won’t fix everything, though: a bike that’s sat over a year with old fuel, or a carb with actual physical damage, needs the real teardown this method is meant to avoid.
Key Takeaways
- In-Place Suitability: In-place cleaning with solvent sprays or fuel additives works for light-to-moderate ethanol varnish and bikes stored under a year.
- Method Choice: Aerosol carburetor spray gives fast, direct results through the intake throat; fuel additives offer a hands-off cleaning option over 20–30 miles.
- Limitations: Completely clogged jets, physical internal damage, or bikes sitting over a year require a complete carburetor removal and manual rebuild.
- Prevention: Adding fuel stabilizer and running the float bowl dry before storage prevents future ethanol separation and varnish buildup.
What Makes a Carburetor Gunk up
Modern gasoline contains up to 10% ethanol (E10), which pulls moisture out of the air. Once fuel sits in the carburetor for more than about 30 days, that absorbed moisture causes the ethanol to separate out and leave behind a sticky, varnish-like residue. That residue hits the pilot jet first, since it’s the smallest passage in the carb, then spreads to the main jet and float bowl the longer the fuel sits.
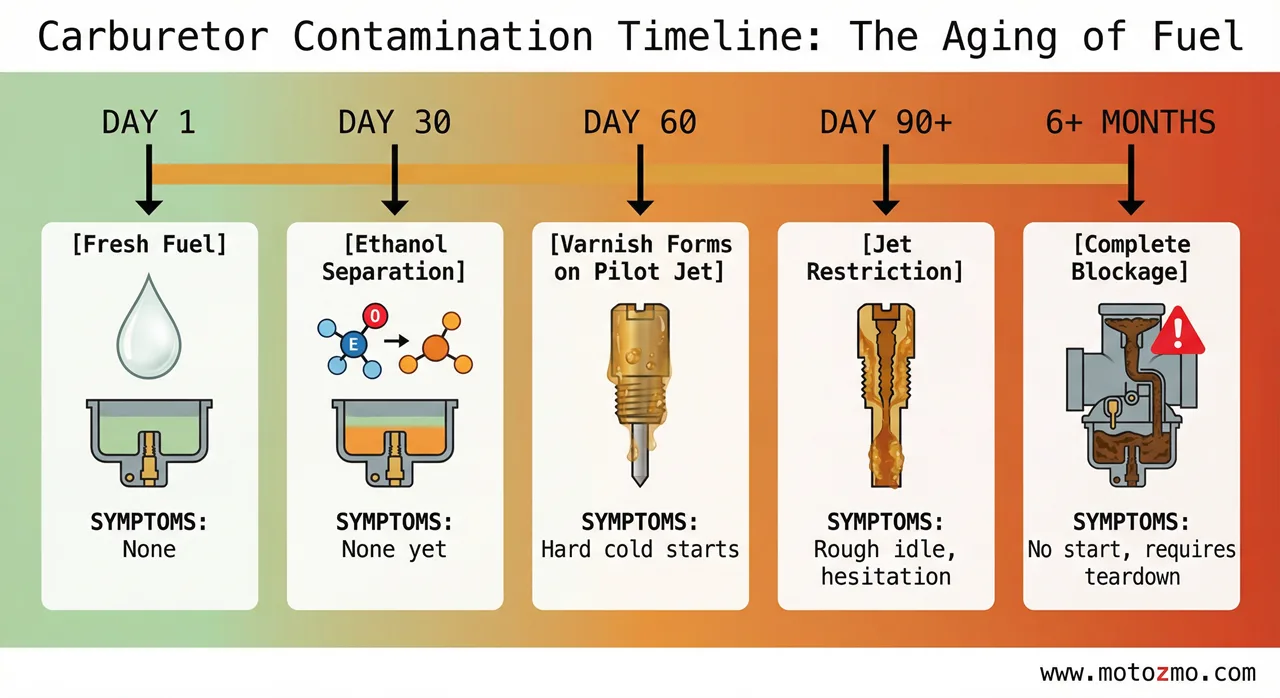
Understanding how those circuits actually work together makes it much easier to tell which symptom points to which passage. Even a thin layer of that residue is enough to cause hard cold starts, a rough or hunting idle, hesitation when you crack the throttle, stalling at low RPM, and worse fuel economy.
Is In-Place Cleaning Even the Right Fix?
Not every running problem is the carburetor’s fault, and it’s worth ruling that out before you start spraying solvent around.
| Symptom | Likely carb-related? | Notes |
|---|---|---|
| Hard starting after sitting 2+ weeks | Yes | Pilot jet clogging from stale fuel |
| Rough idle that smooths out at higher RPM | Yes | Idle circuit restriction |
| Engine dies when throttle is applied | Likely | Accelerator pump or transition circuit |
| Engine keeps cutting out randomly | Maybe | Could be electrical; check spark first |
| Black smoke from the exhaust | Maybe | Rich mixture, could be a stuck choke or float |
| Carburetor leaking fuel | Partially | Cleaning helps, but a stuck float may need physical adjustment |
| No start after 6+ months of storage | Unlikely | Jets probably need manual cleaning or replacement |
The pattern that matters most: symptoms that showed up gradually after weeks of sitting respond well to in-place cleaning. Symptoms that appeared suddenly mid-ride point somewhere else first.
What You’ll Need (and a Safety Detail Most Guides Skip)
For every method: safety glasses, chemical-resistant nitrile gloves, clean shop rags, a screwdriver set, and your bike’s service manual.
For the spray method, add an aerosol carburetor cleaner, compressed air, a small flashlight, and a drip pan. For the fuel additive method, add a fuel system cleaner like Sea Foam or Berryman B-12, fresh gasoline, and a measuring cup.
Here’s the detail most cleaning guides skip: older carburetor cleaner formulas relied on methylene chloride, an aggressive chlorinated solvent that cuts through varnish extremely well but carries real health risks, including cancer risk under California’s Proposition 65 and documented worker deaths from exposure.
California has restricted chlorinated solvents (methylene chloride among them) in carburetor and brake cleaners sold in the state since 2001, and the EPA has moved to phase out most remaining consumer uses.
If you’ve got an old can from years ago or one bought outside the U.S., check the label or safety data sheet before using it, and regardless of which product you’re using, work in a genuinely ventilated space, not just a garage with the door cracked, since these solvents are also highly flammable. Keep it away from sparks, open flame, and hot exhaust pipes, and don’t work near a running space heater or pilot light either.
Method 1: Carburetor Cleaner Spray (Most Effective)
Step 1: prepare the bike. Park on level ground in that well-ventilated space. Shut off the fuel petcock, or disconnect and plug the fuel line. Remove the seat and tank only if they’re actually blocking access; on many standard and cruiser bikes you can reach the carb from the side without pulling the tank.
Step 2: expose the intake side. Loosen the clamp holding the air filter boot to the carburetor throat and slide it back. Stuff a clean rag loosely into any newly-open passages so nothing falls in while you work.
Step 3: identify what you’re looking at. The carburetor throat is the main opening; the pilot air jet sits as a small hole or holes near the throttle butterfly; if your bike has a manual choke, that mechanism is nearby too. Your service manual has the exact layout for your specific carb.
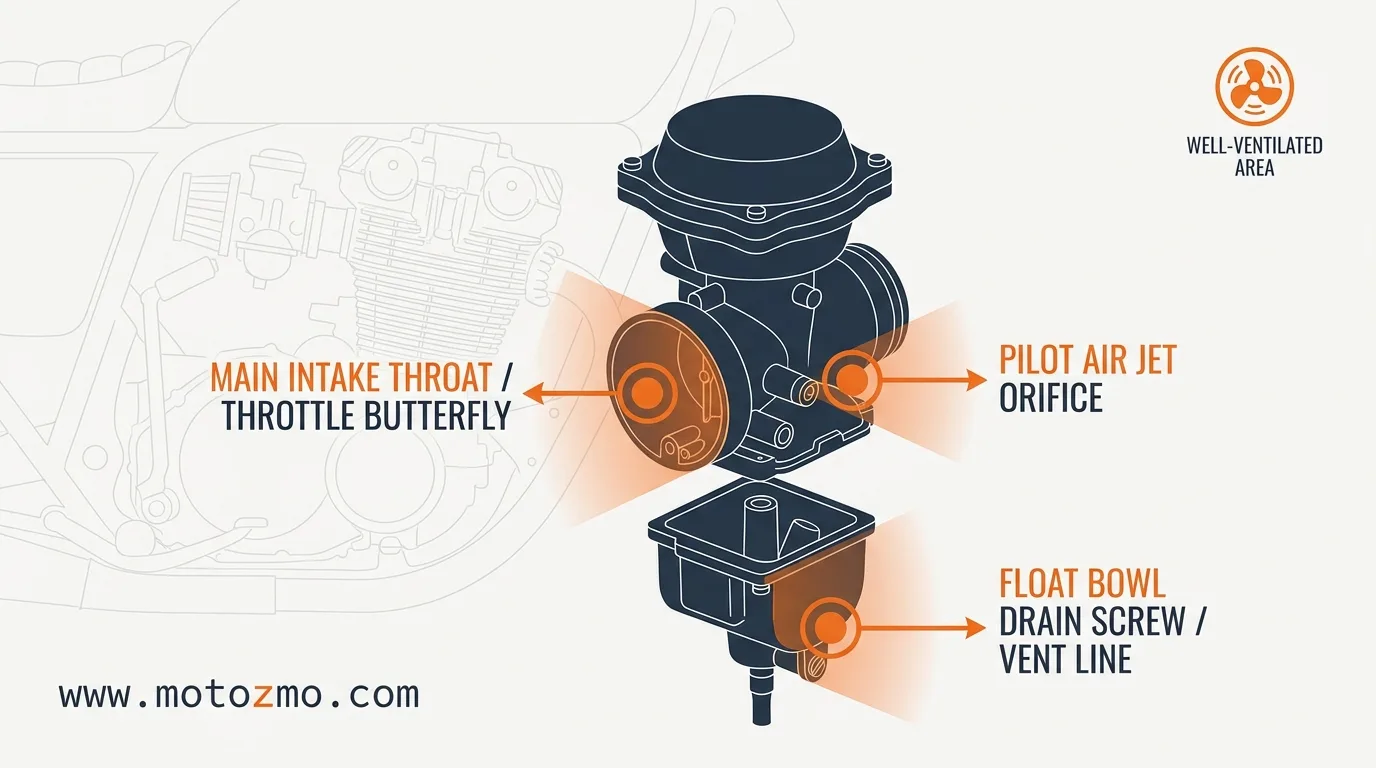
Step 4: apply the cleaner. Shake the can for a full 30 seconds. Spray in 3-to-4-second bursts into the throat, around and behind the throttle butterfly, into any visible jet openings, and into the choke mechanism. Let it soak 2 to 3 minutes, then apply a second round.
Step 5: clear it with compressed air. Once the cleaner’s had time to dissolve deposits, blow it out with compressed air, starting low and increasing only as needed. Too much pressure risks damaging a rubber diaphragm or seal, so err toward gentler airflow through jet openings specifically, saving anything approaching full pressure for general exterior surfaces well away from rubber components.
Step 6: drain the float bowl. Find the drain screw at the bottom of the float bowl, position your drip pan, and loosen it. Count the turns as you go so you can return it to the exact same position, and let the contaminated fuel run out until it comes out clear rather than looking like brown sludge. If it’s still cloudy, repeat steps 4 and 5.
Step 7: reassemble and test. Reinstall the air filter boot and clamp, turn the fuel back on, and let the engine warm up for a couple of minutes. Listen for a smooth, steady idle with no hunting, then blip the throttle a few times through the RPM range to confirm the response is clean.
Method 2: Fuel Additive Treatment (Easiest, but Slower)
This method needs no tools; the cleaner mixes into your gas and works its way through the carburetor over normal riding. It’s a genuinely different dosage than most people assume, and getting this wrong is a common mistake.
For actual cleaning, not just routine maintenance, Sea Foam’s own guidance calls for at least 2 ounces per gallon in a low tank, going higher for heavier deposits, since more concentrated treatment cleans more effectively. The 1-ounce-per-gallon rate you’ll see on a lot of product labels is the maintenance dose meant to prevent buildup in the first place, not the dose meant to clear an already-dirty carburetor.
Start with a low tank, no more than 1 to 2 gallons, add the cleaning concentration, and ride 20 to 30 miles to circulate the treated fuel before topping off with fresh gas. For genuinely heavy deposits, some riders go stronger still and let the bike sit overnight before the first start, giving the treatment extra soak time in the bowl and jets.
The real limitation: a fuel additive cannot reach a jet that’s already completely blocked. If fuel isn’t flowing through a passage at all, the additive never gets to the deposit causing that blockage, and you’ll need the spray method or physical cleaning instead.
Method 3: Compressed Air (Supplemental Only)
Air alone clears loose debris but doesn’t dissolve varnish or gum, so use it alongside a cleaner, not as a standalone fix.
It’s genuinely useful after winter storage to blow out dust and insects, right after a spray cleaner application to finish clearing dissolved residue, and for clearing water droplets out of fuel system components.
Keep pressure modest around jet openings and rubber seals specifically; save higher pressure for general exterior cleaning well clear of anything rubber, since excess pressure risks pushing debris deeper into a passage instead of out of it, or damaging a diaphragm.
Re-Tuning After Cleaning
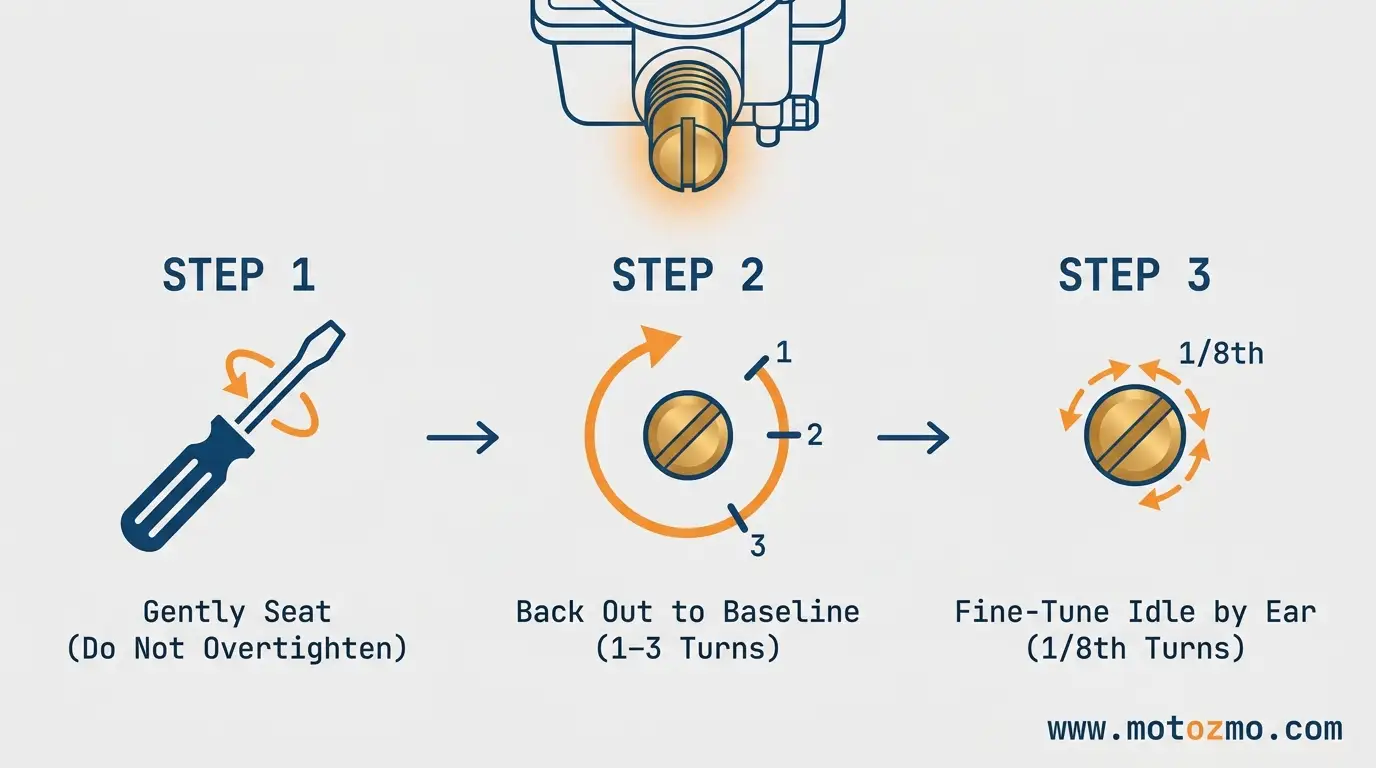
If you turned any adjustment screws during cleaning, the fuel-air mixture may need resetting. Warm the engine to full operating temperature first.
Find the pilot screw, usually on the airbox side of the carb body, turn it clockwise until it seats lightly without overtightening, then back it out to your bike’s factory-specified setting, commonly somewhere between 1 and 3 turns depending on the model, so check your manual rather than assuming a universal number.
From there, fine-tune by ear in small eighth-turn increments until idle sounds smooth. Here’s the fuller walkthrough for adjusting your specific carburetor’s air-fuel mixture if you want more detail than the quick version above.
When In-Place Cleaning Won’t Cut It
Complete jet blockage. If zero fuel flows through a jet, spray cleaner has nothing to dissolve its way into. The jet needs physical cleaning with a wire or replacement.
A damaged diaphragm. A torn or stiffened diaphragm breaks the vacuum operation the carb depends on, and no amount of cleaning fixes mechanical damage.
A stuck float valve. Jammed open floods the engine; jammed closed starves it. Either way it needs hands-on inspection, and a leaking carburetor specifically often traces back to this rather than anything a cleaner can reach.
Multiple carburetor banks. Inline-four bikes running four synchronized carbs need precise balancing. If cleaning throws that synchronization off, you’re looking at a sync tool and possibly removal, not just a rag and some spray.
Storage beyond a year. Fuel that’s sat that long turns to varnish throughout the whole system, and internal passages, O-rings, and gaskets likely need replacing outright rather than cleaning.
If engine noise under acceleration or performance issues persist after a proper in-place cleaning, the problem has likely moved past the carburetor into something else entirely.
Preventing It From Coming Back
Add fuel stabilizer any time the bike will sit more than two weeks; it’s the single biggest lever against the ethanol separation that causes this problem in the first place.
Run the carb dry before storage by shutting the petcock and letting the engine stall out on its own, which empties the bowl and jets rather than leaving treated or untreated fuel to varnish inside them.
Riding regularly, even a 15-minute ride, circulates enough fresh fuel to keep passages from gumming up between rides. And if you can find it, ethanol-free “recreational” or REC-90 fuel removes the root cause entirely; Pure-Gas.org maintains a crowd-sourced list of stations that carry it.
It’s also worth keeping the choke mechanism itself clean, since a sticky choke produces similar cold-start symptoms and often gets blamed on the jets instead.
Bottom Line
Match the method to the deposit: spray cleaner for anything more than light buildup, a fuel additive for gradual maintenance cleaning, and compressed air only as a supplement to one of the other two. And don’t skip the safety read on whatever can you’re spraying; a chemical strong enough to dissolve years of varnish deserves more ventilation than a half-open garage door.
FAQs
How often should I clean my motorcycle carburetor?
Every 12 to 18 months for regular riders, or at the start and end of the season for seasonal riders. A monthly fuel additive during active riding helps prevent buildup between full cleanings.
Can carburetor cleaner damage rubber seals or gaskets?
Yes, with prolonged exposure. Spray in short bursts rather than soaking rubber components, and be aware that some older or imported formulas use more aggressive chlorinated solvents than modern U.S. products typically do.
Will cleaning fix a motorcycle that won’t start at all?
It can fix hard starting caused by clogged jets. If the engine cranks but won’t fire under any circumstances, check for spark and fuel flow first; a complete blockage may need the jet removed entirely.
Does Sea Foam actually work for this?
Yes, for light to moderate deposits, though it works gradually rather than instantly. For actual cleaning rather than routine maintenance, use the 2-ounce-per-gallon (or higher) rate, not the 1-ounce maintenance dose.
How long does in-place cleaning actually take?
The spray method runs 20 to 30 minutes including reassembly. The fuel additive method needs roughly one tank of riding, commonly 100 to 150 miles depending on tank size, to circulate fully.
Can I use throttle body cleaner instead?
It’ll work, but it’s formulated with milder solvents than dedicated carburetor cleaner and won’t cut through heavier deposits as effectively. Use whichever the product label specifies for your actual application.