
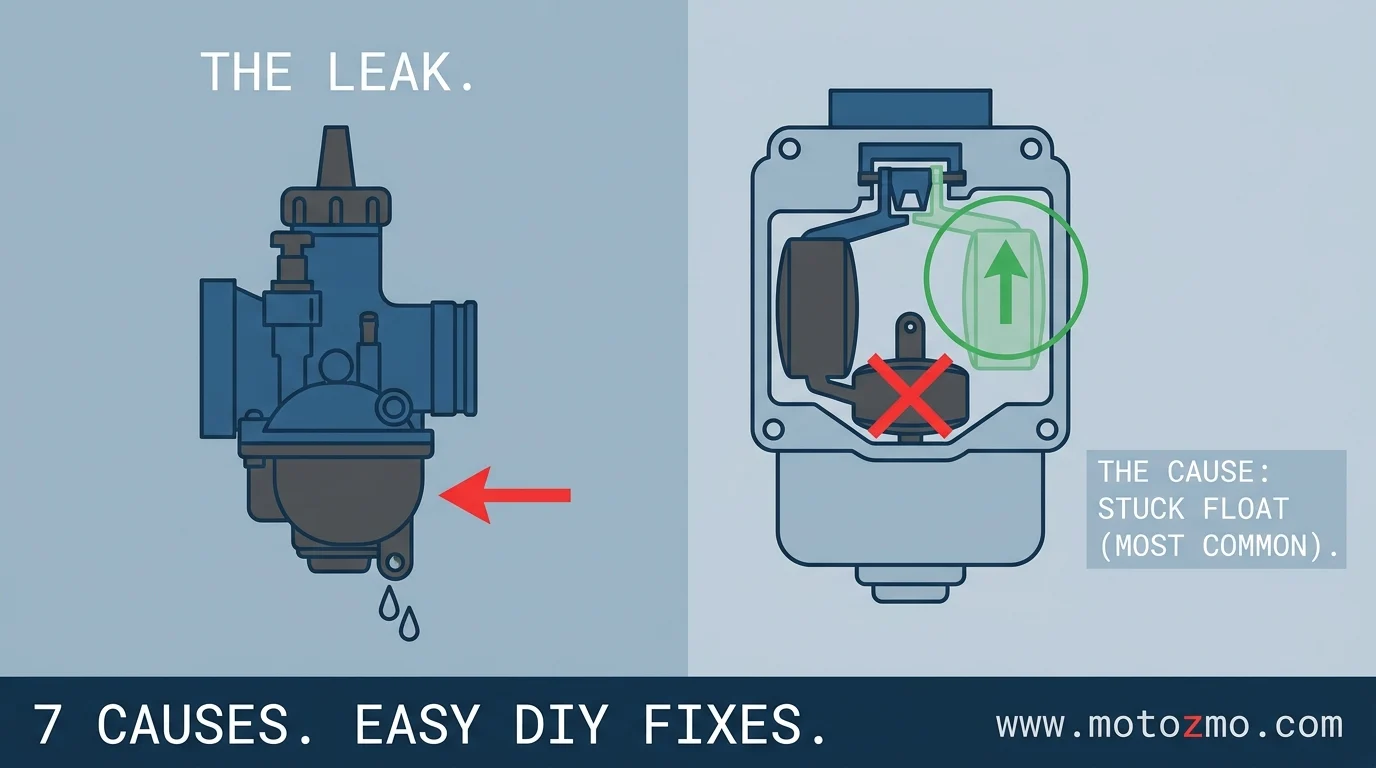
A motorcycle carburetor almost always leaks gas because the float needle isn’t sealing, and the four usual reasons are a stuck float, a worn needle or seat, incorrect float height, or a blocked gas cap vent building pressure in the tank.
Cracked gaskets, a split overflow tube, and a failing petcock account for most of what’s left. None of these require a mechanic in the majority of cases; with basic hand tools and about 30 minutes, you can usually trace the leak to its source and fix it yourself.
This guide walks through diagnosis first, since fuel dripping from three different spots can look identical from underneath the bike, then covers the fix for each of the seven causes, a full repair walkthrough, and what actually prevents this from happening again.
For the wider carburetor picture beyond just leaks, our motorcycle carburetor maintenance guide covers jets, sync, and the choke circuit too.
Key Takeaways
- Diagnosis is Step 1: Don’t just clean it. Pinpoint the source. Use the “Where’s It Leaking?” guide to trace the fuel source before removing a single bolt.
- It’s Usually One Thing: In 90% of cases, the float needle isn’t sealing. This is almost always caused by a stuck float (due to debris/sitting) or a worn-out float needle tip.
- DIY-Friendly Fix: For a single carburetor, this is a 30-minute, $20 DIY job using basic hand tools. A shop will likely charge you $150–$300 for the exact same repair.
- Prevent Future Leaks: A leaking carb is almost always preventable. Simple habits like turning off your petcock and adding fuel stabilizer before storage stop the varnish buildup that causes floats to stick.
Where Is the Leak Coming From?
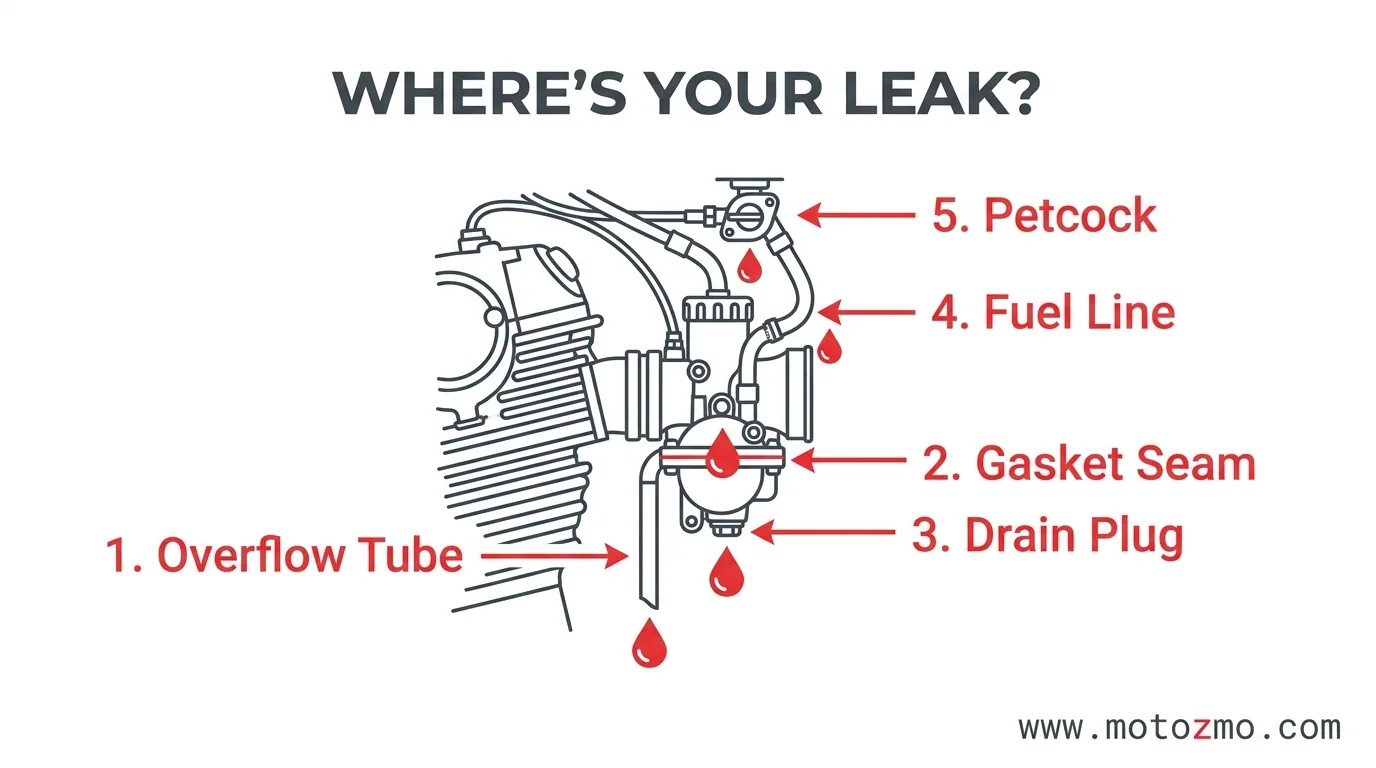
Fuel dripping from underneath the bike can come from several places that all look like “the carburetor” at first glance. Narrow it down before you disassemble anything.
| Leak location | What you’ll see | Likely cause |
|---|---|---|
| Overflow tube hanging below the carb | Steady drip or stream | Stuck float, worn needle, float set too high |
| Seam between the bowl and carb body | Wet ring around the bowl edge | Bad gasket, loose bowl screws |
| Drain plug at the bottom of the bowl | Drip from dead center | Missing washer, loose plug |
| Fuel line connections | Wet at the hose clamps | Cracked hose, loose clamp |
| Around the petcock | Wet around the valve body | Failed petcock diaphragm or seal |
| Under the gas tank, near the cap | Drip near the cap seam | Blocked vent, cracked tank seam |
Before you disassemble anything:
- Turn the petcock to OFF or RES and wait five minutes. If the leak stops, the problem lives inside the carburetor or petcock, not further upstream.
- Run your fingers along every fuel line, feeling for cracks or dampness.
- Open the gas cap and listen. A hiss means pressure was trapped, which points to a blocked vent.
- Tap the float bowl gently with a screwdriver handle. A stuck float sometimes frees itself, which confirms the cause without fixing it permanently.
If the leak continues with the petcock off, fuel already in the bowl is draining through a bad seal. If it stops, the problem is upstream in fuel flow control: float, needle, or petcock.
7 Causes of a Leaking Motorcycle Carburetor
Work through these roughly in order of likelihood.
1. Stuck Float
The float rises with fuel level and pushes the needle into its seat to stop flow. When it sticks low, fuel keeps entering and floods out the overflow.
Why floats stick: fuel residue and varnish from sitting, ethanol deposits, corrosion inside the chamber, or a bent pivot pin.
Symptoms: fuel streaming from the overflow tube, a leak that only starts once the petcock opens, a strong gas smell after parking.
The fix: tap the bowl bottom with the petcock open. If fuel stops, the float freed temporarily, confirming the diagnosis without solving it. For a permanent fix, pull the float bowl, lift out the float, and check the pivot pin for binding. Clean the whole chamber with carburetor cleaner and confirm the float swings through its full range before reassembling. Our breakdown of how a motorcycle carburetor works helps if you want to see how the float, needle, and bowl relate before you start.
2. Worn Float Needle or Seat
The needle tip, usually rubber or Viton, seals against a brass seat every time fuel enters the bowl. Rubber hardens and grooves with age; the seal stops closing fully.
Symptoms: a slow, persistent drip that worsens with a full tank (more fuel pressure pushing past the seal), and a leak that continues even after cleaning.
The fix: pull the needle and inspect the tip under good light for a wear ring, hardened shiny rubber, or cracks. Check the seat too; corrosion or debris there prevents a full seal just as easily as a worn tip does. Worth knowing before you order parts: a lot of “worn needle” leaks are actually just a speck of dirt sitting between the needle and seat, which is why some leaks clear up entirely after a test ride flushes the chamber with fresh fuel. If tapping the bowl and running the engine doesn’t clear it, replace the needle and seat as a matched set, since they wear together and seal best when new.
3. Incorrect Float Height
Float height sets how much fuel the bowl holds before the needle shuts off flow. Too high, and fuel reaches the overflow before the needle closes.
There’s no single universal spec here; real motorcycle carbs range roughly from 14mm to 22mm-plus depending on the model, and the only number that matters is the one in your service manual.
Symptoms: intermittent overflow that shows up on bumpy roads, a rich-running condition with black exhaust smoke, or a fuel smell right at idle.
How to measure: remove the bowl, hold the carb body upside down with the float hanging free, and measure from the gasket surface to the float’s highest point. An alternate method: attach clear vinyl tubing to the bowl drain with the petcock on; fuel in the tube should sit 2-4mm below the gasket surface. Some techs prefer a third method instead: with the bowl off and the carb tipped on its side, blow gently into the fuel inlet while slowly lifting the float; the point where airflow stops is your measuring point.
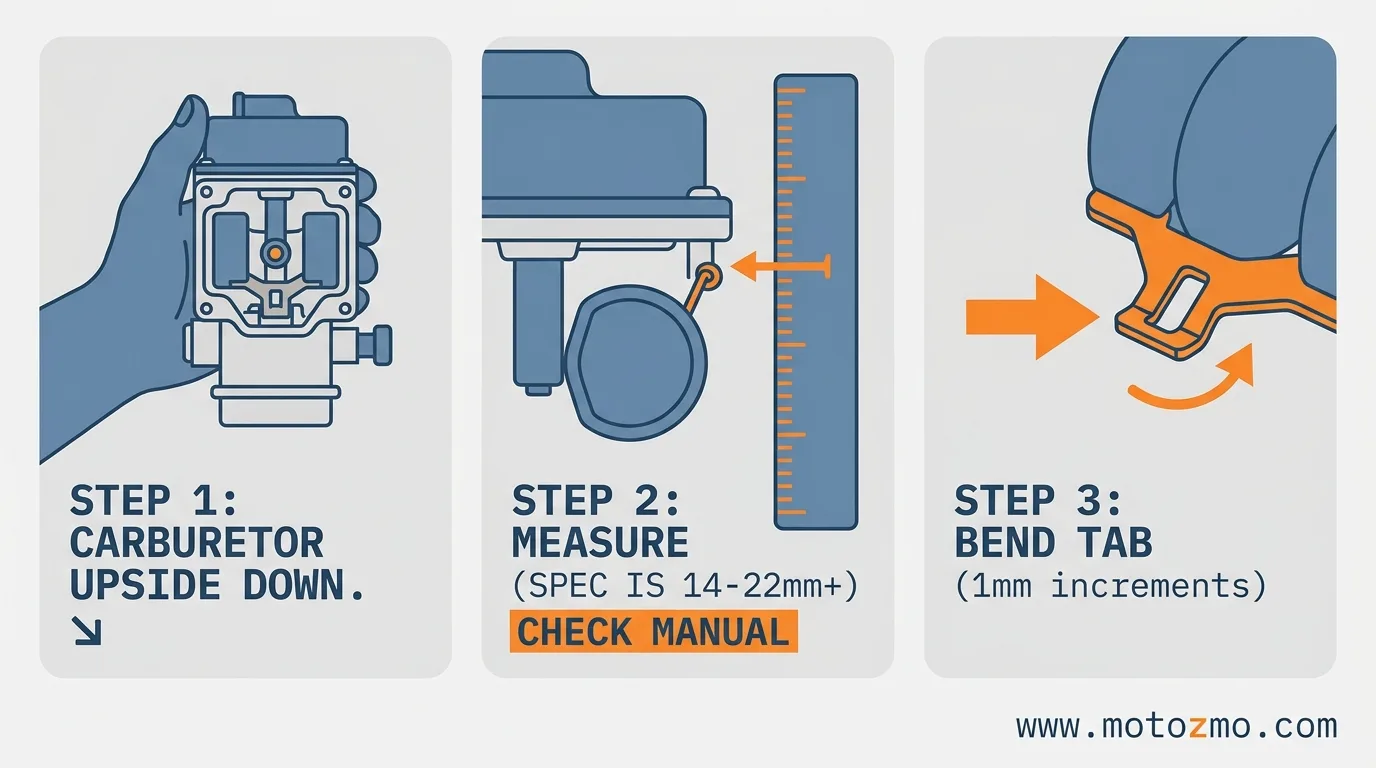
The fix: bend the metal tab that contacts the needle. Away from the needle lowers the fuel level; toward it raises the level. Move in roughly 1mm increments, since small changes shift the mixture noticeably. Float height changes directly affect your air-fuel mixture, so it’s worth rechecking the air-fuel mixture screw setting after any adjustment here.
4. Blocked Gas Cap Vent
The cap has a small vent hole or valve that lets air into the tank as fuel leaves. Block it, and the tank pressurizes, forcing fuel into the carb faster than the engine can use it.
Symptoms: a leak that develops after riding rather than during, a hiss when you open the cap, a tank that feels vacuum-sealed.
The fix: remove the cap and clear the vent passage with compressed air or a thin wire. If there’s a small rubber valve, confirm it moves freely. Test by riding a short distance with the cap slightly loose; if the leak stops, the vent was the problem, and a stubborn one usually means a new cap rather than more cleaning. A pressurized tank forcing extra fuel through the carb can also show up as the engine cutting out mid-ride, which our guide to a motorcycle engine that keeps cutting out covers from that angle.
5. Faulty Petcock Valve
The petcock controls fuel flow from tank to carburetor. Vacuum-operated types use engine vacuum to open; when the diaphragm fails, fuel flows constantly, even with the engine off. Manual petcocks develop worn seals that leak past the shutoff position instead.
Symptoms: fuel leaking with the engine off, a flooded carb after sitting overnight, a petcock lever that feels loose or ineffective.
The fix: remove the petcock, and inspect the diaphragm (vacuum type) or internal seals (manual type). Rebuild kits exist for most petcocks and typically cost under $20. Replace the whole unit if the body shows corrosion or physical damage, and use fuel-resistant sealant on the tank threads during reinstallation.
6. Damaged Bowl Gasket or Drain Plug
The gasket between the bowl and carb body seals fuel inside; it compresses, hardens, and cracks with age. A loose drain plug, or one with a worn washer, drips from the bottom instead.
Symptoms: a wet ring around the bowl’s perimeter, or a drip from dead center at the bottom that worsens with a fuller bowl.
The fix: replace the gasket at any sign of hardness, cracking, or compression. Use OEM or good-quality aftermarket gaskets; cheap ones swell in ethanol-blended fuel and fail fast. Replace the drain plug washer with fresh fiber or copper, and snug the plug without overtightening; it’s easy to crack the bowl casting.
7. Cracked Overflow Tube
The overflow tube routes excess fuel away from the engine, either molded into the bowl or attached as an external hose. A crack, especially where the tube meets the casting, leaks fuel even when the float system works fine.
Symptoms: a drip from the overflow despite a new needle and seat, a leak tied to specific fuel levels rather than constant, or visible damage to the tube.
The fix: inspect the tube inside and out for hairline cracks. Replace a cracked tube outright, or use fuel-resistant epoxy for minor damage, and make sure every hose connection seats tightly.
Full Repair Walkthrough
Tools: flathead and Phillips screwdrivers, 8mm and 10mm wrenches or sockets, needle-nose pliers, carburetor cleaner spray, clear vinyl tubing, clean rags, a drain pan, and whatever replacement parts your diagnosis calls for.
- Turn off the petcock and run the engine until it stalls to empty the bowl.
- Remove the carburetor if access is tight; many bikes let you work with it still mounted. Disconnect the fuel line and overflow hoses either way.
- Remove the float bowl screws and pull the bowl straight down, catching any remaining fuel.
- Lift out the float and needle assembly, noting the orientation before you set it down.
- Clean every part with carburetor cleaner, paying attention to the needle seat, float pivot, and jets. For light buildup elsewhere in the carb, cleaning it without removing it covers the in-place method.
- Inspect the needle tip and seat, and replace if worn.
- Check float height with the carb inverted, and adjust the tab if it’s off spec.
- Install new gaskets and reassemble in reverse order.
- Reconnect fuel, turn the petcock to ON, and watch closely for leaks before starting the engine.
- Start the engine, let it warm up, and confirm nothing’s escaping from the overflow or bowl seam.
If your bike’s choke is also acting up, sticking or flooding on cold starts, this is a natural point to also handle cleaning the choke while everything’s already apart.
Preventing Future Leaks

| Habit | Why it matters |
|---|---|
| Turn off the petcock after every ride | Stops fuel from sitting in the bowl under constant pressure |
| Use ethanol-free fuel where it’s available | Ethanol degrades rubber seals faster and leaves more deposits behind |
| Add fuel stabilizer before any storage period | Prevents the varnish buildup that causes stuck floats in the first place; our winter storage stabilizer guide covers picking and using one |
| Don’t overfill the tank | Reduces pressure on the cap vent and downstream carburetor |
Maintenance schedule: drain the float bowl every 3 months to clear water and sediment, inspect fuel lines and clamps every 6 months, and plan on a full rebuild with new gaskets, needle, and seat every 2 years. Before any extended storage, drain the carburetor completely or run it dry; our winterizing decision guide covers when that’s actually necessary versus overkill.
One current wrinkle worth knowing: on March 25, 2026, the EPA issued a nationwide summer waiver making E15 (15% ethanol) gasoline more widely available at pumps that don’t always clearly separate it from E10. E15 isn’t approved for motorcycles, and misfueling with it accelerates exactly the rubber degradation and varnish buildup behind most of the causes above. Worth double-checking the pump label if you’re filling up somewhere unfamiliar this summer.
DIY vs Shop Cost
| Job | DIY | Shop |
|---|---|---|
| Rebuild kit (gaskets, needle, seat) | $15-50 per carburetor | Included in labor quote below |
| Single-carb rebuild, parts and labor | N/A | $150-300 |
| Multi-carb bike, including sync after reassembly | N/A | $250-600 |
| Petcock rebuild kit | Under $20 | Add roughly 1 hour of labor |
Rough math: at a typical $75-150/hour shop labor rate, a straightforward single-carb job runs one to two hours plus parts, which is where that $150-300 shop range comes from. Get quotes from two or three shops if the estimate feels high, since labor rates vary a lot by region.
When to Call a Mechanic
Most leaks respond to DIY repair, but a few situations are worth handing off:
- Multiple carburetors that need synchronizing after reassembly; this takes tools and experience most home garages don’t have.
- A leak that persists after a full rebuild, which points to warped casting or damage beyond the usual wear parts.
- No service manual available for your specific model; guessing at reassembly order and torque specs causes more problems than the original leak.
- Fuel showing up in the engine oil, which means the leak flooded a cylinder. This needs an inspection beyond carburetor repair, not just a gasket swap.
Safety Reminders
Gasoline work carries real hazards. Work outdoors or somewhere ventilated, since vapors pool at floor level. No open flames or sparks nearby, including pilot lights and cigarettes.
Keep a drain pan under the carb and wipe spills immediately, and wash your hands before touching anything else, since fuel residue transfers easily.
Route overflow hoses down and away from the exhaust; a drip onto a hot header ignites instantly. If the bike’s tipped over, wait 10-15 minutes before starting it, since fuel may have entered the combustion chamber.
FAQs about Motorcycle Carb Leaking Gas
Why does my carburetor leak only when parked overnight?
A failing petcock lets fuel flow continuously even with the engine off, so the float bowl fills, overflows, and drains while you sleep. Shutting the petcock off after every ride prevents this specific pattern.
Can fuel additives stop a carburetor leak?
No. Stabilizers and cleaners prevent future gum and varnish buildup, but they can’t repair a worn needle, seat, or gasket that’s already failed. Use them for prevention, not as a fix for an active leak.
How do I know if my float is punctured?
Remove it and shake it gently near your ear. Sloshing means fuel entered through a crack. A punctured float sinks instead of rising, which causes constant overflow instead of a normal fuel level.
Will a carburetor leak damage my engine?
It can, if fuel reaches the crankcase and dilutes the oil, which destroys lubrication. Check your oil level and smell it. Oil that reeks of gas needs changing immediately, even before you fix the leak.
Is it safe to ride with a small carburetor leak?
No. Even a small drip near hot engine components is a fire risk, and a leak rarely stays small once fuel keeps washing past a bad seal. Fix it before your next ride.
How much does a carburetor rebuild cost?
DIY kits run $15-50 per carburetor. Shop labor for a single-carb bike typically runs $150-300 including parts; multi-carb bikes that also need synchronizing run higher, often $250-600.
Why does my carb leak after sitting all winter?
Old fuel leaves varnish on the needle and seat, and ethanol speeds up the process. The residue keeps the needle from seating fully, producing the same leak symptoms even with parts that aren’t worn.
Should I worry about E15 fuel causing this?
More than in past years. EPA’s 2026 nationwide summer waiver made E15 more widely available at pumps that don’t always label it clearly, and it’s not approved for motorcycles; misfueling accelerates the exact deposit and corrosion problems covered here.