
Maintaining a motorcycle engine comes down to six recurring tasks, oil, coolant, fuel, air, spark, and valves, each on its own mileage or time interval, plus a couple of habits that matter more than most guides mention.
None of it is complicated on its own. What trips riders up is treating every task like it applies the same way to every bike: not every motorcycle has coolant to maintain, not every spark plug wears out at the same rate, and plenty of engines don’t need the valve adjustments most checklists assume are universal. Get the specifics right for your actual engine, and staying ahead of breakdowns is mostly a matter of showing up on schedule.
Key Takeaways
- Break-in period matters: Avoid holding a steady RPM and skip full throttle during the first few hundred miles to ensure piston rings seat properly.
- Oil is specific: Don’t use car oil. Follow your manual’s exact interval and oil grade, and change the filter every time.
- Coolant is crucial (if you have it): Change liquid coolant every two years (or per OAT rating) to prevent engine damage.
- Spark plugs vary by material: Copper plugs need frequent changes; modern iridium or platinum plugs last significantly longer.
- Valves need checking (usually): Unless you have hydraulic lifters, valve clearances must be checked to prevent lost compression and burnt valves.
- Warm up properly: Let the engine idle for 30-60 seconds before riding hard to ensure oil protects moving parts during a cold start.
At a Glance: Your Maintenance Schedule
| Task | Typical interval | Adjust sooner if… |
|---|---|---|
| Oil and filter | Per your owner’s manual, often 3,000–8,000 mi | Frequent short trips, stop-and-go city riding |
| Coolant (liquid-cooled only) | ~2 years or 24,000 mi | Coolant looks murky or brown |
| Fuel filter | 15,000–30,000 mi | Bike runs rough, hesitates, or stalls |
| Air filter | 5,000–10,000 mi | Riding in dust or unpaved roads |
| Spark plugs | 4,000–8,000 mi (copper) or 15,000–26,000 mi (iridium/platinum) | Hard starting, misfires, rough idle |
| Valve clearance | Per manual, commonly 8,000–16,000 mi (some engines never) | Ticking noise at idle |
Before Your First Real Ride: Breaking in a New or Rebuilt Engine
If the engine under you is new or freshly rebuilt, the maintenance clock doesn’t start until you’ve broken it in correctly, and skipping this step is a mistake you can’t fully undo later.
Most manufacturers ask you to vary the RPM during the first several hundred miles rather than holding one steady speed, avoid full throttle, and skip towing or heavy loads. Varying the RPM helps piston rings seat evenly against the cylinder wall, which is what gives the engine proper compression and oil control for the rest of its life.
Once you’re past the break-in mileage in your manual, occasional high-RPM riding on a healthy, properly maintained engine isn’t something to be afraid of, but during break-in itself, restraint matters.
1. Oil and Oil Filter
Oil is what keeps every moving part inside the engine sliding instead of grinding, and it loses that ability over time as it picks up heat cycles and combustion byproducts. Intervals vary more than people expect: some bikes call for 3,000 miles on conventional oil, others go 8,000 miles or more on full synthetic, and stop-and-go city riding shortens whatever interval your manual lists.
Rather than guess at a number here, check the specific interval for your bike, since using a car’s rule of thumb on a motorcycle engine, which runs hotter and revs harder for its size, is a common and costly mistake.
Change the filter every time you change the oil, not every other change. A clogged filter restricts oil flow to the exact parts that need it most, and the filter itself costs a few dollars against an engine rebuild that costs thousands.
If you’re doing this yourself for the first time, here’s the full process from drain to refill, and it’s worth knowing which oil actually suits a four-stroke engine before you buy whatever’s cheapest on the shelf.
Common mistake: topping off dark, old oil instead of changing it. Oil that looks fine on the dipstick has often already lost its additive package; color alone doesn’t tell you whether it’s still protecting the engine.
2. Coolant, But Only If Your Engine Has Any
This one doesn’t apply to every bike. Air-cooled engines, common on cruisers, singles, and plenty of older machines, have no coolant system at all, so skip straight to the fuel section if that’s what you’re riding.
If your bike is liquid-cooled, the coolant is doing real work: carrying heat away from the cylinders to a radiator where it can dissipate. How hot a motorcycle engine actually runs without that cooling working properly is enough to cause real damage fast.
Check the reservoir when the engine is warm and keep it at the “full” mark; a low level lets air pockets form, which reduces how effectively the coolant can carry heat.
The standard rule of thumb is a full coolant change every two years or roughly 24,000 miles, though some newer long-life formulations (OAT-type coolants) are rated by their manufacturers for three to five years. Check your specific coolant’s label rather than assuming, since mixing an old-style coolant with a long-life one can shorten both their lifespans.
Common mistake: topping off with plain tap water in an emergency and forgetting to flush it out later. Tap water minerals encourage scale buildup inside the radiator over time; get back to a proper mix as soon as you reasonably can.
3. Fuel System
Use the octane your manual specifies, not a higher grade “just in case.” Higher octane doesn’t clean anything or add power on an engine that wasn’t designed to need it; it just costs more per gallon.
Buy from stations with reasonable turnover so you’re not getting fuel that’s been sitting in an underground tank for months, and try not to let the tank run consistently low, since that gives condensation more room to form and work its way into the fuel line.
The fuel filter catches dirt and water before they reach the injectors or carburetor jets, and a neglected one is a common, boring cause of a bike that runs rough or stalls unpredictably for no obvious reason.
Manufacturer intervals typically fall between 15,000 and 30,000 miles, though carbureted bikes benefit from more frequent attention to the jets themselves, not just the filter; a proper carburetor cleaner handles the varnish buildup a fuel filter alone won’t catch.
Common mistake: assuming a fuel additive fixes a filter or jet that’s already clogged. Additives help prevent buildup in fresh fuel; they don’t dissolve a blockage that’s already solid.
4. Air Filter
The filter’s whole job is keeping dirt out of the combustion chamber, and it does that job until it’s so clogged it starts restricting the airflow the engine needs. Most manuals call for inspection at every oil change and replacement every 5,000 to 10,000 miles, sooner if you’re riding somewhere dusty. Pull it, hold it up to light, and if daylight barely gets through, it’s done.
Foam filters can usually be washed and re-oiled; paper filters get replaced, not washed, since water breaks down the paper media. Here’s a closer look at whether an aftermarket reusable filter is worth it over the stock paper element.
Common mistake: washing a paper filter because it looks salvageable. It might look clean afterward, but the water has already compromised the material’s ability to trap fine particles.
5. Spark Plugs
Plug life depends almost entirely on the material, and this is where a lot of maintenance advice understates how long a modern plug actually lasts. Copper plugs wear fastest, typically needing replacement every 4,000 to 8,000 miles as the softer electrode erodes and the gap grows.
Platinum and iridium plugs hold their shape far longer; on a motorcycle specifically, that commonly means somewhere in the 15,000 to 26,000 mile range, noticeably shorter than the 60,000-plus miles iridium plugs often achieve in cars, since motorcycle engines spend more time at higher RPM relative to their size. Check your manual for the number that applies to your actual plug type rather than assuming one figure covers every bike.
Pulling a plug during a check tells you more than just whether it needs replacing. A sooty, black deposit usually points to a rich fuel mixture or a dirty air filter; a wet plug often means the engine’s not reaching full combustion temperature on short trips. If the engine sounds off under acceleration around the same time plugs are due, it’s worth checking both at once rather than assuming they’re unrelated.
Common mistake: using the wrong heat range because it was on sale. The heat range is matched to your specific engine’s thermal characteristics; a plug that runs too cold fouls easily, and one that runs too hot risks pre-ignition.
6. Valve Clearance
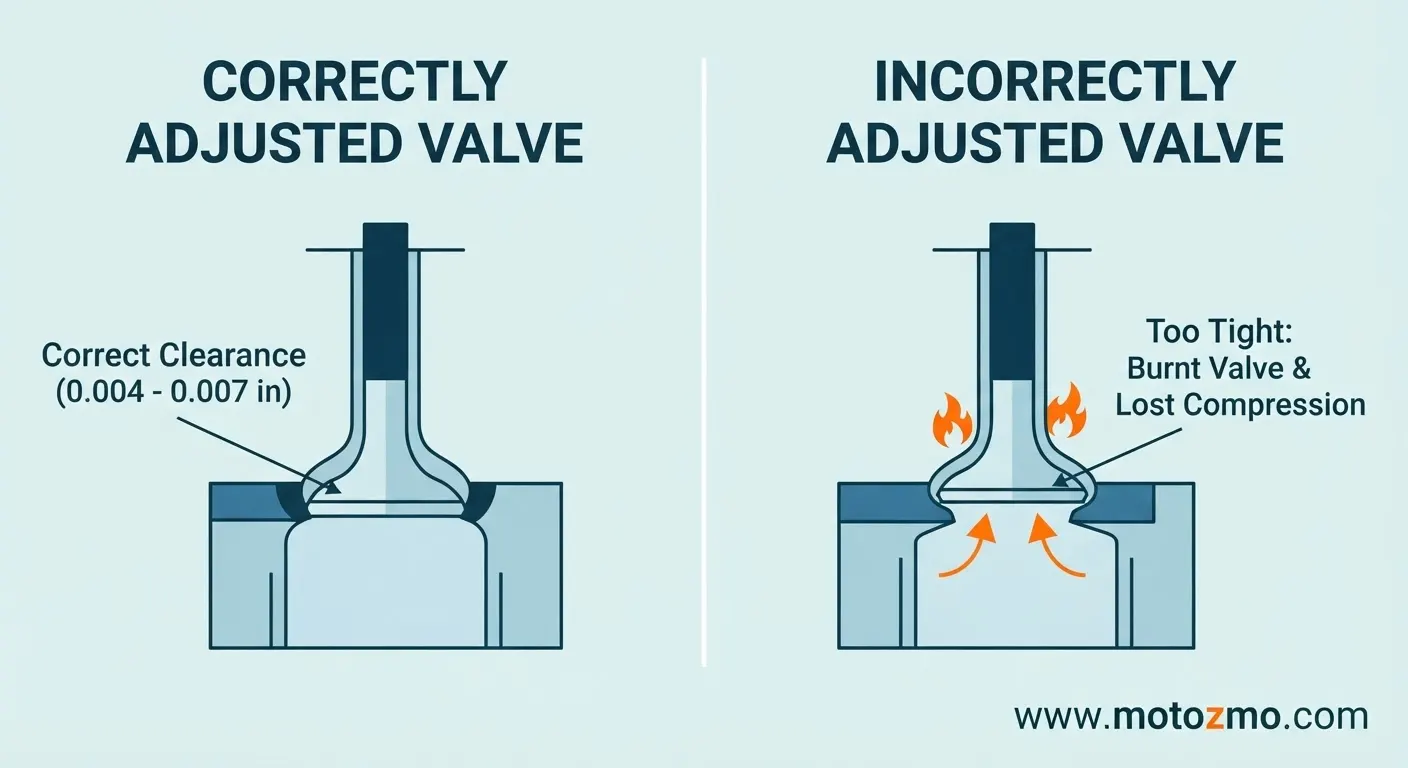
This is the task most guides oversimplify, and it’s worth being precise about it. Valve clearance is the small gap between the valve and the component that opens it (a rocker arm, bucket, or shim, depending on the engine), and it needs to sit within a specific range: too tight and the valve can’t fully seat, which burns the valve and loses compression; too loose and you get a ticking noise along with reduced power.
Typical clearances run in the range of 0.004 to 0.007 inches (roughly 0.10 to 0.18mm) for intake valves and slightly more for exhaust valves, since exhaust valves run hotter and expand more, but the exact number is specific to your engine, not a universal figure.
Here’s the gap in most advice on this topic: some motorcycle engines don’t need this task at all. Bikes with hydraulic valve lifters, common on many Harley-Davidson models and some other cruisers and tourers, adjust themselves automatically and never need a manual clearance check.
Bikes with screw-and-locknut or shim-and-bucket valve trains, common on smaller-displacement and sportier engines, do need periodic checks, typically somewhere between 8,000 and 16,000 miles depending on the model, sometimes longer on shim-type systems designed to extend the interval.
If you’re not sure which type your engine uses, understanding how your specific engine is built is the fastest way to find out before you assume you’re overdue for a job you may not even need.
Checking clearance takes a feeler gauge and some patience; adjusting it means getting into the top end of the engine, which is a job most riders hand off to a shop unless they’re already comfortable with detailed mechanical work.
| DIY | Shop | |
|---|---|---|
| Checking clearance | Reasonable for a confident home mechanic with a service manual | N/A |
| Adjusting clearance (screw type) | Doable with basic tools and patience | Optional, but reduces risk of a mistake |
| Adjusting clearance (shim type) | Requires cam removal on most engines | Recommended unless you’ve done it before |
Common mistake: assuming a ticking noise at idle is always a valve issue. It’s a common cause, but not the only one; rule out a loose heat shield or exhaust component first, since those are a five-minute check compared to a full valve inspection.
A Habit Worth Adding: How You Warm the Engine up
None of the six tasks above matter as much if the engine spends every cold start under hard load before it’s warmed up. Oil is thickest and least protective in the first minute after a cold start, and pushing the engine hard before it reaches operating temperature accelerates wear on exactly the parts regular maintenance is trying to protect.
Thirty seconds to a minute of idle, followed by gentle riding for the first mile or two, gives the oil time to reach every part of the engine before it’s asked to work hard.
Bonus: The Outside of the Engine Matters too
Everything above is internal, but grime, oil residue, and road salt on the outside of the engine trap heat and hide small leaks before they become big ones.
Cleaning the exterior of the engine periodically isn’t strictly required, but it makes every future inspection easier, since you’re looking at bare metal instead of guessing what’s under a layer of grime.
Bottom Line
Six tasks, each on its own schedule, plus a couple of habits most checklists skip: break the engine in properly if it’s new, and give it a real warm-up on every cold start. Get those right and most of what sends other riders to the shop unexpectedly simply doesn’t happen to you.
FAQs
How often should I change my motorcycle’s engine oil?
It depends on your bike and oil type, commonly 3,000 to 8,000 miles. Check your owner’s manual rather than assuming a fixed number, since synthetic oil and highway-heavy riding both extend the safe interval.
Do all motorcycles need coolant maintenance?
No. Air-cooled engines have no coolant system at all. Only liquid-cooled bikes need coolant checks and changes, typically every two years or about 24,000 miles.
How long do spark plugs actually last?
Copper plugs typically need replacing every 4,000 to 8,000 miles. Iridium or platinum plugs commonly last 15,000 to 26,000 miles on a motorcycle, noticeably less than the same materials achieve in cars.
Do I need to adjust my valves regularly?
It depends on your engine. Bikes with hydraulic valve lifters self-adjust and never need this. Bikes with screw or shim-type valve trains need periodic checks, typically every 8,000 to 16,000 miles.
What’s the best type of oil for my motorcycle?
It depends on your engine and riding style, but synthetic generally offers the best protection, with semi-synthetic as a reasonable middle ground on cost. Your manual’s specification matters more than the marketing on the bottle.
Can I do valve adjustments myself?
Checking clearance is reasonable for a confident home mechanic. Adjusting it, especially on shim-type valve trains that require removing the camshaft, is usually worth handing to a shop unless you’ve done it before.