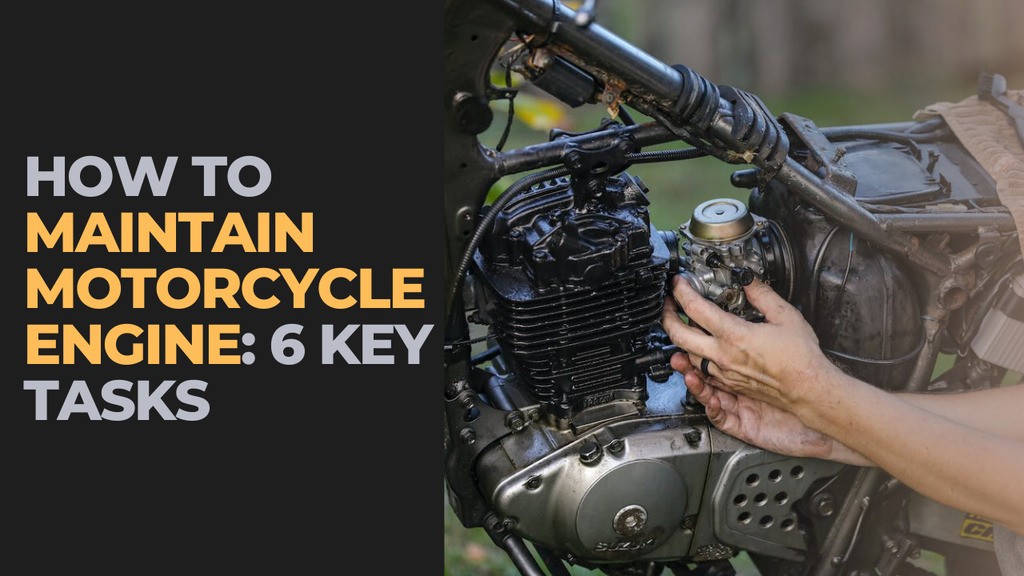
Just like how we all need to check the bike’s oil, tires, and filters periodically, the engine needs some TLC under the hood as well. The engine is the heart of any bike, so it’s crucial to keep it in tip-top shape. By sticking to a basic maintenance schedule, you can prevent costly breakdowns and annoying technical issues.
How to maintain motorcycle engine? Well, doing simple checkups yourself is an easy way to avoid getting stranded on the side of the road. Plus, mechanics are always booked solid these days, so maintenance can save you time and money otherwise spent sitting in the shop.
We’ll cover how to take care o your motorcycle engine in six important tasks.
How to Maintain Motorcycle Engine: 6 Tasks for Peak Performance
Whether you’re putting around town on a daily basis or taking your motorcycle on longer road trips, the engine works hard. Following some basic rules of care goes a long way towards protecting your investment and keeping you riding worry-free.
1. Engine Oil Checking and Changing
- Changing engine oil regularly as per manual
- Checking and changing oil filter
Changing your engine oil on schedule is downright essential for motorcycle maintenance. After all, oil is what keeps all those moving parts inside the engine sliding past each other without grinding to a halt.
Over time, spent oil loses its lubricating qualities and collects contaminants – you don’t want that muck circulating through such a high-performance system!
Most bikes nowadays require an oil change every 3,000-5,000 miles, but be sure to check your owner’s manual for the specific recommendation.
Shorter intervals are usually needed if you’re doing a lot of stop-and-go city riding versus highway cruising. The type of oil matters too – conventional oil needs changes more often than synthetic.
Swapping old oil is simple, just drain it from the crankcase plug and refill through the dipstick tube. Don’t forget to also change the oil filter cartridge during each oil change.
Clogged filters can reduce lubricating flow like a clogged artery! I like to put a new O-ring on the filter housing as well since they’re inexpensive insurance against leaks.
SEE MORE: How to Change Oil on Motorcycle: Don’t Pay for an Oil Change!
Speaking of leaks, be on the lookout for dripping fluid around your engine, especially the oil filter housing. A slow leak left unchecked could leave you stranded far from home. It’s also a good idea to check the oil level periodically using the dipstick. Catching any losses early helps avoid damage from low levels.
2. Keep Your Cool(ant)
- Checking coolant levels regularly
- Changing coolant as per interval
We’ve all seen steam coming from under an engine hood – that’s the cooling system doing its job of keeping the engine from overheating. But coolant won’t do its job properly if it’s not maintained. Making sure you have enough of the right stuff in your bike is cooling system 101.
Most bikes take a 50/50 mix of antifreeze and distilled water as coolant. Check the reservoir regularly, anytime the engine is warm, to ensure the level is right at the “Full” mark. If it’s low, you’ll need to refill it – this prevents air pockets from forming.
While you’re checking coolant, make sure the fluid itself looks clean – it should be transparent with no evident contamination. If it’s gotten dirty, it’s time to flush and replace the entire system.
As for coolant changes, schedules vary depending on the bike, but every 2 years is a generally recommended interval. Changing it at this frequency keeps the fluid from degrading as it circulates. Replacing it with fresh antifreeze/water mix ensures peak performance and temperature regulation.
With minimal effort, you can keep your engine running at an optimum temperature. No one wants to end up with an overheated motor on a long ride! So take a moment to check your coolant and change it regularly. Your engine will thank you with reliable, trouble-free operation.
SEE MORE: Motorcycle Engine Keeps Cutting Out: Reasons and Fixes
3. Check the Fuel
- Using recommended fuel as per manual
- Checking fuel levels
- Cleaning/replacing fuel filter
We’ve all seen bikers sputtering down the highway with a fuel light on – not a fun situation! Keeping tabs on your fuel supply and quality is an easy way to avoid running dry.
First off, only put the grade of gas recommended in your owner’s manual into the tank. Using the proper octane prevents engine issues. Also, try to buy fuel from high-volume stations, as gas sitting on the shelf too long can go bad.
Check fuel levels regularly when refueling. Running the tank low means condensation can build up, which gunks up the lines. Keeping it at least 1/4 full prevents this.
The fuel filter is also crucial – it removes dirt and water that could clog injectors or carburetor jets. Check your manual for replacement intervals, typically every 15,000-30,000 miles. Do it too seldom and your engine could run rough or stall!
Taking a few moments to fuel up with clean gas and inspect filter levels is good preventative maintenance. No one wants to get stranded with fuel problems. A little fuel system TLC keeps you riding free and easy down the road.
4. Regular Air Filter Checks
- Checking and replacing air filter regularly
When was the last time you replaced your motorcycle’s air filter? This simple maintenance task is often overlooked but is crucial for keeping your engine running smoothly.
The air filter’s job is to catch dirt before it’s sucked into the engine’s combustion chambers. Over time, filters become clogged as they do their job. Left unchanged, a blocked filter strains the air intake, causing diminished performance and even damaging vulnerable engine parts.
Most owners’ manuals recommend checking the air filter at every oil change interval and replacing it every 5,000-10,000 miles, or more often in dusty conditions. To inspect the filter, simply locate it (usually under the seat) and remove it from its housing. Look for excessive dirt buildup that would impair airflow.
Filter replacements are inexpensive – choosing the right type like oiled foam vs. dry paper depends on your bike. Installation only takes a few minutes. It’s a small chore that reaps big benefits by protecting your engine.
SEE MORE: K&N Motorcycle Air Filter Review: Better Than Stock Filters?
Spouting black exhaust or experiencing power loss could mean it’s time for a new air filter. Stay on top of regular inspections and changes to avoid costly repairs down the road. Your engine will run cleaner and stronger as a result.
5. Check and Replace Spark Plugs
- Checking and replacing spark plugs as per interval
If your bike has been sputtering or losing power, worn-out spark plugs could be the culprit. These tiny but crucial components create the spark that ignites the air-fuel mixture in the combustion chamber.
Most manufacturer guidelines recommend changing plugs every 5,000-15,000 miles depending on the bike. Copper plugs need more frequent changes than platinum or iridium varieties. Regardless of make, neglected plugs lead to starting/running issues.
Inspecting plugs during changes provides useful info too. A sooty or wet appearance means they worked hard under less than ideal conditions – a sign other systems need attention. Overly worn plugs could point to other engine troubles as well.
Replacement is straightforward, though some bikes require partial disassembly. Simply remove one plug at a time, swap in the new one, and reattach. Be sure to use the same heat range/material as OEM. A feeler gauge checks gaps.
Sparking new life into old iron is as easy as changing a couple spark plugs. Prevent downtime by following periodic tune-up schedules customized to your bike. After all, a properly firing combustion system is key to smooth operation mile after mile.
6. Keep the Valves Tuned Up
- Adjusting valve clearance regularly
While it isn’t the most exciting task, adjusting valve clearances is important preventative maintenance for your engine’s long term health. Clearances that are too tight or loose cause various issues over time like accelerated part wear.
Most owners’ manuals recommend checking clearances at specific mileage intervals. Free play should be within specs listed, usually around 0.001-0.004 inches. Loose tolerances result in noise, reduced power and efficiency. Too tight stresses components.
Adjustment requires feeler gauges and is best left to mechanics, as dismantling parts of the top end is involved. However, some simple bikes allow DIY jobs. Either way, keeping on schedule prevents expensive repairs down the road.
Neglecting this tune up step can lead to symptoms like ticking noises at higher rpm. Catching and addressing clearance issues early preserves your engine and riding enjoyment. Don’t skimp on maintenance – your wallet and nerves will thank you.
FAQs About How to Maintain Motorcycle Engine
How often should I change my motorcycle’s engine oil?
Most manufacturers recommend changing engine oil every 3,000-5,000 miles. High performance bikes or those subjected to a lot of short trips may need oil changed more frequently. Always refer to your owner’s manual for the specific recommendation.
What’s the best type of oil to use – conventional, synthetic or semi-synthetic?
For most motorcycles, a good quality semi-synthetic oil provides the ideal balance of protection and affordability. Synthetic is the best option but also most expensive. Refer to your manual for the recommended specification.
When should I replace my air filter?
Air filters should be checked every oil change and replaced at least every 5,000-10,000 miles, or more often if riding in dusty conditions. Inspect for dirt buildup and replace as needed based on condition.
How do I know when to change my spark plugs?
Spark plug change intervals vary, but most manufacturers recommend every 5,000-15,000 miles depending on the bike and plug type. Signs like hard starting, reduced power or spark plug fouling mean it’s time for new plugs.
Can I perform my own valve clearance checks and adjustments?
On simple single or twin cylinder bikes, valve checks can sometimes be done by experienced DIYers. However, clearance adjustment often requires detailed knowledge and dismantling engine parts. It’s usually best left to an experienced mechanic.
What’s the best way to clean my motorcycle’s air filter?
For paper filters, gentle tapping or compressed air is sufficient. Foam filters can be washed in detergent and re-oiled. Always refer to your owner’s manual for the recommended cleaning method and avoid getting the filter excessively wet.
