
Maintaining a motorcycle carburetor requires five core actions: draining the float bowl every 30 days of inactivity, cleaning or replacing the fuel filter every 3,000 miles, inspecting jets and passages annually, checking gaskets and O-rings for cracks, and adjusting the idle mixture seasonally. Skip any of these, and your bike rewards you with hard starts, rough idle, and stalling under throttle.
Modern ethanol-blended fuels (E10, E15) accelerate carburetor degradation faster than older formulations. Ethanol attracts moisture, corrodes brass jets, and leaves varnish deposits inside fuel passages within 30 days of sitting. This means carburetor maintenance matters more today than it did 20 years ago.
The good news? Most carburetor maintenance takes 30 minutes or less with basic hand tools. You do not need to remove the carburetor for routine upkeep.
This guide walks through every maintenance step, explains what each action prevents, and gives you a schedule that keeps common motorcycle problems away from your garage.
🎯 Key Takeaways
- Drain the float bowl every 30 days of inactivity to remove water and sediment buildup.
- Replace the fuel filter every 3,000 miles—clogged filters cause lean running and stalling.
- Clean jets annually using carburetor cleaner additives or direct spray cleaning.
- Inspect gaskets and O-rings yearly for cracks that cause vacuum leaks.
- Adjust idle mixture seasonally as temperature changes affect fuel combustion.
- Before storage: Run stabilized fuel through the system, then drain the float bowl completely.
- Ethanol fuels (E10, E15) accelerate deposits that shorten maintenance intervals by 30-50%.
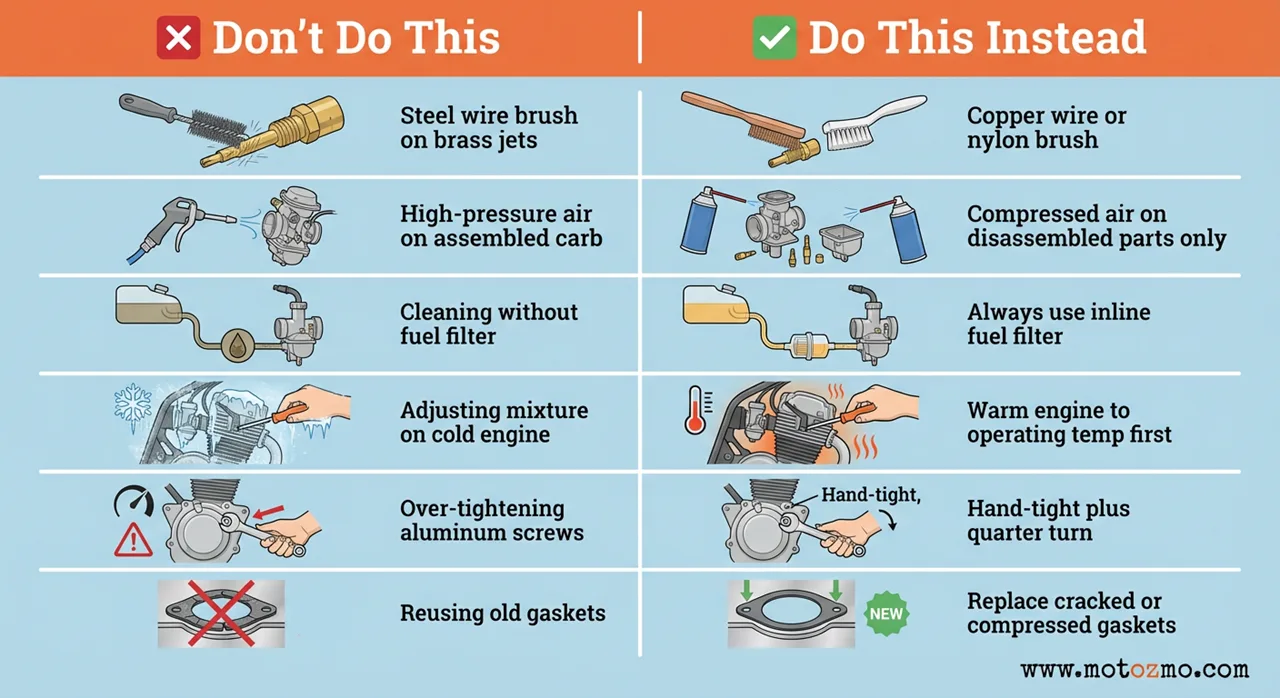
- Never use steel wire on brass jets. Use copper wire or nylon brushes only.
- Why Carburetors Fail Without Maintenance
- How Often to Maintain Your Carburetor
- Step-by-Step Carburetor Maintenance
- Seasonal Storage Maintenance
- Multi-Carburetor Synchronization
- Signs Your Carburetor Needs Immediate Attention
- Common Maintenance Mistakes to Avoid
- FAQs About How to Maintain a Motorcycle Carburetor
Why Carburetors Fail Without Maintenance
A carburetor mixes fuel and air in precise ratios. When deposits, corrosion, or worn parts disrupt this balance, your engine suffers immediately.
Here is what happens when maintenance gets ignored:
| Neglected Component | What Builds Up | Resulting Problem |
|---|---|---|
| Float bowl | Varnish, sediment, water | Hard starting, fuel starvation |
| Pilot jet | Gum deposits | Rough idle, stalling at stops |
| Main jet | Corrosion, blockage | Power loss under acceleration |
| Fuel filter | Debris, rust particles | Lean running, engine cutting out |
| Gaskets/O-rings | Cracks, hardening | Vacuum leaks, gas leaking from carburetor |
| Choke mechanism | Sticky residue | Cold start failure, flooding |
Every maintenance task in this guide targets one of these failure points directly.
How Often to Maintain Your Carburetor
Maintenance frequency depends on riding habits, fuel quality, and storage duration. Use this schedule as your baseline:
| Maintenance Task | Active Riding | Seasonal Storage | High Ethanol Fuel (E15+) |
|---|---|---|---|
| Drain float bowl | Every 2,000 miles | Before storage | Every 1,000 miles |
| Replace fuel filter | Every 3,000 miles | Annually | Every 2,000 miles |
| Inspect/clean jets | Annually | Before storage | Every 6 months |
| Check gaskets/O-rings | Annually | Before storage | Annually |
| Clean choke mechanism | Annually | Before storage | Every 6 months |
| Adjust idle mixture | Seasonally | After storage | Seasonally |
| Full carburetor cleaning | Every 5,000 miles | After extended storage | Every 3,000 miles |
Riders in humid climates or coastal areas should lean toward the more frequent intervals. Salt air and moisture accelerate corrosion inside brass components.
Step-by-Step Carburetor Maintenance
Each step below prevents a specific failure. Complete them in order for the most efficient workflow.
01. Drain the Float Bowl
The float bowl collects fuel at the bottom of your carburetor. Sediment, water, and varnish settle here first.
What this prevents: Hard starting, fuel contamination reaching jets, water damage to internal components.
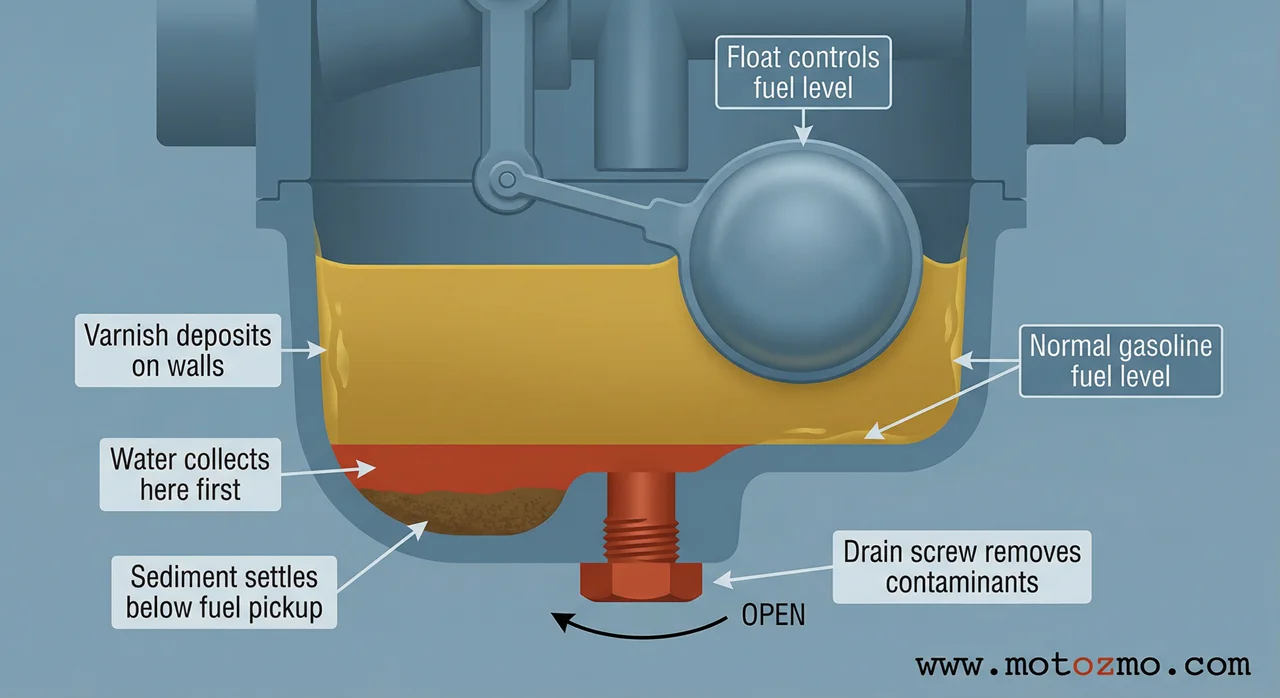
How to do it:
- Locate the float bowl drain screw at the lowest point of the carburetor body.
- Place a small container beneath the drain.
- Turn the drain screw counterclockwise until fuel flows out.
- Let the bowl empty completely (usually 2–3 ounces of fuel).
- Inspect the drained fuel for water droplets (they sink to the bottom) or dark sediment.
- Tighten the drain screw finger-tight plus a quarter turn.
If you spot water or heavy sediment, drain the tank as well and consider adding a fuel stabilizer to your next fill-up.
02. Inspect and Replace the Fuel Filter
The fuel filter catches debris before it reaches your carburetor. A clogged filter starves the engine of fuel under load.
What this prevents: Lean running, engine dying when throttle applied, hesitation during acceleration.
How to do it:
- Trace the fuel line from the tank to the carburetor.
- Locate the inline fuel filter (usually a clear plastic cylinder).
- Inspect the filter element for discoloration, debris accumulation, or reduced fuel flow.
- If dirty, turn off the fuel petcock and disconnect the fuel lines from both ends of the filter.
- Install a new filter with the arrow pointing toward the carburetor (flow direction).
- Reconnect lines and check for leaks before starting the engine.
Replace the filter. Do not attempt to clean it. A new inline fuel filter costs under $10 and removes all guesswork.
03. Clean the Carburetor Jets
Jets control fuel flow at different throttle positions. The pilot jet handles idle and low-speed running. The main jet controls wide-open throttle.
What this prevents: Rough idle, poor acceleration, inconsistent power delivery.
How to do it without full removal:
- Add a quality carburetor cleaner to your fuel tank according to product instructions (typically 1 oz per gallon).
- Run the engine for 15–20 minutes to circulate the cleaner through all passages.
- For stubborn deposits, remove the float bowl and spray cleaner directly into visible jet openings.
- Use compressed air to blow through jet passages after cleaning.
For severe buildup, remove the jets entirely and soak them in carburetor cleaner overnight. Clear each orifice with a strand of copper wire. Never use steel, which damages the brass.
Understanding how a motorcycle carburetor works helps you identify which jet causes specific symptoms.
04. Inspect Gaskets and O-Rings
Rubber components degrade over time. Cracked gaskets and hardened O-rings allow air leaks that upset the fuel mixture.
What this prevents: Vacuum leaks, lean running, erratic idle, fuel leaks.
How to do it:
- Remove the float bowl and inspect the bowl gasket for cracks, tears, or compression marks.
- Check the O-ring around the float bowl drain screw.
- Inspect fuel line connections for cracked rubber.
- Look for wetness around carburetor mounting surfaces (indicates a failing intake gasket).
Replace any gasket or O-ring that shows visible damage. Most carburetors use standard-sized O-rings available at hardware stores, but OEM gasket kits ensure a proper fit.
05. Clean the Choke Mechanism
The choke enriches the fuel mixture during cold starts. A sticky choke causes flooding or prevents the engine from starting cold.
What this prevents: Cold start failure, rich running, flooding, high idle after warm-up.
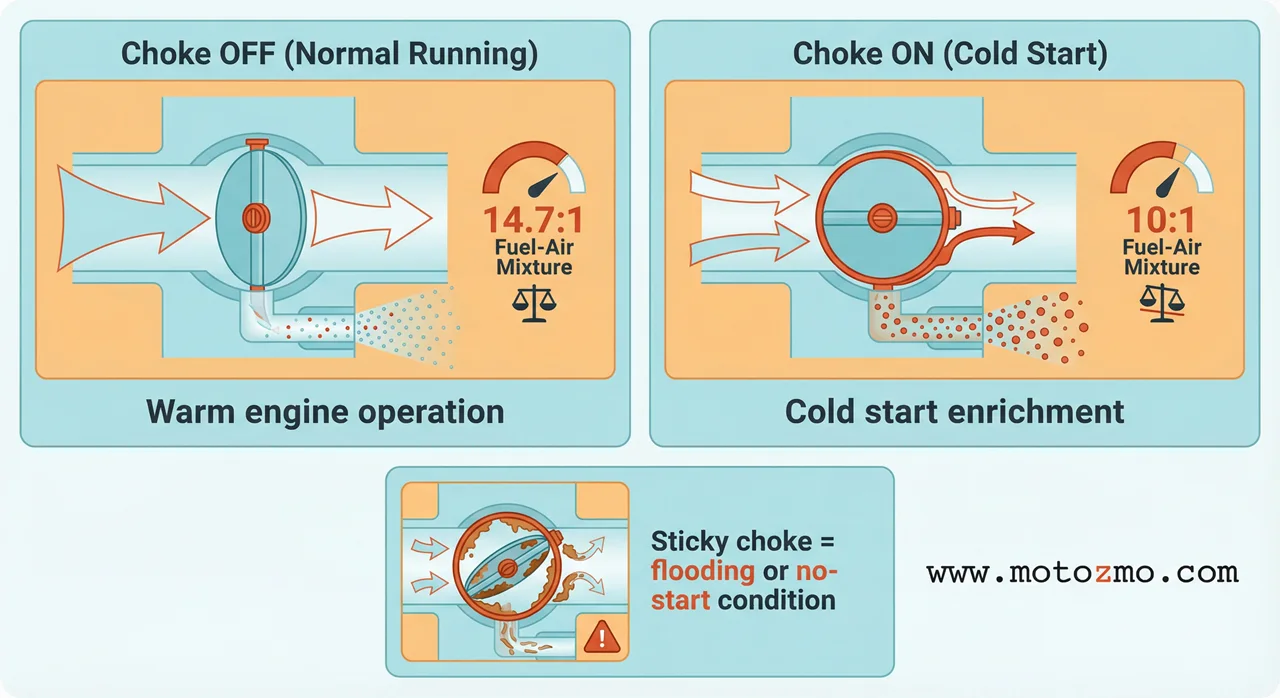
How to do it:
- Locate the choke plate or plunger on your carburetor (varies by design).
- Actuate the choke lever and observe the mechanism for smooth movement.
- Spray carburetor cleaner on the choke butterfly or plunger shaft.
- Work the choke lever repeatedly to free any sticky residue.
- Wipe away dissolved deposits with a lint-free cloth.
For detailed procedures specific to your carburetor type, see our guide on cleaning the carburetor choke.
06. Adjust the Idle and Air-Fuel Mixture
Seasonal temperature changes affect how your engine burns fuel. A mixture set for summer runs lean in winter and vice versa.
What this prevents: Rough idle, stalling at stops, poor fuel economy, hard starting.
How to do it:
- Warm the engine to normal operating temperature (5–10 minutes of riding).
- Locate the idle speed screw (controls throttle butterfly position at rest).
- Turn the screw clockwise to raise idle, counterclockwise to lower it. Target 1,000–1,200 RPM for most motorcycles.
- Locate the pilot air screw or fuel screw (varies by carburetor type).
- Turn the screw in small increments (1/8 turn) and listen for the highest, smoothest idle.
- Readjust idle speed if necessary after mixture adjustment.
For precise tuning steps, read our complete guide on adjusting the air-fuel mixture.
Seasonal Storage Maintenance
Carburetors suffer more damage sitting idle than running regularly. Fuel oxidizes, ethanol absorbs moisture, and varnish coats internal passages within weeks.
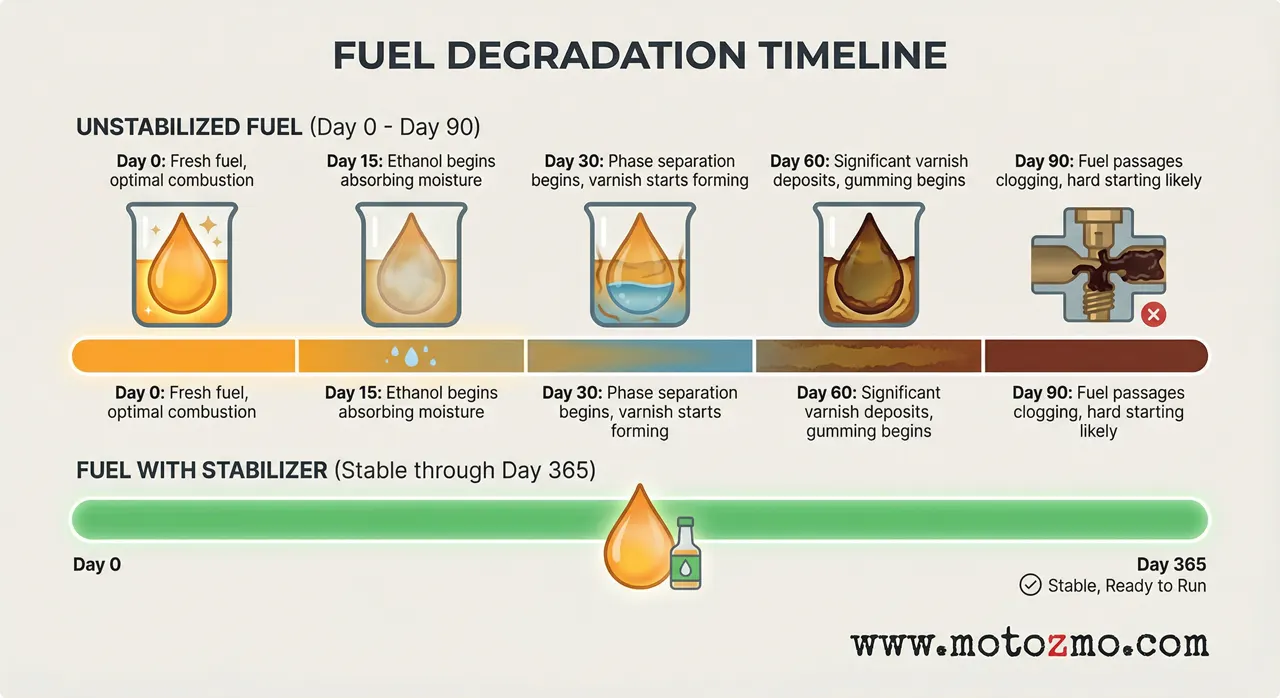
Before storing your motorcycle for 30+ days:
- Add fuel stabilizer to a full tank (follow product ratios—typically 1 oz per 2.5 gallons).
- Run the engine for 10 minutes to circulate treated fuel through the carburetor.
- Turn off the fuel petcock and let the engine run until it stalls (empties the float bowl).
- Alternatively, drain the float bowl completely using the drain screw.
After storage:
- Drain any remaining old fuel from the float bowl.
- Fill the tank with fresh fuel.
- Clean the jets if the engine hesitates or idles rough after starting.
According to the Motorcycle Industry Council, ethanol-blended fuels begin degrading within 30 days of purchase. Stabilizer extends this to 12 months when stored properly.
Multi-Carburetor Synchronization
Motorcycles with two or more carburetors require synchronization to run smoothly. Each carburetor must deliver equal vacuum at idle.
What this prevents: Rough idle, vibration, uneven power delivery, poor fuel economy.
Signs your carburetors need synchronization:
- Engine vibrates excessively at idle
- Idle quality changes when engine warms up
- One cylinder feels weaker than others
- Difficulty maintaining steady idle speed
Synchronization requires vacuum gauges (manometers) or an electronic sync tool. This procedure adjusts the throttle cable tension to each carburetor until all cylinders draw equal vacuum.
Most riders synchronize carburetors every 6,000 miles or after any carburetor removal. If you are uncomfortable performing this adjustment, a motorcycle shop charges $50–$100 for the service.
For bikes with different engine types, synchronization procedures vary. V-twins, inline fours, and parallel twins each have specific access points and adjustment screws.
Signs Your Carburetor Needs Immediate Attention
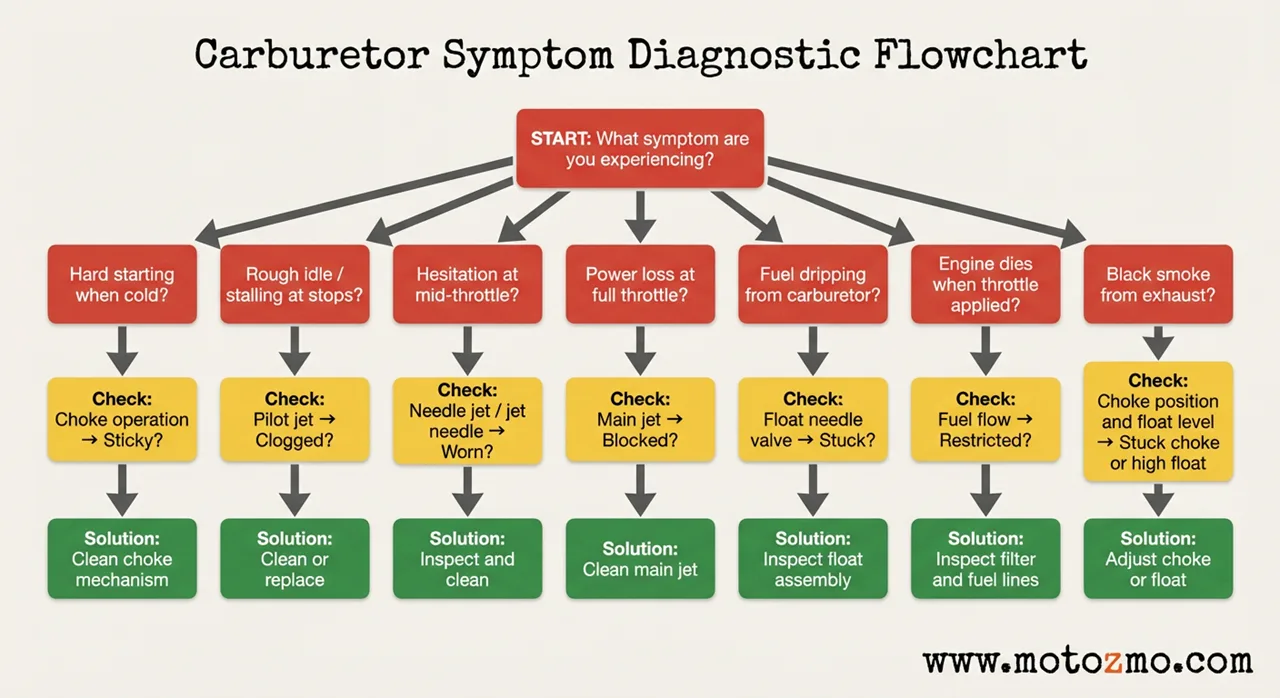
Some symptoms indicate problems beyond routine maintenance. Address these immediately to prevent engine damage:
| Symptom | Likely Cause | Immediate Action |
|---|---|---|
| Fuel dripping from carburetor | Stuck float, failed needle valve | Stop riding, inspect float assembly |
| Black smoke from exhaust | Flooding, stuck choke, rich mixture | Check choke, inspect float level |
| Engine dies when throttle applied | Clogged main jet, fuel starvation | Clean jets, check fuel flow |
| Backfiring through carburetor | Lean mixture, intake leak | Check for vacuum leaks, adjust mixture |
| Fuel smell without visible leak | Permeated float bowl gasket, overflow | Replace gaskets, check vent lines |
Ignoring these symptoms leads to expensive repairs. A stuck float, for example, can hydrolock your engine if fuel floods the cylinder while parked.
Common Maintenance Mistakes to Avoid
Even experienced riders make these errors:
Using compressed air on assembled carburetors. High-pressure air pushes debris deeper into passages rather than clearing them.
Ignoring the fuel tank. Rust and sediment in the tank contaminate your carburetor repeatedly. Flush the tank if you find debris during float bowl drains.
Over-tightening screws. Brass jets and aluminum carburetor bodies strip easily. Hand-tighten, then add a quarter turn.
Using wire brushes on jets. Steel brushes enlarge jet orifices and permanently alter fuel metering. Use copper wire, nylon brushes, or soaking only.
Skipping the fuel filter. Running without a filter invites every particle from your tank directly into the carburetor passages.
Adjusting mixture without warming the engine. Cold engines need enrichment. Adjustments made cold will run lean when the engine reaches operating temperature.
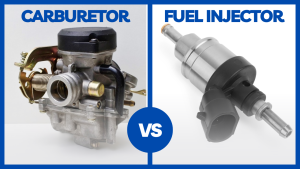
Understanding carburetor vs fuel injection differences clarifies why carbureted bikes demand this hands-on maintenance while fuel-injected models do not.
FAQs About How to Maintain a Motorcycle Carburetor
How often should I clean my motorcycle carburetor?
Clean every 3,000–5,000 miles with fuel additive. Perform deep cleaning annually or after any extended storage period.
Can I use automotive carburetor cleaner on motorcycles?
Yes. Most spray carburetor cleaners work on motorcycle carburetors. Avoid cleaners containing methanol on rubber components.
Why does my carburetor need maintenance if I ride regularly?
Modern ethanol fuels degrade quickly and leave deposits. Regular riding helps but does not eliminate buildup in jets and passages.
What causes a carburetor to flood?
Stuck float needle, worn needle seat, or incorrect float height allows fuel to overflow into the engine or out the overflow tube.
How do I know if my jets are clogged?
Symptoms include rough idle (pilot jet), hesitation at mid-throttle (needle jet), or power loss at full throttle (main jet).
Should I rebuild my carburetor or buy a new one?
Rebuild kits cost $20–$50 and restore function if the body is not damaged. New carburetors cost $150–$400 but eliminate all wear variables.

