You know what really grinds our gears? Worn out grips that slip and slide all over the place. It’s difficult to handle a bike when you got zero grip control. Makes for some white-knuckle rides, that’s for sure.
So, we’ll share our top tips and tricks about how to remove motorcycle handlebar grips. And let me tell you, these methods work like a charm every time.
Key Takeaways
- Learn different techniques for removing stubborn motorcycle grips, from common hand tools to specialized heat methods.
- Tips for safely loosening adhesive bonds using knives, screwdrivers or targeted heat application.
- Hacks like lubricants, compressed air or alternative tools that work when you don’t have a heat gun.
- Proper cleaning of handlebars is key for new grip adhesion long-term.
- Instructions for reinstalling replacement grips smoothly, whether glued or dry-fitting types.
Some of the links in this post are affiliate links, meaning we may get a small commission when you purchase through our links, at no extra cost to you. It helps us covering the expenses of keeping this site free for you. Thank you for your support!
How to Remove Motorcycle Handlebar Grips
Let’s explore different methods of removing the old handlebar grips and how to install a new one.
| Method | Tools Needed | Suitable for Grip Types | Notes |
|---|---|---|---|
| Everyday Tools | Utility knife, Flathead screwdriver | Non-glued, lightly adhered grips | Requires patience and may damage grips. |
| Heat Gun | Heat gun, gloves | All grip types, especially stubborn or glued grips | Use caution, wear gloves, and maintain a safe distance. |
| Compressed Air | Compressed air nozzle, optional: masking tape | Non-glued, lightly adhered grips | Requires an air compressor or canned air. |
| Lubricant | WD-40, CLP, Goof Off (not recommended for heavy-duty adhesives) | Non-glued, lightly adhered grips | May damage some grip materials. Use caution. |
Additional Notes:
- These are general guidelines, and the best method may vary depending on the specific grip and adhesive used.
- Always refer to your motorcycle’s manual or the grip manufacturer’s instructions for specific recommendations.
- When unsure, start with the least aggressive method and progress to more forceful techniques if needed.
Removing Grips with Common Tools
The first method we’ll discuss is using everyday tools like:
- Utility knife
- Flathead screwdriver
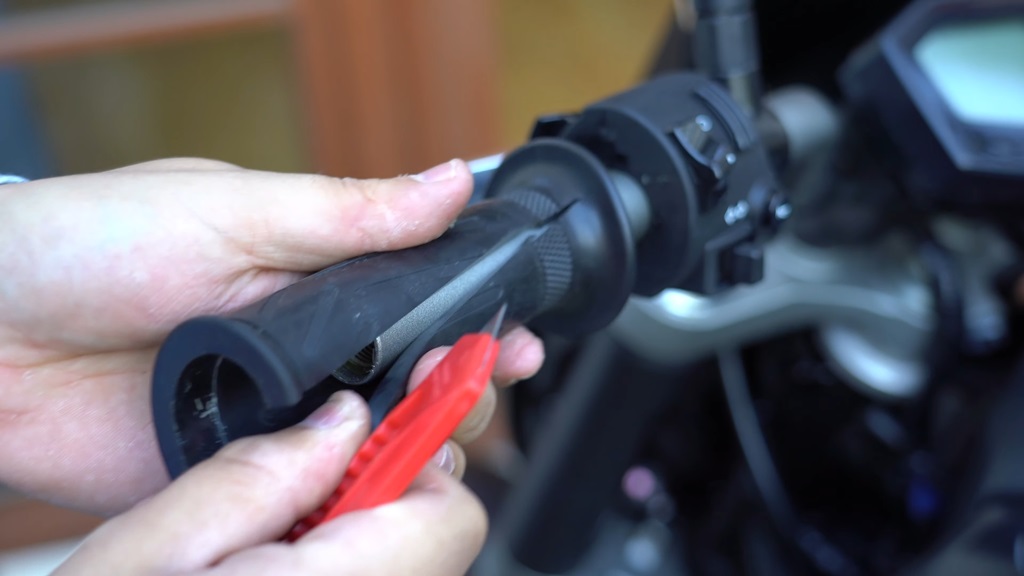
One of the most common ways to get those old grips off is with a utility knife. You’ll want to break the seal where the grip meets the handlebar.
First, remove the handlebar screw using hex keys (Allen keys). Then, slide the knife blade between the two and run it along the edge. This should pop the grip loose enough to start prying up.
If the handlebar is stuck because of a glued surface, you can use a flathead screwdriver. We like to use one with a good wide head for leverage.
Simply wedge the tip under the grip edge you just cut open. Apply firm, steady pressure to loose it bit by bit as you work your way around. Go slow so you don’t rip the grip, especially if it’s really adhered on there good.
If a spot is giving you trouble, try inserting the knife blade again just under the edge of the grip. A little slice can help “persuade” it to let go of the handlebar. Just be careful not to nick the bar itself.
Using Heat to Remove Stubborn Grips
Sometimes those grips just don’t want to budge no matter what you try. When the everyday tools fail us, it’s time to use a heat gun.
We’ve found these little guys really do the trick on handlebar grips that have been glued on for years. The heat breaks down the bond between the rubber and the bar so it peels right off with no fuss.
Don’t crank the heat too high or you risk melting or warping the plastic. We like to start it on a low setting and do short bursts of air, moving it around to slowly loosen the entire grip surface.
It doesn’t take long before you start to see the grip edge separating where you’re blowing hot air underneath. When it starts to peel up on its own, gently peel it back little by little.
Go slow and careful so you don’t rip it, especially if the glue is still kind of tacky. Watch your fingers also, because those heat gun barrels get hot!
PRO TIP: Blow some of the heat down the sides and ends of the grip too if it’s a real bear to remove. The whole thing will start to flex and soften up for easy removal. Just mind your fingers, and your handlebars too, obviously, because you don’t want any melted plastic parts!
It’s crucial to prioritize safety when using a heat gun. Here are some key precautions:
- Wear heat-resistant gloves: Protect your hands from the intense heat radiating from the nozzle.
- Maintain a safe distance: Keep the heat gun at a recommended distance from the grip to avoid overheating or warping the handlebar.
- Avoid prolonged contact: Don’t focus the heat on one spot for too long to prevent burning the material.
- Ventilate the area: Use the heat gun in a well-ventilated space to avoid inhaling harmful fumes.
- Be mindful of surroundings: Keep flammable materials away from the work area to prevent fire hazards.
Some Outside-the-Box Grip Removal Methods
If you don’t have a heat gun or air compressor, there are still options! We’ve had good results using compressed air or even just plain old lubricant.
For the compressed air trick, you take one of those tiny straw attachments and insert it under the grip edge. Then give it a blast and watch the grip inflate like a tiny balloon. It should slide right off while inflated. Be quick though, before the air deflates!
As for lubes, we like WD-40 or CLP. Spray some down inside the edge and rotate the grip to work it in. This loosens the bond so it slides off smoothly. Goof Off or similar solvents can work too if it’s a heavy duty glue. We’ve even used chopsticks before in a pinch – just wiggle the edge until it lifts up to pry underneath.
Oh and those canned air used for cleaning keyboards? Yup, those work in place of an air compressor. Just aim the straw and blast away. The vibration of the liquid may help it slide off too.
If you don’t want to cut the old handlebars or want to replace them undamaged, check the following video tutorial:
How to Install Motorcycle Handlebar Grips
We hope that you’ve successfully remove the grips by following our methods. Now, it’s time to install a new pair:
Preparing for New Grips
Once those old grips are finally off, it’s time to prep for the new ones.
First thing is cleaning the handlebars. We like to use isopropyl or rubbing alcohol – the high percentage stuff. It does a great job cutting through any oils or residues leftover from the old grips.
Grab a rag, pour some alcohol on, and give the bars a good scrubbing. Get into all the nooks and crannies. You want a bare, clean surface for the new grips to stick to well. No sense putting them on if they’ll just slide around!
PRO TIP: If you want to transfer a design from your old grips, lay them out on a table first before removal. Sometimes the ends can break off in the process. Then clean the bars, lay out the old grip pieces as a guide, and place the new grip material on top to trace the pattern.
We’ve had luck holding the new grip material in place with masking or painter’s tape as well. Then you can really take your time to get the transferred design just right without slipping around. Cool little customization if the old grips had some distinctive stripes or colors.
But either way – clean bars are key.
Installing New Grips – Like a Pro
Now we’ll get these new grips installed! First thing is grip adhesive. Some come pre-glued, while others you’ll want to apply a thin coating inside yourself.
We like rubber grips best with a little adhesive. Gives a nice sturdy bond without being permanent. Just a light smearing along the inside ridges does the trick. Go even so they don’t shift sideways over time.
For grips like gel or foam, sometimes leaving them dry works fine since they form-fit to the bar. Experiment and see what works best for your style.
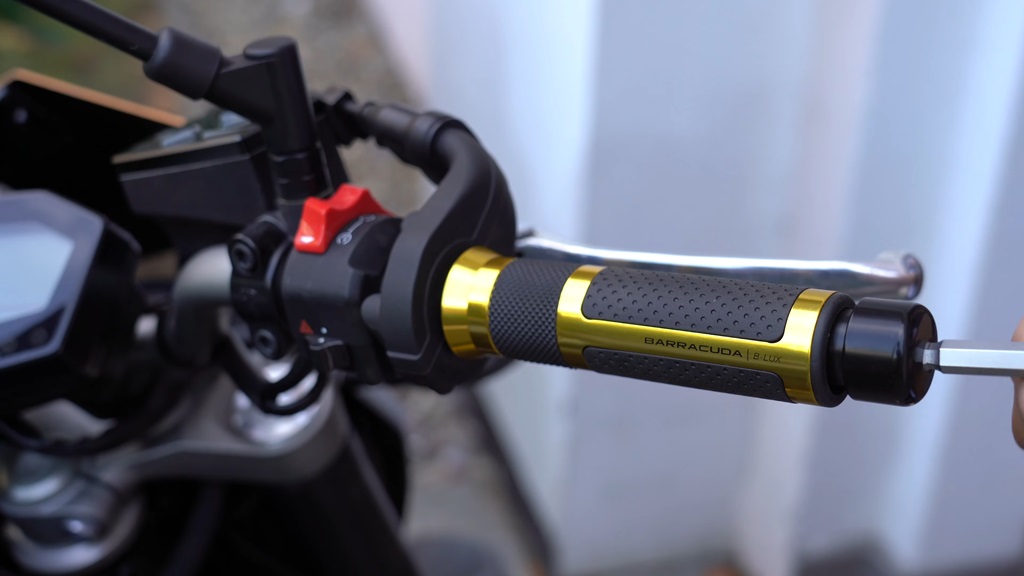
Once prepped, it’s slide time! Ease the new handlebar, rotating as you go to prevent air bubbles. Squeeze it into all the nooks. With foam grips we kind of smash them on for full contact. Check for lumps.
If end caps are included, screw them on last to seal it up. Couple hours to dry and you’re good to twist that throttle!
Conclusion
With this comprehensive guide, you can tackle the task of replacing your motorcycle handlebar grips. Remember, assessing the situation (grip type, adhesion strength) helps you choose the most suitable method. Prioritize safety by wearing gloves and working in a well-ventilated area when using heat guns. Cleanliness is key for optimal grip adhesion, so ensure the handlebars are spotless before installation. Finally, carefully follow the instructions for your chosen removal and installation methods, paying close attention to details specific to grip type and adhesive application.
Now, it’s your turn to share your expertise! Have you tackled this project yourself? What methods or tools have you found most effective? Share your insights and experiences in the comments below.
FAQs About How to Remove Motorcycle Handlebar Grips
Can I reuse the same grips if I’m just taking them off to paint the bars?
Yes, you can reuse your existing grips if carefully removing them just for painting. Be gentle so as not to damage the grips. Clean them thoroughly after removal so no paint gets on them.
What’s the best way to remove grips made of a softer material like gel or foam?
Softer grips may require gentle heating with a blow dryer instead of a heat gun to avoid melting. You can also try loosening the adhesive seam with a plastic tool before peeling off. Go slowly to prevent tearing.
The ends of my grips broke off in removal. Now what?
If grip ends break, carefully pry out remaining pieces and clean the area well. For reinstallation, cut new grips slightly short and ease them on without pushing into broken ends. Consider upgrading to reinforced grips.
Can I reuse adhesive or should I apply new stuff?
It’s best to remove all old adhesive residue when cleaning. Apply a small amount of fresh adhesive for a strong bonding surface with new grips. Make sure to spread it evenly inside.
What’s the safest way to remove really old, brittle grips?
For grips that may crack instead of peel, gently cut into sections with a sharp knife while stabilizing the grip portion still attached to bars. Take your time, bracing the grip edges along the way to minimize breakage.

