Your motorcycle engine dies when you apply throttle because the fuel delivery system fails to match the increased air intake. The most common culprits are clogged carburetor jets (especially the accelerator pump), vacuum leaks in intake boots, blocked fuel filters, dirty air filters, or on fuel-injected bikes, a failing throttle position sensor (TPS). The engine idles fine because it runs on the pilot jet circuit, but when you twist the throttle, it demands more fuel. If that fuel can’t flow, the engine starves and stalls.
Immediate diagnostic tests you can are pulling the clutch, twisting the throttle, and watching what happens. If the RPMs don’t climb smoothly or the engine bogs down, you have a fuel starvation problem. For carbureted bikes, remove the air filter and manually open the throttle while watching for fuel spray from the accelerator pump nozzle.
Here’s what causes this stalling issue and how to fix each problem permanently.
🎯 Key Takeaways
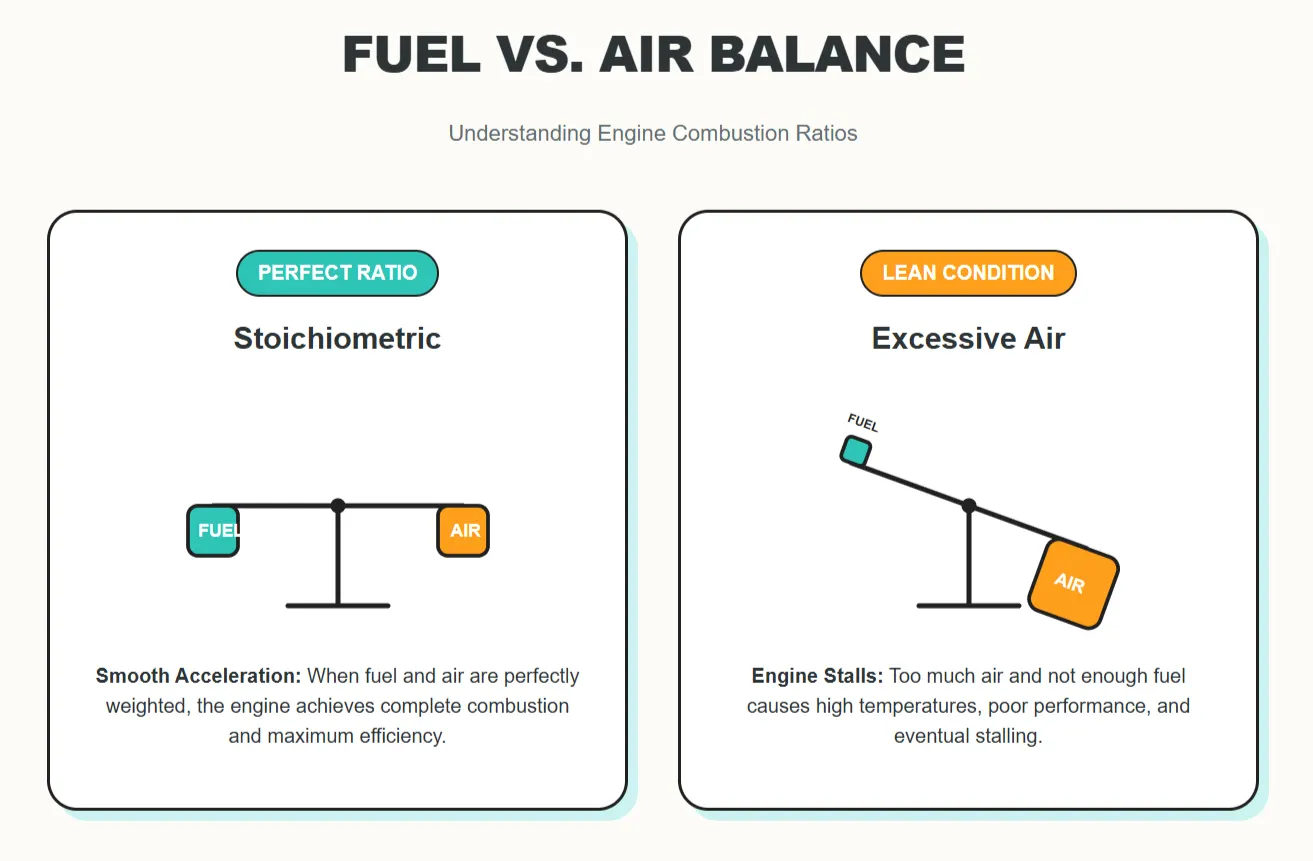
- The Core Issue: Your engine is “starving”—it’s getting plenty of air when you twist the throttle, but not enough fuel to match.
- Top 3 Culprits: Clogged carburetor jets (specifically the accelerator pump), vacuum leaks in intake boots, or a failing Throttle Position Sensor (TPS).
- The Quick Fix: Most issues are solved by cleaning the fuel system or replacing brittle rubber intake parts.
- Pro Tip: If it idles fine but dies instantly, check the accelerator pump first.
01. Clogged Accelerator Pump (Carbureted Bikes)
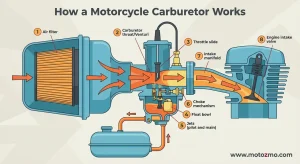
The accelerator pump squirts extra fuel into the carburetor throat when you crack the throttle open. This compensates for the sudden rush of air. When this pump circuit clogs with varnish from old gas, the engine receives only air — no fuel — and dies instantly.
Test the accelerator pump: Remove your air filter. Start the engine and let it warm up, then shut it off. Look into the carburetor throat and manually snap the throttle open. You should see a strong stream of fuel shoot from a small brass nozzle. No stream? The pump circuit is blocked.
Clean the accelerator pump by removing the float bowl. Locate the small pump diaphragm (usually under a cover held by two screws). Remove it carefully because these tear easily. Soak the diaphragm in carburetor cleaner overnight. Use compressed air to blow through the tiny pump passage from both directions. Replace the diaphragm if you spot any cracks or holes.
The pump passage runs from the diaphragm chamber to the discharge nozzle. Gunk builds up here first. Thread a single strand of wire through this passage to scrape away deposits. Blow it clean again. Reassemble and test. That fuel squirt should return.
02. Vacuum Leaks in Intake Boots
Intake boots connect your carburetor or throttle body to the engine. These rubber components crack and harden from heat, fuel exposure, and age. When they crack, unmetered air sneaks into the engine, leaning out the fuel mixture.
At idle, the leak is small enough that the pilot jet compensates. When you open the throttle, the leak pulls in massive amounts of air, making the mixture too lean to ignite.

Symptoms of vacuum leaks:
- High idle that won’t drop below 2,000 RPM
- Engine runs better with the choke partially engaged
- Revs “hang” when you close the throttle quickly
- Bike runs better at highway speeds than in traffic
These symptoms overlap with engine keeps cutting out issues, where intermittent stalling occurs even at steady speeds. Vacuum leaks create a lean condition that affects performance across all RPM ranges.
Find vacuum leaks: Start the engine and let it idle. Spray carburetor cleaner or propane gas (from an unlit torch) around the intake boots, manifold gaskets, and vacuum hose connections. When you hit the leak spot, the engine RPMs will suddenly jump or drop as it sucks in the spray. You found it.
Common leak spots include the carburetor-to-manifold connection, the manifold-to-engine gasket, cracked vacuum lines to the petcock, and worn throttle shaft seals inside the carburetor body.
Replace cracked intake boots immediately. Temporary fixes with RTV silicone only delay the inevitable. Tighten loose clamps. Replace brittle vacuum hoses. For manifold gaskets, clean both surfaces thoroughly and apply fuel-resistant gasket maker before installing new gaskets.
03. Main Jet or Pilot Jet Blockage
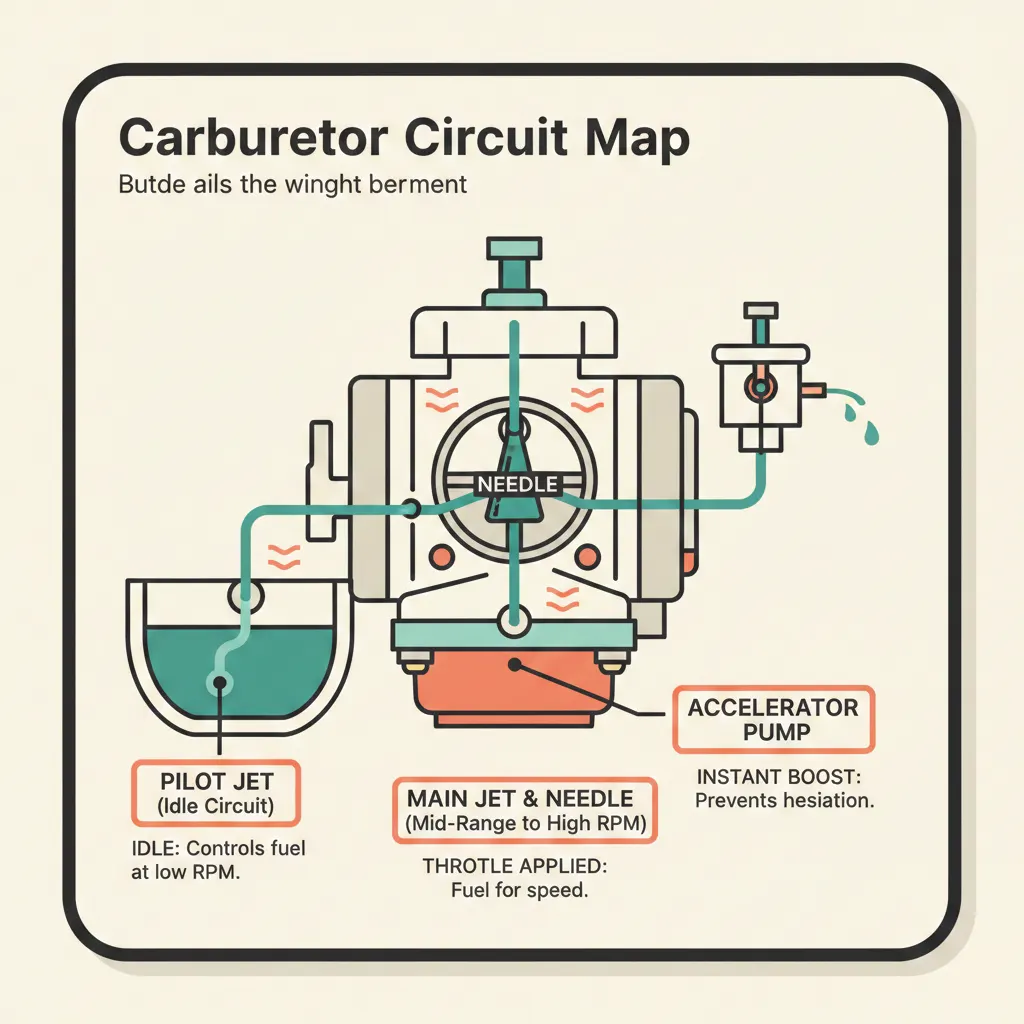
Jets meter fuel flow. The pilot jet handles idle and low throttle openings (0-25%). The main jet takes over at higher throttle positions. When the main jet clogs, the bike idles normally but starves for fuel the moment you accelerate.
Old fuel leaves varnish deposits inside these tiny brass passages. Even a partial blockage chokes fuel flow enough to kill the engine under load. Understanding how the carburetor works helps you grasp why these tiny jets have such massive impact on performance.
Remove and inspect jets: Drain the float bowl. Unscrew the main jet (usually at the bottom center of the bowl) and pilot jet (typically in the side). Hold each jet up to bright light—you should see clear daylight through the center hole and any side bleeds.
Can’t see through? Soak jets in carburetor cleaner for 30 minutes. Use compressed air to blast from the inside out. Never use wire to ream jets, as you’ll enlarge the hole and ruin the fuel mixture. If soaking and air won’t clear them, replace the jets.
Check the needle jet (emulsion tube) too. This brass tube has multiple small holes that mix air with fuel. Varnish blocks these holes. Remove it, soak it, and blow it clean.
While the carburetor is apart, inspect float height. Bend the float tab to adjust. Incorrect height starves the engine or floods it. If you notice fuel leaking from the carburetor or overflow tubes, float height adjustment or a stuck float needle valve is usually the culprit.
For a thorough cleaning without complete disassembly, follow proper techniques for cleaning a clogged carburetor, though complete removal provides better access to all internal passages.
04. Blocked Fuel Filter or Weak Fuel Pump
Fuel filters trap rust, dirt, and debris before they reach the carburetor or injectors. Over months, this crud builds up and restricts fuel flow. At idle, minimal fuel is needed. Under acceleration, fuel demand spikes. A clogged filter can’t keep up, and the engine starves.
Locate your fuel filter: In-line filters sit between the petcock and carburetor. Some bikes have a mesh screen inside the petcock itself. Fuel-injected bikes have filters inside the fuel tank or inline before the pump.
Remove the filter and hold it to light. Can’t see through? Replace it. External in-line filters cost $5-15 and install in minutes. Internal tank filters require dropping the tank — a bigger job but equally important.
Test fuel pump pressure (fuel-injected bikes): Disconnect the fuel line at the throttle body. Turn the key to “ON” without starting the engine. Fuel should spray strongly. Weak flow indicates a dying fuel pump. These pumps sit inside the fuel tank on most modern bikes and require tank removal to replace.
Check the fuel pump relay too. A weak relay prevents the pump from spinning at full voltage. Swap relays if you have spares, or test voltage at the pump connector with a multimeter. It should read 12+ volts with the key on.
05. Dirty or Collapsed Air Filter
The air filter prevents dirt from entering the engine. When it clogs with dust and oil, airflow drops. At idle, reduced airflow isn’t critical. When you twist the throttle and open the carburetor slide or throttle plate, the engine expects a rush of air. A clogged filter can’t deliver it. The fuel mixture becomes too rich (too much fuel, too little air) and bogs the engine.
Remove the air filter. Hold it up to sunlight. If light barely passes through, it’s done. Foam filters can be cleaned with filter oil and solvent. Paper filters must be replaced because washing ruins them.
Some riders remove the air filter entirely to test. If the bike suddenly runs better, the filter was the problem. Don’t ride without a filter long-term because dirt will destroy your engine.
Inspect the airbox too: Check for cracks, loose clamps, or missing screws. Any opening lets unfiltered air enter, which acts like a vacuum leak.
06. Failing Throttle Position Sensor (Fuel-Injected Bikes)
The throttle position sensor (TPS) tells the ECU how far you’ve opened the throttle. The ECU uses this data to calculate fuel injection quantity and timing. A failing TPS sends incorrect voltage signals.
The ECU thinks the throttle is closed when it’s actually open. It injects idle-level fuel while the engine gulps air at 5,000 RPM. The mixture leans out catastrophically, and the engine dies.
TPS failure symptoms:
- Engine bogs or hesitates when you crack the throttle
- Rough idle or hunting idle (RPMs bounce between 800-2,500)
- Check engine light illuminates
- Bike enters “limp mode” with severely limited power
- Poor fuel economy (10-15% worse than normal)
Most TPS units fail at the idle position because the sensor wiper sits in one spot for thousands of miles, wearing a dead spot into the resistive track.
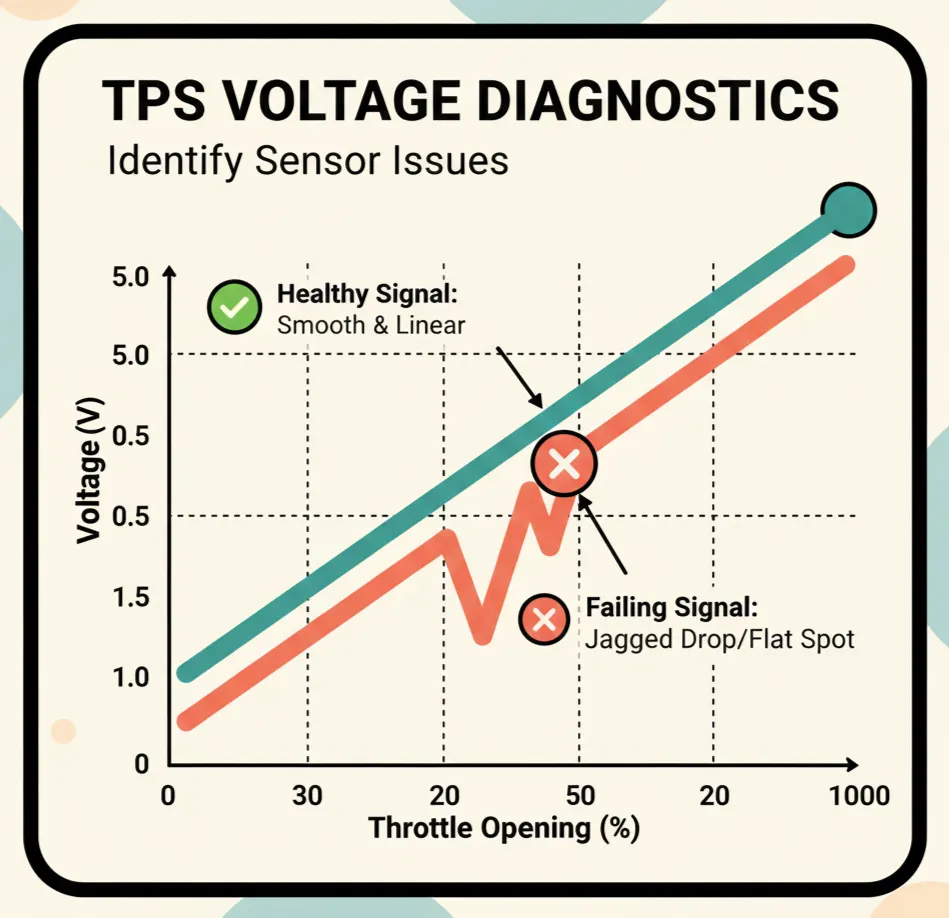
Test the TPS: You need a digital multimeter. Locate the TPS (mounted on the throttle body). Backprobe the signal wire with the key on, engine off. Voltage should read around 0.5-0.7 volts at closed throttle. Slowly open the throttle. Voltage should rise smoothly to 4.5-5.0 volts at wide-open throttle. If voltage jumps, drops, or stays flat at any point, the TPS is failing.
Replace a bad TPS immediately. Some bikes require ECU reprogramming or TPS calibration after replacement. Check your service manual. Many riders report dramatic improvements after TPS replacement on bikes with 15,000+ miles.
07. Clogged Fuel Tank Vent or Bad Petcock
Fuel tanks must vent to atmosphere. As fuel exits toward the engine, air enters the tank to replace it. If the vent clogs (usually on the gas cap), a vacuum forms inside the tank. This vacuum fights against fuel flow.
At idle, minimal fuel is needed. The weak vacuum doesn’t matter. Under hard acceleration, fuel demand spikes, but the vacuum prevents flow. The engine starves and dies.
Test for tank vent blockage: Ride until the bike starts cutting out. Pull over immediately and crack the gas cap open. If you hear a “whoosh” of air rushing in, the vent was blocked. The engine should start and run normally afterward.
Clean the vent hole in the gas cap with a thin wire. Blow compressed air through it. Some bikes have a separate vent line that runs down the frame. Check this for kinks or blockages.
Inspect the petcock: This valve controls fuel flow from the tank. On vacuum-operated petcocks (common on older bikes), a diaphragm opens the valve when the engine creates vacuum. If this diaphragm tears or hardens, fuel flow becomes erratic. The bike might idle fine but starve under acceleration.
Remove the petcock and disassemble it. Check the diaphragm for tears, stiffness, or fuel contamination. Replace if damaged. Clean the fuel screen inside the petcock because rust and debris collect here. Rebuild kits cost $15-30 and include all gaskets and diaphragms.
How to Diagnose Your Specific Problem
Follow this diagnostic sequence:
Step 1 – Visual inspection (5 minutes):
- Check air filter condition
- Inspect fuel lines for kinks or cracks
- Look for obvious vacuum leaks (cracked boots, loose clamps)
- Ensure fuel is flowing from the tank
Step 2 – Test fuel delivery (10 minutes):
- For carbureted bikes: Remove air filter, start engine, snap throttle and watch for accelerator pump squirt
- For fuel-injected bikes: Disconnect fuel line at throttle body, turn key to ON, verify strong fuel spray
Step 3 – Check for vacuum leaks (15 minutes):
- Spray carb cleaner around intake boots while engine idles
- Listen for RPM changes indicating a leak
- Inspect all vacuum hoses and caps
Step 4 – Test sensor inputs (fuel-injected bikes only):
- Connect OBD scanner or multimeter to TPS
- Verify smooth voltage increase from 0.5V to 5.0V as throttle opens
- Check for stored trouble codes
Step 5 – Carburetor inspection (1-2 hours):
- Pull carburetor
- Remove and clean all jets
- Inspect accelerator pump diaphragm
- Check float height against specs
A Symptom vs. Diagnosis Table
| Symptom | Most Likely Cause | Quick Test |
|---|---|---|
| Dies instantly when throttle cracks open | Clogged accelerator pump | Look for fuel squirt when throttle snaps |
| Dies after 1-2 seconds of acceleration | Main jet blockage | Pull carburetor, inspect jets |
| High idle, dies when throttle applied | Vacuum leak | Spray carb cleaner on intake boots |
| Gradual power loss, then dies | Fuel filter/pump issue | Check fuel flow at carburetor |
| Inconsistent stalling, check engine light | TPS failure (FI bikes) | Test TPS voltage with multimeter |
Why Your Bike Idles Fine But Dies Under Throttle
This specific symptom confuses many riders. Here’s why it happens:
At idle, your engine operates on the pilot jet circuit. This circuit delivers a small, consistent amount of fuel mixed with air from the idle ports. The throttle plate is nearly closed, so only a trickle of air passes through. The pilot jet can easily keep up with this low demand.
When you twist the throttle, two things change instantly:
- The throttle plate swings open, flooding the engine with air
- The engine demands 5-10x more fuel to match that air
The main jet and accelerator pump must deliver this extra fuel. If any component in this high-flow circuit fails, such as clogged main jet, dead accelerator pump, or blocked fuel filter, the engine receives only air. The mixture leans out catastrophically. Combustion stops. The engine dies.
Carburetor circuits don’t overlap smoothly. The pilot jet shuts off as the main jet engages. There’s a transition zone (1/8 to 1/4 throttle) where the needle jet controls the mixture. Problems in any of these circuits create dead spots where the engine stumbles or dies.
On fuel-injected bikes, the ECU calculates fuel needs based on throttle position, air temperature, engine RPM, and manifold pressure. If the TPS lies about throttle position or a vacuum leak confuses the manifold pressure sensor, the ECU’s calculations fail. It injects the wrong amount of fuel, and the engine dies.
This problem sometimes manifests when the engine won’t start when hot, as heat-related sensor failures compound fueling issues across different temperature ranges.
Maintenance Tips to Prevent Throttle Stalling
Fuel quality matters: Use TOP TIER certified gas from major brands (Shell, Chevron, BP, Exxon). These fuels contain detergents that prevent varnish buildup in jets and injectors. Avoid discount station gas. The 10 cents per gallon savings isn’t worth a clogged carburetor.
Fuel stabilizer for storage: Add stabilizer to your tank before storing the bike over winter. Fuel degrades in 30-45 days without stabilizer, leaving varnish deposits throughout the fuel system. Stabilizer extends fuel life to 12 months.
Replace fuel filters annually: In-line filters cost $5-15. Replace them every year or 5,000 miles, whichever comes first. This simple step prevents 90% of fuel delivery problems.
Clean carburetors yearly: Even if the bike runs fine, pull the carburetor once per year. Remove the float bowl, pull the jets, and soak everything in carburetor cleaner overnight. Blow dry with compressed air. Inspect gaskets and O-rings for hardening. This preventive work stops problems before they strand you. Pay special attention to carburetor choke cleaning, as a sticky choke affects cold starts and can mask other fueling issues.
Inspect intake boots every 2 years: Shine a flashlight on the boots while the engine idles. Look for cracks, especially on the backside near the engine. Replace boots proactively; don’t wait for failure. New boots cost $40-80 per cylinder but prevent expensive lean-condition engine damage. If you notice any unusual engine noise when accelerating, check for intake leaks first, as they can create hissing or whistling sounds under load.
Adjust air-fuel mixture properly: After any carburetor work, adjusting the air-fuel mixture ensures optimal performance. An incorrect mixture causes the same symptoms as mechanical failures — poor acceleration, stalling, and rough running.
Use ethanol-free fuel when possible: Ethanol absorbs water from the air and damages rubber fuel system components. It also dissolves varnish and clogs jets. Many marine fuel stations sell ethanol-free premium. Worth the extra cost for bikes that sit between rides.
When to Take Your Bike to a Mechanic
Some problems exceed DIY capability:
Major engine work: Top-end rebuilds, valve adjustments, and compression testing require specialized tools and experience. Low compression from worn rings or tight valves causes power loss that mimics fuel starvation, but the fix is internal engine work, not carburetor cleaning.
Note that aggressive riding habits can compound these problems. While redlining a motorcycle occasionally isn’t inherently harmful to a healthy engine, doing so with compromised fuel delivery risks serious damage from lean conditions at high RPM.
Electrical diagnostics on fuel-injected bikes: Modern bikes have complex wiring harnesses, multiple sensors, and ECU programming. If you’ve tested the TPS and it checks out, but the bike still runs poorly, a mechanic with diagnostic software can read live data streams and pinpoint failing sensors.
Carburetor synchronization on multi-cylinder bikes: After cleaning carburetors on 2, 3, or 4-cylinder engines, they must be synchronized so each cylinder pulls the same vacuum. This requires mercury sticks, vacuum gauges, or an electronic carb sync tool. Poorly synchronized carburetors cause rough running, poor fuel economy, and power loss.
Throttle body cleaning (fuel injection): Injectors and throttle bodies accumulate carbon deposits. Professional ultrasonic cleaning removes these deposits without damaging sensors or injector seals.
Intermittent electrical problems: If your bike dies randomly with no pattern, an intermittent short or failing connector could be cutting power to the ignition system or fuel pump. Mechanics can test circuits under load to find these gremlins.
Expect to pay $80-120/hour for shop labor. Diagnostic fees run $60-100. Factor in parts. A complete carburetor rebuild (labor + kit) costs $300-500. TPS replacement runs $150-250 parts + labor.
FAQs About Dead Motorcycle Engine for Throttling
Why does my motorcycle idle perfectly but die the moment I apply throttle?
The pilot jet circuit fuels idle operation while the main jet and accelerator pump handle acceleration. When the accelerator pump clogs or the main jet blocks, the engine receives only air during acceleration, and the mixture leans out too much to combust.
Can bad gas cause my bike to stall when I give it throttle?
Yes. Contaminated or old fuel leaves varnish deposits that clog jets and injectors. Water in fuel prevents proper combustion. Drain the tank, clean the fuel system, and refill with fresh premium gas to resolve bad fuel issues.
How do I know if I have a vacuum leak or carburetor problem?
Spray carb cleaner around intake boots while the engine idles. If RPMs change, you have a vacuum leak. If spraying doesn’t change anything, pull the carburetor and inspect jets.
What’s the difference between symptoms on carbureted vs fuel-injected bikes?
Carbureted bikes with this problem usually have clogged jets or a bad accelerator pump. Fuel-injected bikes point to TPS failure, bad fuel pump, or clogged injectors. Check engine lights illuminate on FI bikes but not carbureted ones.
Will seafoam fix a motorcycle that dies when throttled?
Seafoam helps with minor varnish deposits in fuel lines and mild jet clogging. For severely clogged jets or a failed accelerator pump, you must disassemble and clean manually. Seafoam works best as preventive maintenance, not emergency repair.
How much does it cost to fix this problem?
DIY repairs cost $20-80 for jets, gaskets, filters, and chemicals. Professional carburetor cleaning runs $200-400. TPS replacement costs $100-200 for the part plus labor. Fuel pump replacement hits $300-500 total on most bikes.
![Read more about the article Motorcycle Problems and Fixes: Complete Guide [2026]](https://www.motozmo.com/wp-content/uploads/2025/12/man-inspecting-a-motorcycle-300x200.webp)